


文章目录
展开Kubernetes配置管理ConfigMap
ConfigMap介绍
## 为什么要用configMap?
为了将配置文件和POD解耦

## configMap如何存储配置?
键值对的形式
1.键值对:key:value
2.文件名:文件内容

## configMap支持的配置类型
1.直接定义的键值对
2.基于文件创建的键值对

## configMap创建方式
1.命令行
2.资源配置清单

## configMap的配置文件如何传递到POD里
1.变量传递(env)   对应  命令行
2.数据卷挂载(mount)  对应  资源配置清单

## 使用configMap的限制条件
1.ConfigMap必须在Pod之前创建,Pod才能引用他
2.ConfigMap受限于命名空间限制,只有处于同一个命名空间中的Pod才可以被引用
命令行创建ConfigMap
键值对配置
[root@master-1 ~]# kubectl create configmap nginx-config --from-literal=nginx_port=80 --from-literal=server_name=blog.hg.com

## 查看configMap
[root@master-1 ~]# kubectl get configmaps
NAME           DATA   AGE
nginx-config   2      105s

[root@master-1 ~]# kubectl get cm
NAME           DATA   AGE
nginx-config   2      2m18s

## 查看指定的configmap详细信息 能看到它的键值对内容
[root@master-1 ~]# kubectl describe cm nginx-config
Name:         nginx-config
Namespace:    default
Labels:       <none>
Annotations:  <none>

Data
====
server_name:
----
blog.hg.com
nginx_port:
----
80
Events:  <none>
POD环境变量形式引用configMap
1)变量传递
[root@master-1 ~]# cat configmap-nginx.yml
apiVersion: v1
kind: Pod
metadata:
  name: nginx-cm
spec:
  containers:
  - name: nginx-pod
    image: nginx:alpine
    env:                            ## configMap需要写在env里
    - name: NGINX_PORT              ## 自定义变量名 但容器镜像如果要接收传参 就需要指定这个变量名传入变量
      valueFrom:                    ## valueFrom:从哪里去获得变量 是从下面的configMapKeyRef获得的变量
        configMapKeyRef:            ## 接收的类别是configMap
          name: nginx-config        ## 指定要接收的configMap名字
          key: nginx_port           ## 指定nginx-configmap里的key 就会去找对应的value
    - name: SERVER_NAME             ## 同一个configMap里的多个变量可以写一起 也可以分开
      valueFrom:                    ## 写一起的话 就直接写多个name key即可
        configMapKeyRef:
          name: nginx-config
          key: server_name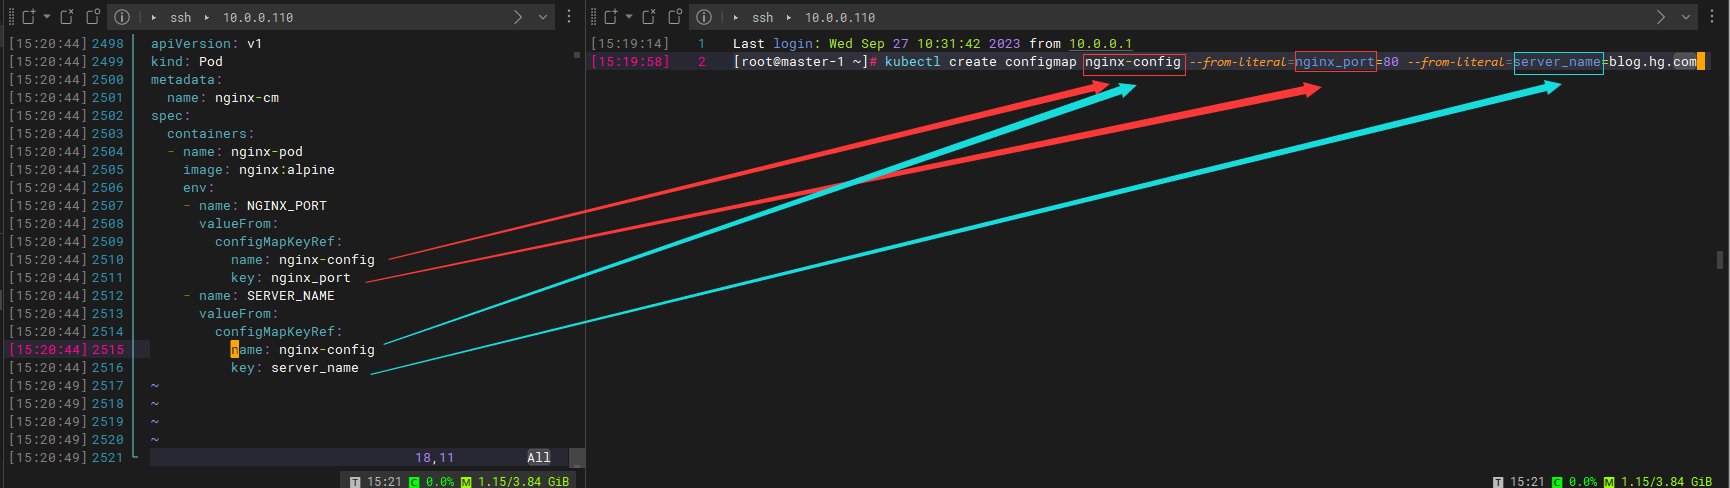
## 进入容器
[root@master-1 ~]# kubectl exec nginx-cm -it /bin/sh
kubectl exec [POD] [COMMAND] is DEPRECATED and will be removed in a future version. Use kubectl exec [POD] -- [COMMAND] instead.

## 查看环境变量
/ # echo ${NGINX_PORT}
80
/ # echo ${SERVER_NAME}
blog.hg.com

## 打印环境变量
/ # printenv |egrep "NGINX_PORT|SERVER_NAME"
NGINX_PORT=80
SERVER_NAME=blog.hg.com
命令行创建文件形式的ConfigMap
## 配置文件
[root@master-1 wp]# cat www.conf
server {
        listen 80;
        server_name _;

        location / {
                root /usr/share/nginx/html/www;
                index index.html;
        }
}

## 创建configMap
[root@master-1 wp]# kubectl create configmap nginx-www --from-file=nginx.www.conf=./www.conf
configmap/nginx-www created

## 查看configMap
[root@master-1 wp]# kubectl  get cm
NAME           DATA   AGE
nginx-www      1      26s

## 查看详细configMap信息
[root@master-1 wp]# kubectl describe cm nginx-www
Name:         nginx-www
Namespace:    default
Labels:       <none>
Annotations:  <none>

Data
====
nginx.www.conf:
----
server {
  listen 80;
  server_name _;

  location / {
    root /usr/share/nginx/html/www;
    index index.html;
  }
}

Events:  <none>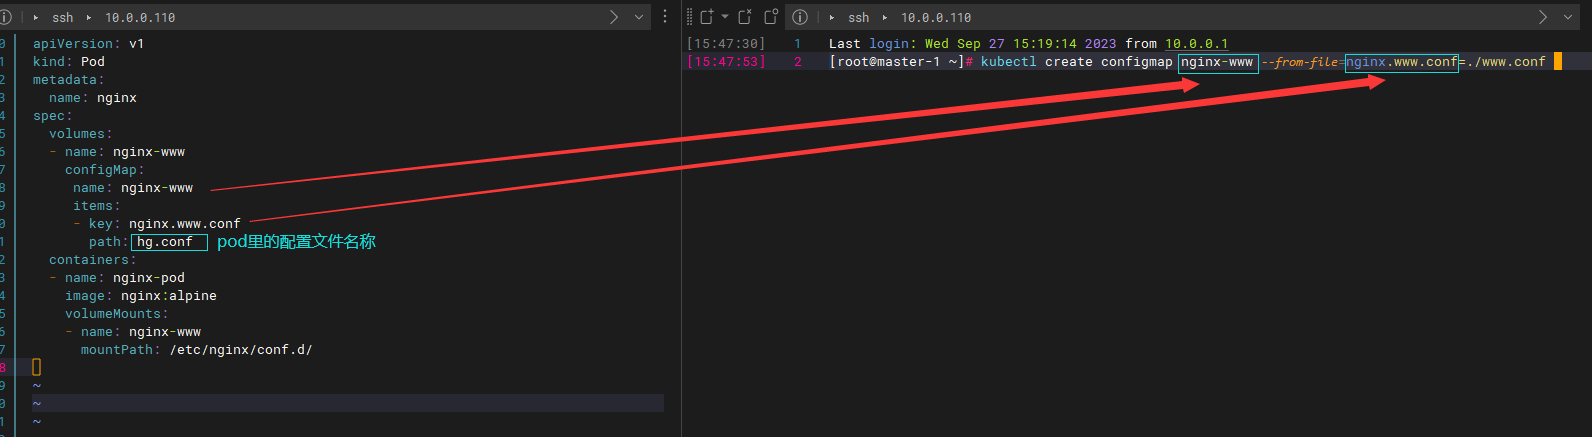
挂载configMap
## 资源清单
[root@master-1 wp]# cat nginx.yml
apiVersion: v1
kind: Pod
metadata:
  name: nginx
spec:
  volumes:
  - name: nginx-www
    configMap:
     name: nginx-www
     items:
     - key: nginx.www.conf
       path: hg.conf
  containers:
  - name: nginx-pod
    image: nginx:alpine
    volumeMounts:
    - name: nginx-www
      mountPath: /etc/nginx/conf.d/

## 执行
[root@master-1 wp]# kubectl apply -f nginx.yml
pod/nginx created

## 进入容器
[root@master-1 wp]# kubectl exec nginx -it /bin/sh
kubectl exec [POD] [COMMAND] is DEPRECATED and will be removed in a future version. Use kubectl exec [POD] -- [COMMAND] instead.

## 查看配置文件
/ # cat /etc/nginx/conf.d/hg.conf
server {
        listen 80;
        server_name _;

        location / {
                root /usr/share/nginx/html/www;
                index index.html;
        }
}
ConfigMap资源清
## 资源清单
root@master-1 wp]# cat nginx-config.yml
apiVersion: v1
kind: ConfigMap
metadata:
  name: ngx-cm
data:
  www.conf: |
    server {
            listen       80;
            server_name  www.hg.com;
            location / {
                root   /usr/share/nginx/html/www;
                index  index.html index.htm;
            }
        }
  blog.conf: |
    server {
            listen       80;
            server_name  blog.hg.com;
            location / {
                root   /usr/share/nginx/html/blog;
                index  index.html index.htm;
            }
        }
apiVersion: v1
kind: ConfigMap      ## kind 指定 ConfigMap
metadata:
  name: ngx-cm       ## 定义ConfigMap的名字
data:
  www.conf: |        ## key名: |是把下面的内容传入key里 下面就是要传入的文件内容
    server {
            listen       80;
            server_name  www.hg.com;
            location / {
                root   /usr/share/nginx/html/www;
                index  index.html index.htm;
            }
        }
  blog.conf: |
    server {
            listen       80;
            server_name  blog.hg.com;
            location / {
                root   /usr/share/nginx/html/blog;
                index  index.html index.htm;
            }
        }

----------------------------------------
## 无注释版↓
apiVersion: v1
kind: ConfigMap
metadata:
  name: ngx-cm
data:
  www.conf: |
    server {
            listen       80;
            server_name  www.hg.com;
            location / {
                root   /usr/share/nginx/html/www;
                index  index.html index.htm;
            }
        }
  blog.conf: |
    server {
            listen       80;
            server_name  blog.hg.com;
            location / {
                root   /usr/share/nginx/html/blog;
                index  index.html index.htm;
            }
        }

## 创建configMap
[root@master-1 wp]# kubectl apply -f nginx-config.yml
configmap/ngx-cm created

## 查看详细信息
[root@master-1 wp]# kubectl describe cm ngx-cm
Name:         ngx-cm
Namespace:    default
Labels:       <none>
Annotations:  <none>

Data
====
blog.conf:
----
server {
        listen       80;
        server_name  blog.hg.com;
        location / {
            root   /usr/share/nginx/html/blog;
            index  index.html index.htm;
        }
    }

www.conf:
----
server {
        listen       80;
        server_name  www.hg.com;
        location / {
            root   /usr/share/nginx/html/www;
            index  index.html index.htm;
        }
    }

Events:  <none>
挂载configMap
[root@master-1 wp]# cat ngx-cm.yml
apiVersion: v1
kind: Pod
metadata:
  name: nginx-web
spec:
  volumes:
  - name: nginx-web
    configMap:
      name: ngx-cm
      items:
      - key: www.conf
        path: www.hg.com.conf
      - key: blog.conf
        path: blog.hg.com.conf
  containers:
  - name: nginx-pod
    image: nginx:alpine
    volumeMounts:
    - name: nginx-web
      mountPath: /etc/nginx/conf.d/

## 进入容器 查看configMap的挂载方式
[root@master-1 wp]# kubectl exec -it nginx-web /bin/sh

## ls看到blog.hg.com.conf显示是蓝色的 但它不是目录 而是一个软连接 这样就方便对配置文件进行修改(动态修改)
/etc/nginx/conf.d # ls -la
total 0
drwxrwxrwx    3 root     root           106 Sep 27 08:39 .
drwxr-xr-x    3 root     root           152 Dec 29  2021 ..
drwxr-xr-x    2 root     root            53 Sep 27 08:39 ..2023_09_27_08_39_59.203449284
lrwxrwxrwx    1 root     root            31 Sep 27 08:39 ..data -> ..2023_09_27_08_39_59.203449284
lrwxrwxrwx    1 root     root            23 Sep 27 08:39 blog.hg.com.conf -> ..data/blog.hg.com.conf
lrwxrwxrwx    1 root     root            22 Sep 27 08:39 www.hg.com.conf -> ..data/www.hg.com.conf
修改ConfigMap的方法
## 直接修改cm
[root@master-1 wp]# kubectl edit cm ngx-cm

## 修改资源清单
[root@master-1 wp]# vim ngx-cm.yml
## 资源清单
[root@master-1 wp]# cat nginx.yml
apiVersion: v1
kind: Pod
metadata:
name: nginx
spec:
volumes:
- name: nginx-www
configMap:
name: nginx-www
items:
- key: nginx.www.conf
path: hg.conf
containers:
- name: nginx-pod
image: nginx:alpine
volumeMounts:
- name: nginx-www
mountPath: /etc/nginx/conf.d/
## 执行
[root@master-1 wp]# kubectl apply -f nginx.yml
pod/nginx created
## 进入容器
[root@master-1 wp]# kubectl exec nginx -it /bin/sh
kubectl exec [POD] [COMMAND] is DEPRECATED and will be removed in a future version. Use kubectl exec [POD] -- [COMMAND] instead.
## 查看配置文件
/ # cat /etc/nginx/conf.d/hg.conf
server {
listen 80;
server_name _;
location / {
root /usr/share/nginx/html/www;
index index.html;
}
}## 资源清单
root@master-1 wp]# cat nginx-config.yml
apiVersion: v1
kind: ConfigMap
metadata:
name: ngx-cm
data:
www.conf: |
server {
listen 80;
server_name www.hg.com;
location / {
root /usr/share/nginx/html/www;
index index.html index.htm;
}
}
blog.conf: |
server {
listen 80;
server_name blog.hg.com;
location / {
root /usr/share/nginx/html/blog;
index index.html index.htm;
}
}
apiVersion: v1
kind: ConfigMap ## kind 指定 ConfigMap
metadata:
name: ngx-cm ## 定义ConfigMap的名字
data:
www.conf: | ## key名: |是把下面的内容传入key里 下面就是要传入的文件内容
server {
listen 80;
server_name www.hg.com;
location / {
root /usr/share/nginx/html/www;
index index.html index.htm;
}
}
blog.conf: |
server {
listen 80;
server_name blog.hg.com;
location / {
root /usr/share/nginx/html/blog;
index index.html index.htm;
}
}
----------------------------------------
## 无注释版↓
apiVersion: v1
kind: ConfigMap
metadata:
name: ngx-cm
data:
www.conf: |
server {
listen 80;
server_name www.hg.com;
location / {
root /usr/share/nginx/html/www;
index index.html index.htm;
}
}
blog.conf: |
server {
listen 80;
server_name blog.hg.com;
location / {
root /usr/share/nginx/html/blog;
index index.html index.htm;
}
}
## 创建configMap
[root@master-1 wp]# kubectl apply -f nginx-config.yml
configmap/ngx-cm created
## 查看详细信息
[root@master-1 wp]# kubectl describe cm ngx-cm
Name: ngx-cm
Namespace: default
Labels: <none>
Annotations: <none>
Data
====
blog.conf:
----
server {
listen 80;
server_name blog.hg.com;
location / {
root /usr/share/nginx/html/blog;
index index.html index.htm;
}
}
www.conf:
----
server {
listen 80;
server_name www.hg.com;
location / {
root /usr/share/nginx/html/www;
index index.html index.htm;
}
}
Events: <none>[root@master-1 wp]# cat ngx-cm.yml
apiVersion: v1
kind: Pod
metadata:
name: nginx-web
spec:
volumes:
- name: nginx-web
configMap:
name: ngx-cm
items:
- key: www.conf
path: www.hg.com.conf
- key: blog.conf
path: blog.hg.com.conf
containers:
- name: nginx-pod
image: nginx:alpine
volumeMounts:
- name: nginx-web
mountPath: /etc/nginx/conf.d/
## 进入容器 查看configMap的挂载方式
[root@master-1 wp]# kubectl exec -it nginx-web /bin/sh
## ls看到blog.hg.com.conf显示是蓝色的 但它不是目录 而是一个软连接 这样就方便对配置文件进行修改(动态修改)
/etc/nginx/conf.d # ls -la
total 0
drwxrwxrwx 3 root root 106 Sep 27 08:39 .
drwxr-xr-x 3 root root 152 Dec 29 2021 ..
drwxr-xr-x 2 root root 53 Sep 27 08:39 ..2023_09_27_08_39_59.203449284
lrwxrwxrwx 1 root root 31 Sep 27 08:39 ..data -> ..2023_09_27_08_39_59.203449284
lrwxrwxrwx 1 root root 23 Sep 27 08:39 blog.hg.com.conf -> ..data/blog.hg.com.conf
lrwxrwxrwx 1 root root 22 Sep 27 08:39 www.hg.com.conf -> ..data/www.hg.com.conf## 直接修改cm
[root@master-1 wp]# kubectl edit cm ngx-cm
## 修改资源清单
[root@master-1 wp]# vim ngx-cm.yml 


Comments | NOTHING