jenkins 自动化部署代码 – pipeline 流水线风格
pipeline 介绍
Jenkins 2.0 的精髓是 Pipeline as Code,是帮助 Jenkins 实现 CI 到 CD 转变的重要角色。什么是 Pipeline,简单来说,就是一套运行于 Jenkins 上的工作流框架,将原本独立运行于单个或者多个节点的任务连接起来,实现单个任务难以完成的复杂发布流程。Pipeline 的实现方式是一套 Groovy DSL,任何发布流程都可以表述为一段 Groovy 脚本,并且 Jenkins 支持从代码库直接读取脚本,从而实现了 Pipeline as Code 的理念。
pipeline 概念
Pipeline 是一个用户定义的 CD 流水线模式。Pipeline 代码定义了通常包含构建、测试和发布步骤的完整的构建过程。
Node (ansible中的- hosts:)
node 是一个机器,它是 Jenkins 环境的一部分,并且能够执行 Pipeline。同时,node 代码块也是脚本式 Pipeline 语法的关键特性。
Stage (ansible中的任务tasks)
Stage 块定义了在整个 Pipeline 中执行的概念上不同的任务子集(例如“构建”,“测试”和“部署”阶段),许多插件使用它来可视化或呈现 Jenkins 管道状态/进度。
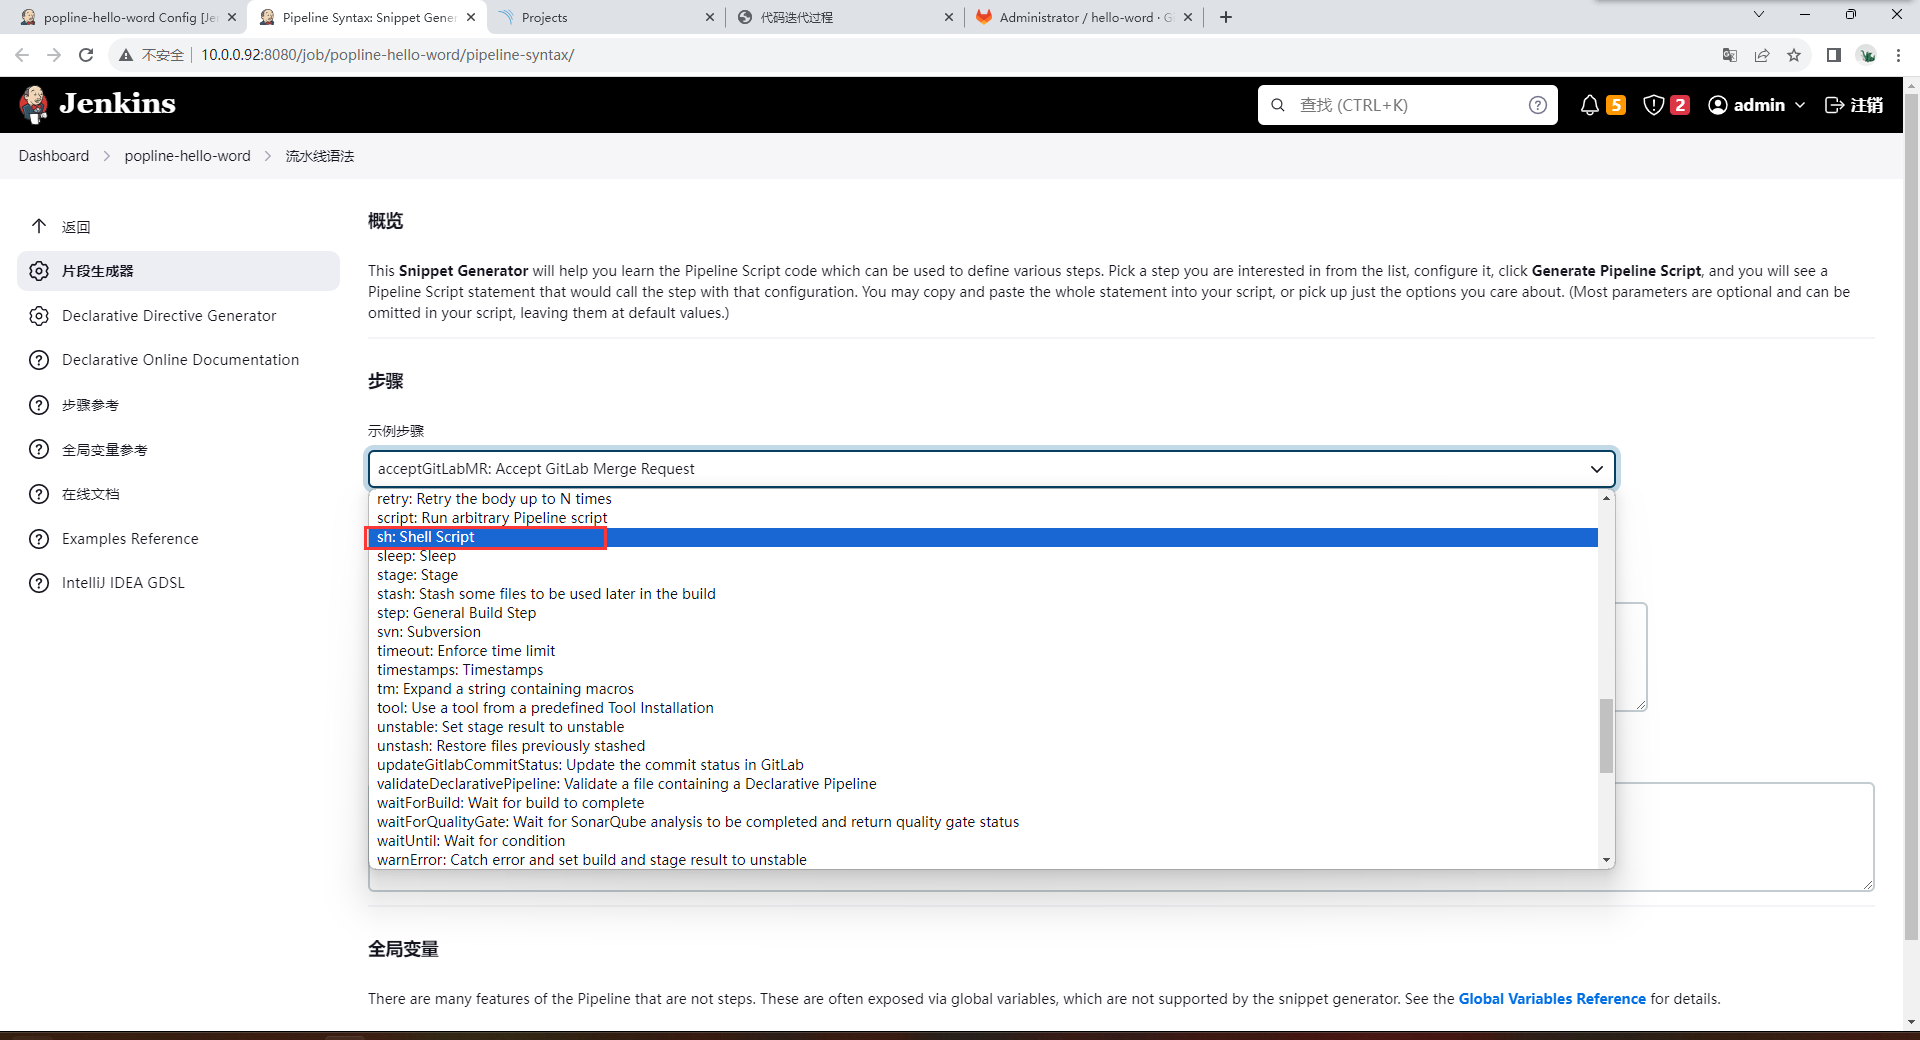
Step (ansible中的- name)
一项任务。从根本上讲,一个步骤告诉 Jenkins 在特定时间点(或过程中的“步骤”)要做什么。例如,使用 sh step:sh 'make' 可以执行 make 这个 shell 命令。pipeline 脚本模板 (jenkins file)
声明式 脚本式
脚本式语法格式:
pipeline{
agent any
stages{
    stage("get code"){
       steps{
           echo "get code from scm"
       }
    }
    stage("package"){
        steps{
            echo "packge code"
        }
    }
    stage("deploy"){
        steps{
            echo "deploy packge to node1"
        }
    }
}
}
创建 pipeline
{
agent any
stages{
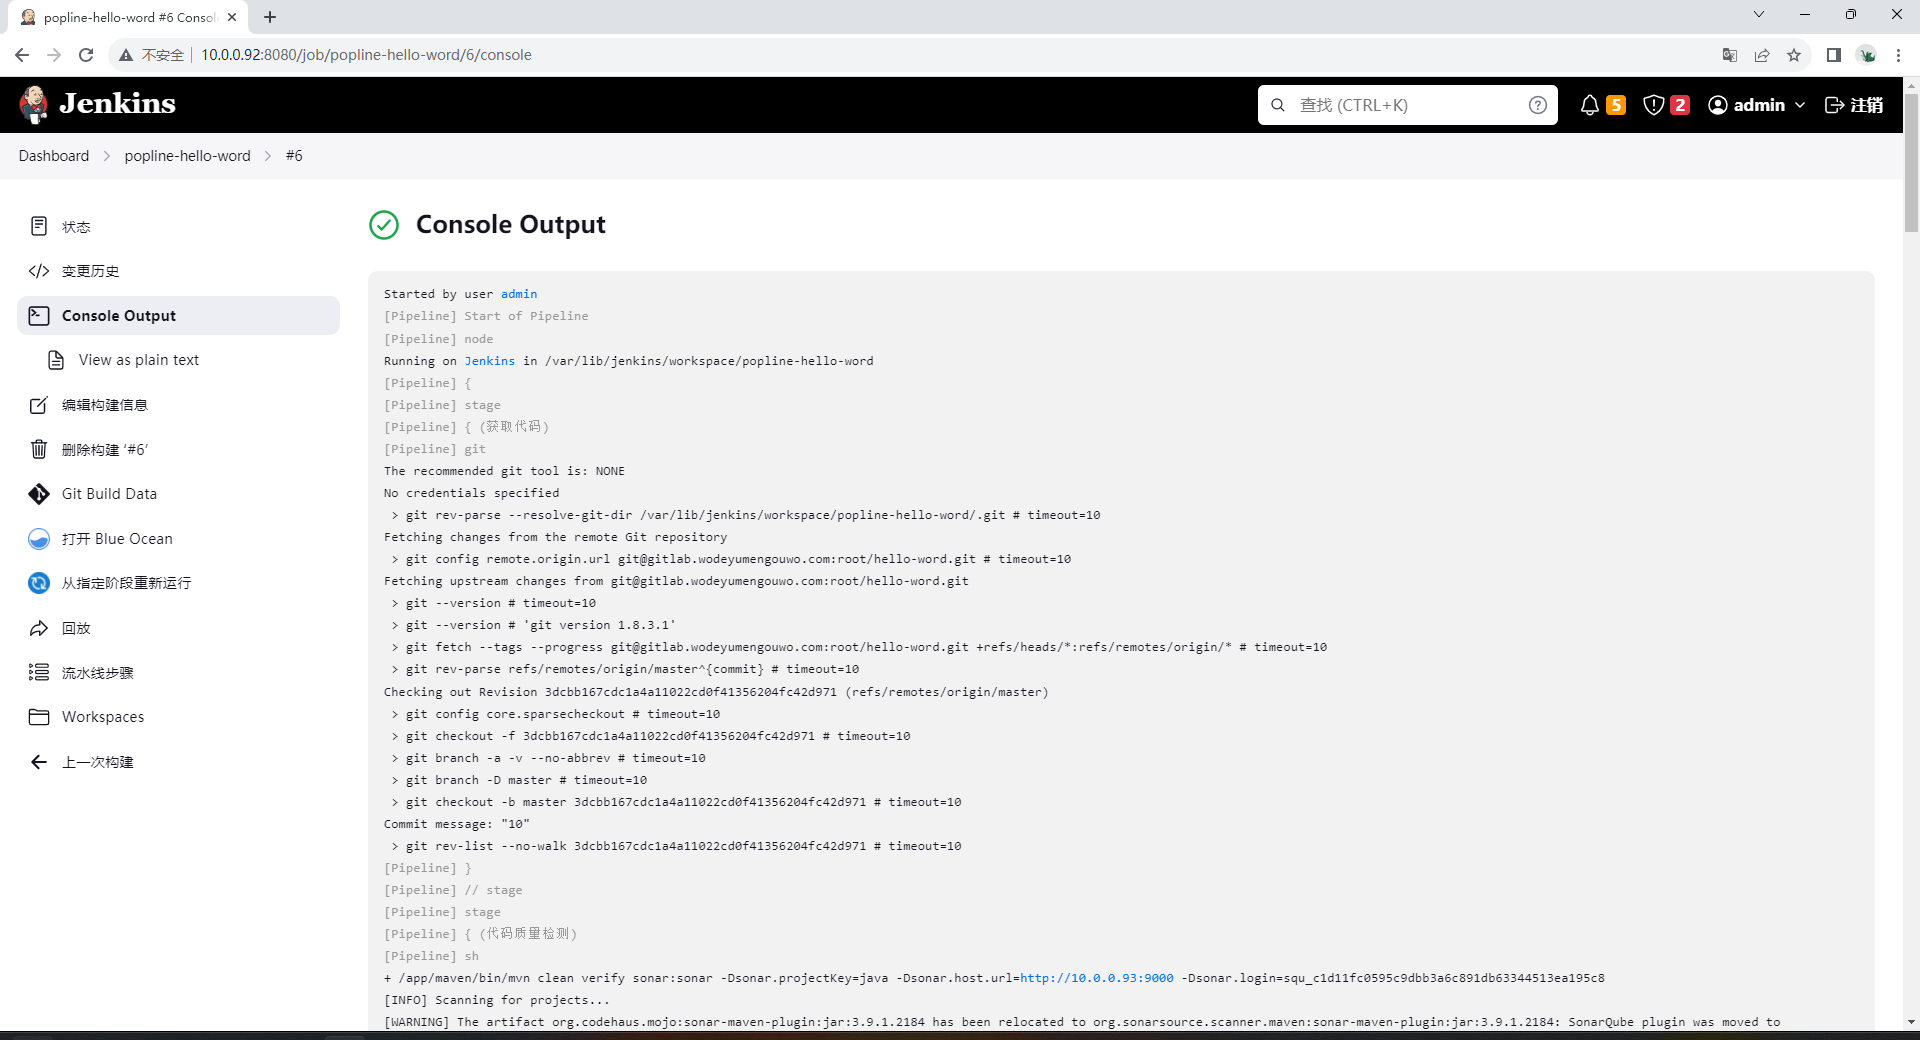
stage("获取代码"){
steps{
git 'git@gitlab.wodeyumengouwo.com:root/hello-word.git'
}
}
stage("代码质量检测"){
steps{
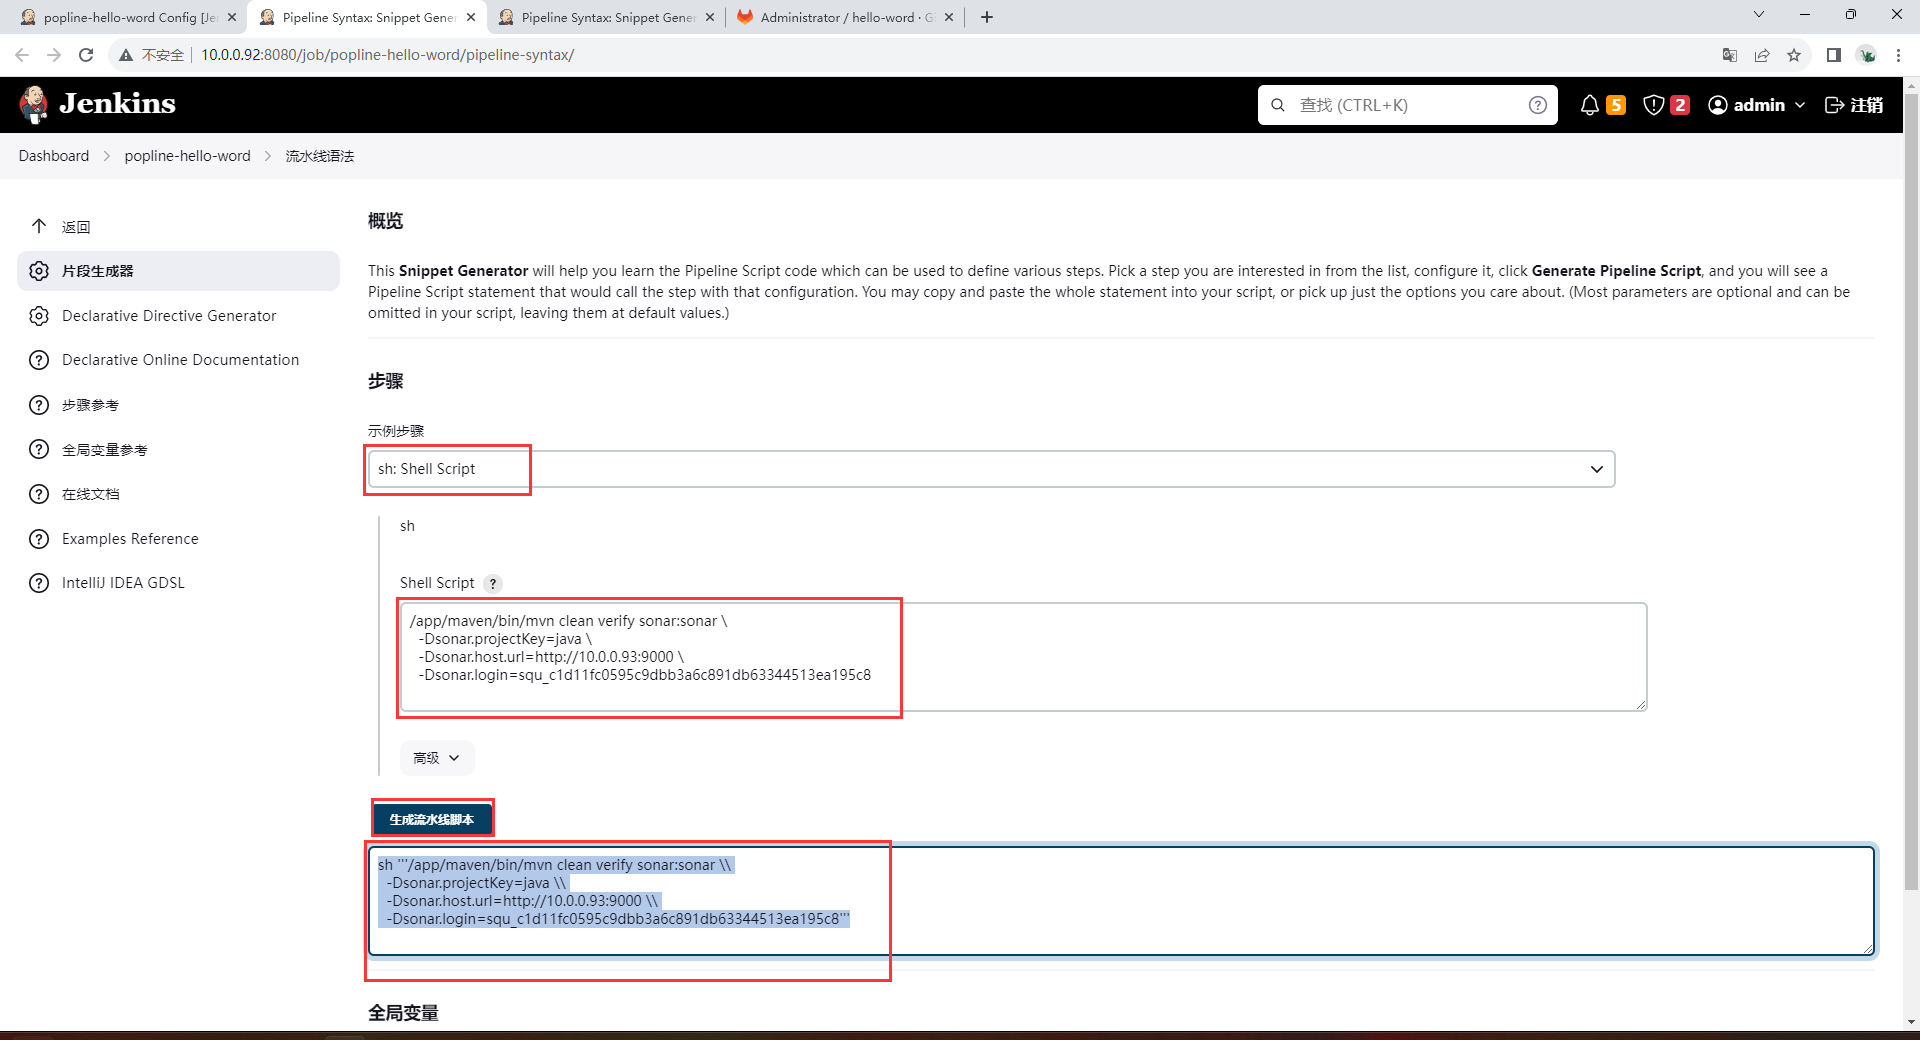
sh '''/app/maven/bin/mvn clean verify sonar:sonar \\
-Dsonar.projectKey=java \\
-Dsonar.host.url=http://10.0.0.93:9000 \\
-Dsonar.login=squ_c1d11fc0595c9dbb3a6c891db63344513ea195c8'''
}
}
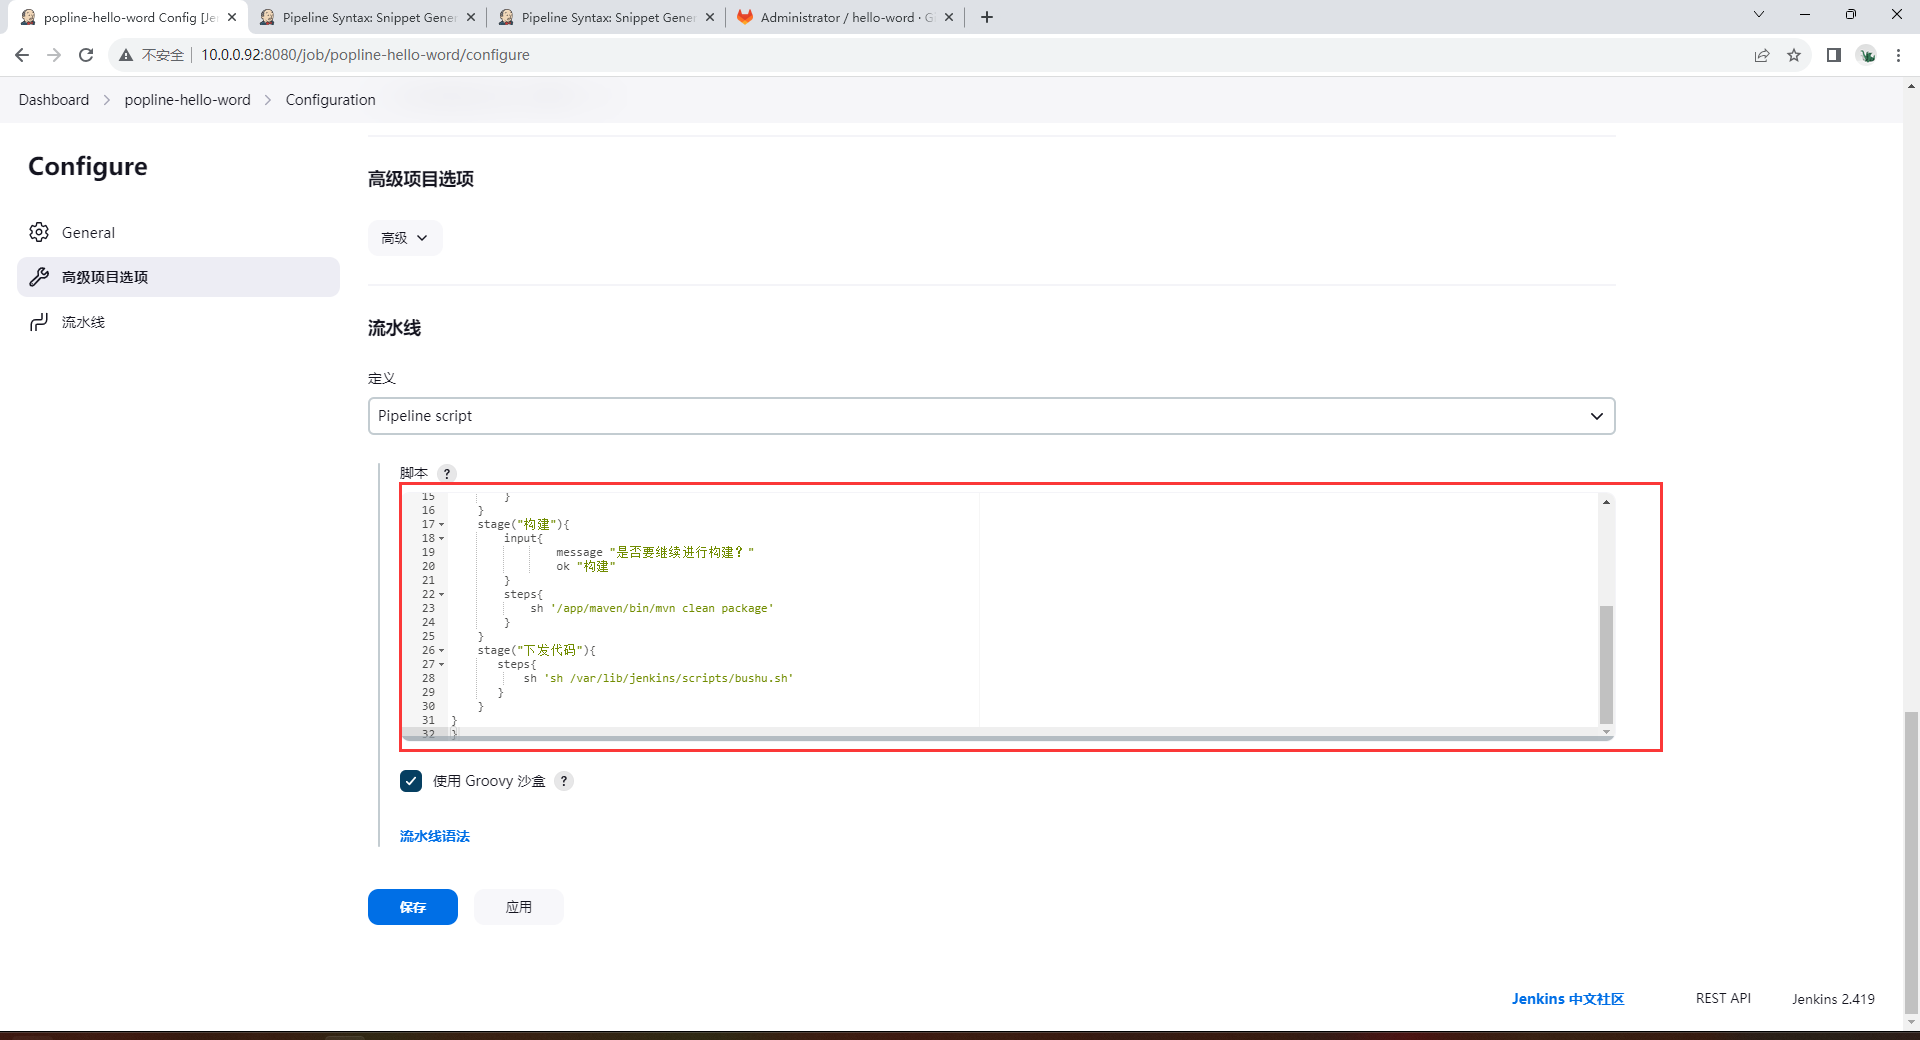
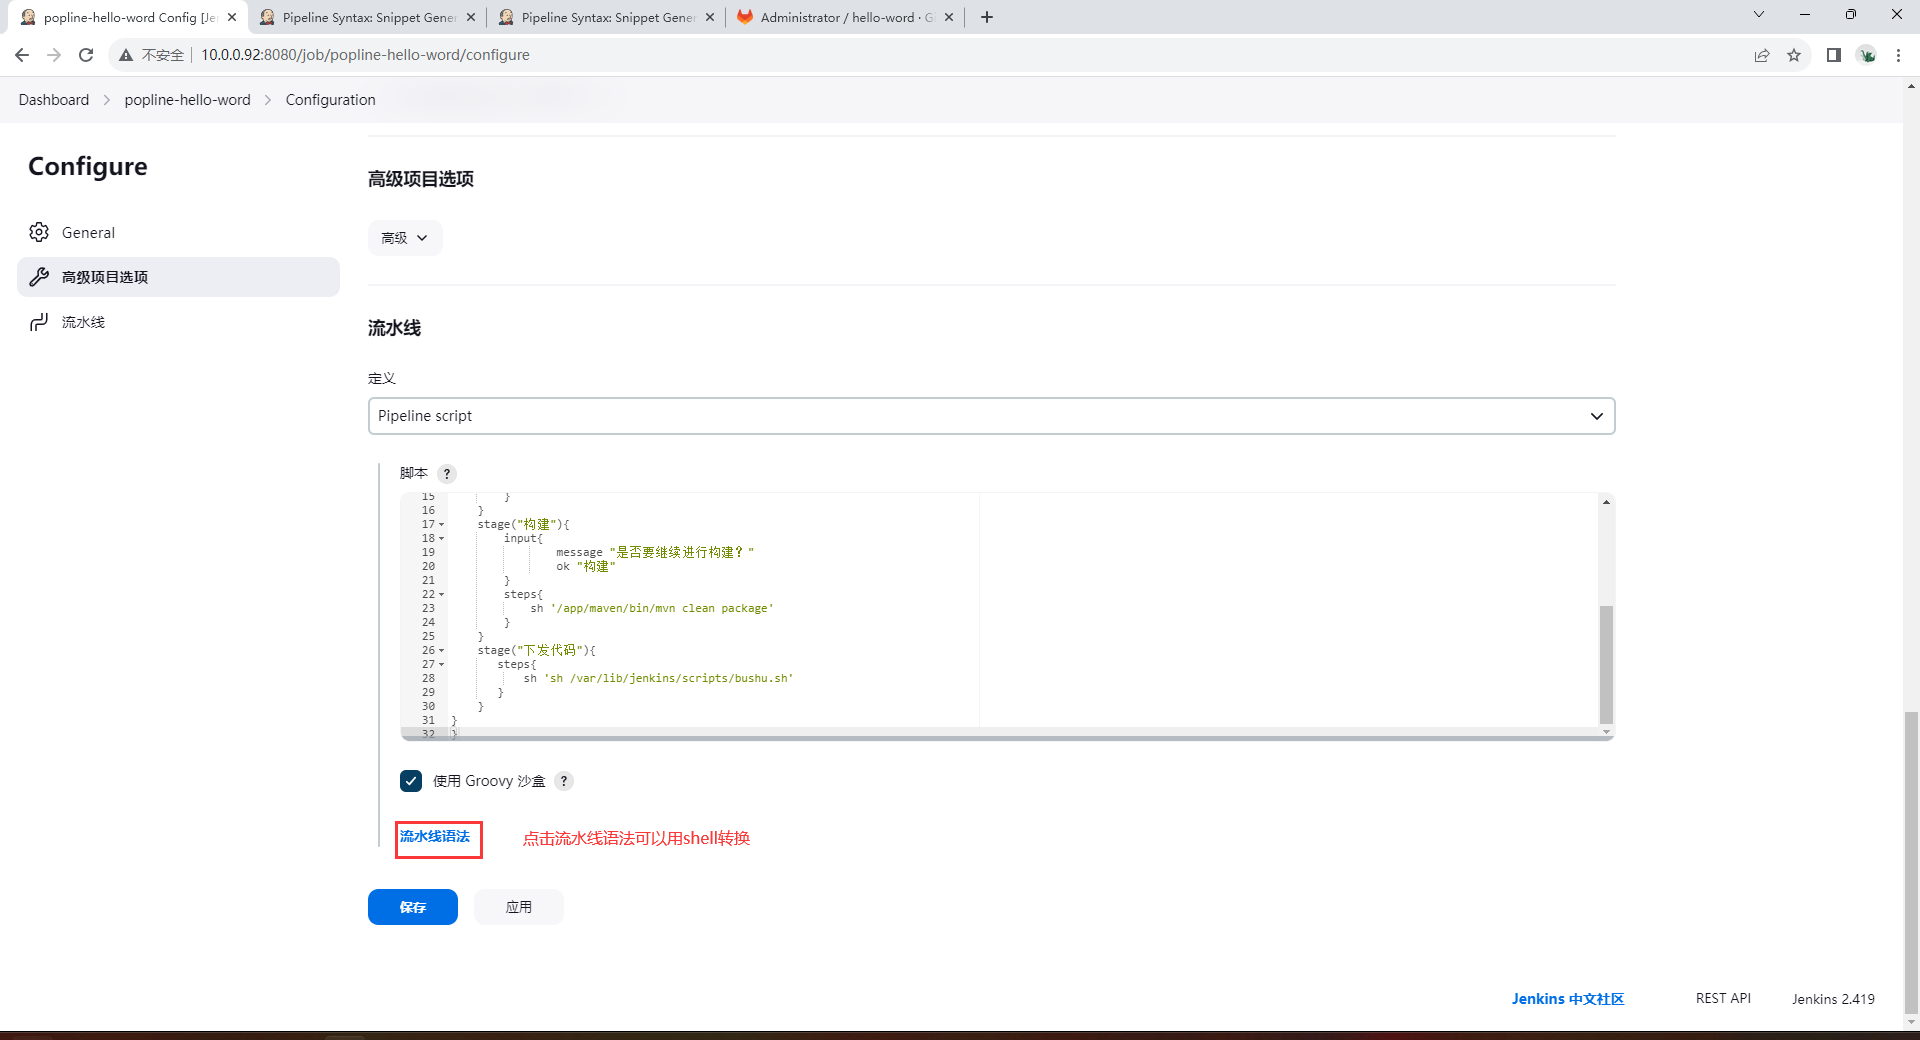
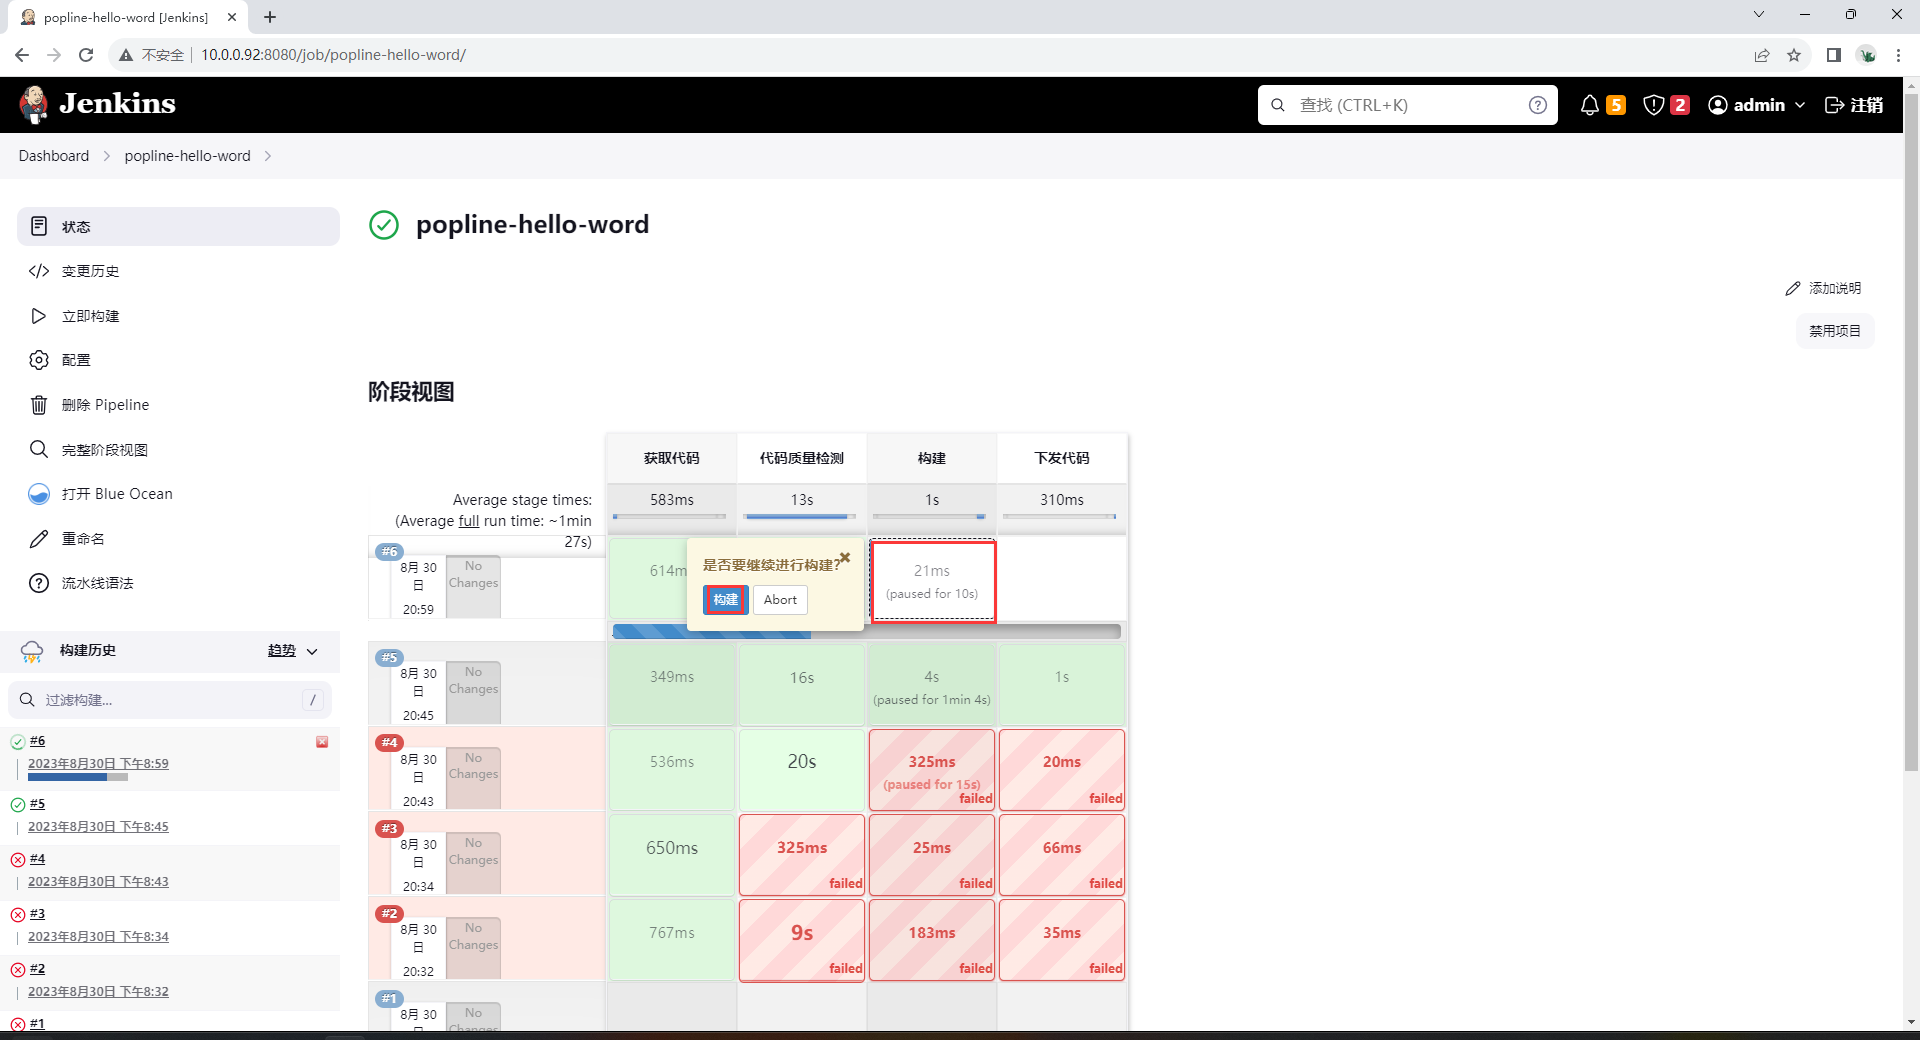
stage("构建"){
input{
message "是否要继续进行构建?"
ok "构建"
}
steps{
sh '/app/maven/bin/mvn clean package'
}
}
stage("下发代码"){
steps{
sh 'sh /var/lib/jenkins/scripts/bushu.sh'
}
}
}
}
[root@jenkins ~]# cd /var/lib/jenkins/
[root@jenkins jenkins]# mkdir scripts
[root@jenkins jenkins]# cd scripts/
[root@jenkins scripts]# vim bushu.sh
#/bin/bash
version=`awk -F '[><]' '/<version>/{print $3; exit}' ${WORKSPACE}/pom.xml`
history='/hello_version'
for ip in 7;do
ssh root@172.16.1.${ip} "rm -rf ${history}/*"
scp ${WORKSPACE}/target/hello-world-war-${version}.war
root@172.16.1.${ip}:${history}
ssh -o StrictHostKeyChecking=no -o BatchMode=yes root@172.16.1.${ip} "unzip -n
${history}/hello-world-war-${version}.war -d ${history}/hello-world^Bwar-${version}"
ssh root@172.16.1.${ip} "rm -rf /usr/share/tomcat/webapps/ROOT"
ssh root@172.16.1.${ip} "ln -s ${history}/hello-world-war-${version}
/usr/share/tomcat/webapps/ROOT"
ssh root@172.16.1.${ip} "systemctl restart tomcat"
done
发邮件工具
安装 sendemail
[root@jenkins ~]# mv sendEmail-v1.56 /app/sendemail-1.56
[root@jenkins ~]# ln -s /app/sendemail-1.56 /app/sendemail
[root@jenkins ~]# vim /etc/profile.d/sendemail.sh
[root@jenkins ~]# source /etc/profile
-f 112233@qq.com       # 发件人邮箱地址
-t 445566@qq.com       # 收件人邮箱地址
-s smtp.qq.com         # 发件人邮箱的smtp服务器地址
-u 'hg test email'    # 邮件标题
-m 'test mail content' # 邮件内容
-a /tmp/data.txt /tmp/1.jpg #发送附件
-xu 112233             # 发件人邮箱登录用户名
-xp fdnzuslqhshgkslxj  # 发件人邮箱登录密码(QQ邮箱的授权码)
-cc 222222@qq.com      # 抄送指定用户
-bcc 333333@qq.com     # 加密抄送
-o message-content-type=html# 邮件内容格式为html
-o message-file=FILE   # 指定某个文件内容作为邮件内容
-o message-charset=utf8# 邮件内容编码为utf8
-o tls=no              #关闭tls握手
发邮件脚本
#!/bin/bash
# File Name: __send_test_mail.sh__
# Version: __v1.1__
# Author: __zdh__
# Mail: __1637991558@qq.com__
# Blog: __https://wodeyumengouwo.com__
# 当前时间
now_time=`date +%F\ %T`
# 主机IP
ip_address=`ifconfig eth0|awk 'NR==2{print $2}'`
# 收件箱
reciver="1637991558@qq.com"
# 发送者邮箱
sender=1637991558@qq.com
# 邮箱用户名
login_user=1637991558
# 邮箱密码
# 使用qq邮箱发邮件,首先需要开启:POP3/SMTP服务,然后使用授权码发送。而不是邮箱密码
login_pass=passwdpasswdpasswd
# smtp服务器地址
smtp_host=smtp.qq.com
# 邮件标题
email_title="${ip_address}_${HOSTNAME}:文件被修改告警"

# 指定文件
email_file="/root/file_status.html"
sendEmail \
-f ${sender} \
-t ${reciver} \
-s ${smtp_host} \
-u ${email_title} \
-xu ${login_user} \
-xp ${login_pass} \
-o message-file=${email_file} \
-o message-charset=utf-8 \
-o message-content-type=html \
-o tls=no