


nginx四层负载
什么是四层负载均衡
OSI七层模型中,四层是传输层,传输层使用端口到端口的通信方式
四层负载均衡,就是在传输层做端口的转发(端口映射)
端口转发
本机起一个端口映射到另外一台服务器的端口,使得访问本机的IP+端口即访问另外一台服务器的对应端口应用
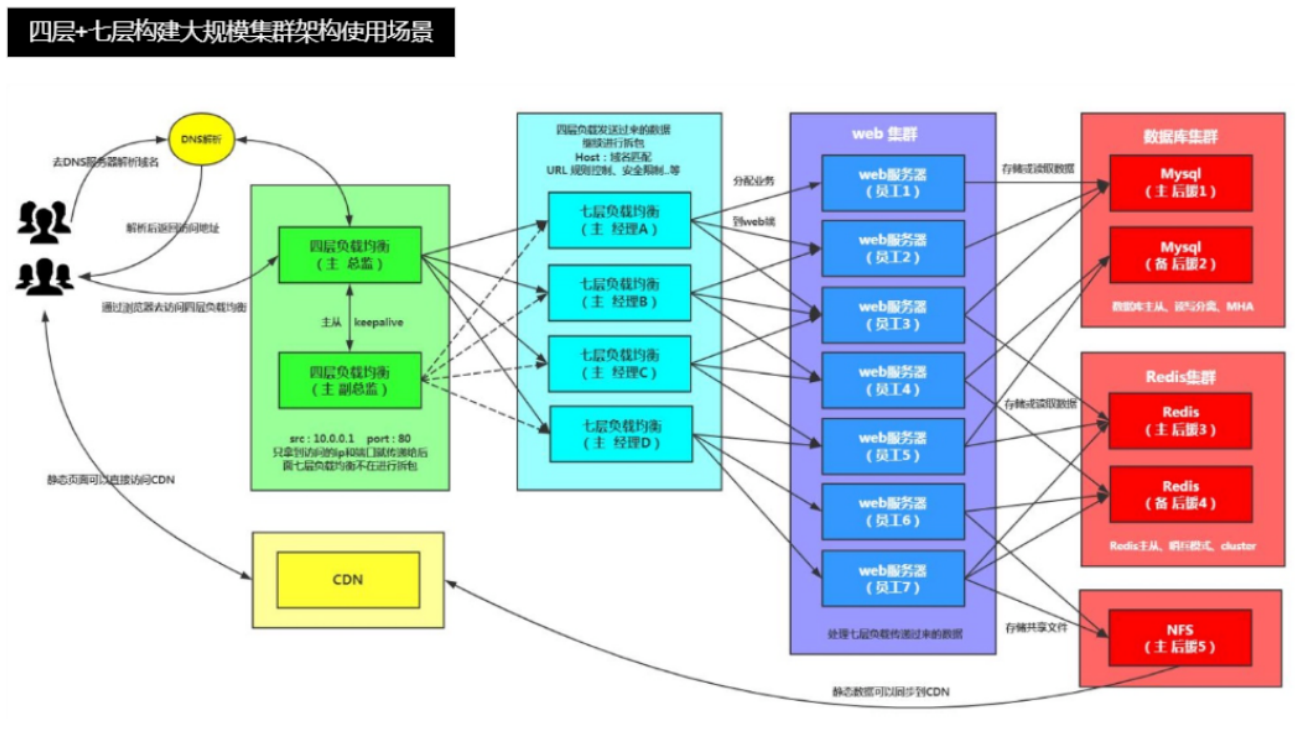
四层负载应用场景
1、四层+七层来做负载均衡,四层可以保证七层的负载均衡的高可用性;如:nginx就无法保证自己的服务高可用,需要依赖LVS或者keepalive。
2、如:tcp协议的负载均衡,有些请求是TCP协议的(mysql、ssh),或者说这些请求只需要使用四层进行端口的转发就可以了,所以使用四层负载均衡。
nginx四层负载
负载均衡软件:
- nginx
- 四层负载(nginx 1.9版本以后有stream模块,才可以做四层负载)
- stream
- 七层负载
- upstream
- LVS
- 四层负载
- HAproxy
- 四层负载
- 七层负载
四层负载均衡配置
环境准备
| 主机名 | WANIP | LANIP | 角色 | 应用 |
|---|---|---|---|---|
| lb01 | 10.0.0.5 | 172.16.1.5 | 七层负载 | nginx |
| lb02 | 10.0.0.6 | 172.16.1.6 | 四层负载 | nginx |
| web01 | 10.0.0.7 | 172.16.1.7 | web网站 | nginx、php |
| web02 | 10.0.0.8 | 172.16.1.8 | web网站 | nginx、php |
| db01 | 10.0.0.51 | 172.16.1.51 | 数据库 | MariaDB |
部署四层负载
# 1.添加nginx官方源
[root@lb02 ~]# vim /etc/yum.repos.d/nginx.repo
[nginx-stable]
name=nginx stable repo
baseurl=http://nginx.org/packages/centos/$releasever/$basearch/
gpgcheck=1
enabled=1
gpgkey=https://nginx.org/keys/nginx_signing.key
module_hotfixes=true

# 2.安装nginx
[root@lb02 ~]# yum install -y nginx

# 3.配置四层负载 配置在http层外
[root@lb02 ~]# vim /etc/nginx/nginx.conf

stream {
    upstream backend {
        server 172.16.1.5:80;
    }
    server {
        listen 90;
        proxy_pass backend; ## 这里不需要加http//: 因为是直接通过ip和端口去访问
    }
}
http{
...
}

## 此时 当访问lb02(172.16.1.6)的90端口就是在访问lb01(172.16.1.5)的80端口
使用stream做端口转发
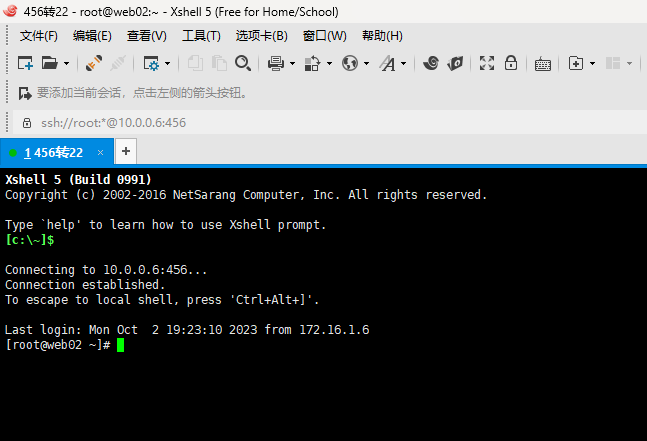
实现22端口转发
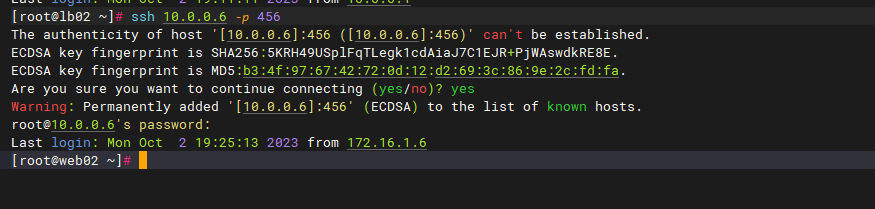
# 在10.0.0.6机器上开456端口,映射到10.0.0.8的22端口
ssh 10.0.0.6 -p 456

# 主配置文件,添加include
[root@lb02 ~]# vim /etc/nginx/nginx.conf
user nginx;
worker_processes auto;

error_log /var/log/nginx/error.log notice;
pid /var/run/nginx.pid;
events {
    ...
}

include /etc/nginx/stream.d/*.conf;

http {
    ...
}

# 创建stream.d文件夹
[root@lb02 ~]# mkdir /etc/nginx/stream.d

# 实现456映射22端口需求
[root@lb02 ~]# vim /etc/nginx/stream.d/456_22.conf
stream {
    upstream web02_ssh {
        server 172.16.1.8:22;
    }
    server {
        listen 456;
        proxy_pass web02_ssh;
    }
}

## 如果是按照上面一步步做下来的 需要先删除上面部署四层负载里的stream 因为只能有一个stream
## 完成以后 检查语法加重启nginx 然后拿Xshell改456端口连接测试
[root@lb02 ~]# nginx -t
nginx: the configuration file /etc/nginx/nginx.conf syntax is ok
nginx: configuration file /etc/nginx/nginx.conf test is successful
[root@lb02 ~]# systemctl reload nginx
# 1.添加nginx官方源
[root@lb02 ~]# vim /etc/yum.repos.d/nginx.repo
[nginx-stable]
name=nginx stable repo
baseurl=http://nginx.org/packages/centos/$releasever/$basearch/
gpgcheck=1
enabled=1
gpgkey=https://nginx.org/keys/nginx_signing.key
module_hotfixes=true
# 2.安装nginx
[root@lb02 ~]# yum install -y nginx
# 3.配置四层负载 配置在http层外
[root@lb02 ~]# vim /etc/nginx/nginx.conf
stream {
upstream backend {
server 172.16.1.5:80;
}
server {
listen 90;
proxy_pass backend; ## 这里不需要加http//: 因为是直接通过ip和端口去访问
}
}
http{
...
}
## 此时 当访问lb02(172.16.1.6)的90端口就是在访问lb01(172.16.1.5)的80端口# 在10.0.0.6机器上开456端口,映射到10.0.0.8的22端口
ssh 10.0.0.6 -p 456
# 主配置文件,添加include
[root@lb02 ~]# vim /etc/nginx/nginx.conf
user nginx;
worker_processes auto;
error_log /var/log/nginx/error.log notice;
pid /var/run/nginx.pid;
events {
...
}
include /etc/nginx/stream.d/*.conf;
http {
...
}
# 创建stream.d文件夹
[root@lb02 ~]# mkdir /etc/nginx/stream.d
# 实现456映射22端口需求
[root@lb02 ~]# vim /etc/nginx/stream.d/456_22.conf
stream {
upstream web02_ssh {
server 172.16.1.8:22;
}
server {
listen 456;
proxy_pass web02_ssh;
}
}
## 如果是按照上面一步步做下来的 需要先删除上面部署四层负载里的stream 因为只能有一个stream
## 完成以后 检查语法加重启nginx 然后拿Xshell改456端口连接测试
[root@lb02 ~]# nginx -t
nginx: the configuration file /etc/nginx/nginx.conf syntax is ok
nginx: configuration file /etc/nginx/nginx.conf test is successful
[root@lb02 ~]# systemctl reload nginx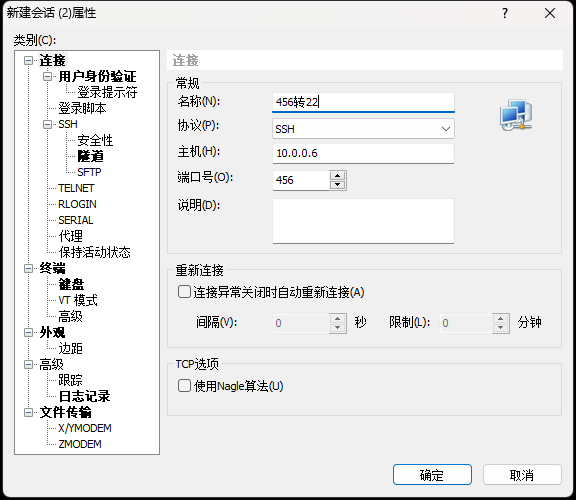
映射数据库端口
[root@lb02 ~]# vim /etc/nginx/stream.d/456_22.conf
stream {
        upstream db01_mysql {
                server 172.16.1.51:3306;
        }
        server {
                listen 3307;
                proxy_pass db01_mysql;
        }
}

# 检查语法加重启nginx 然后在web服务器上,安装数据库客户端命令:mysql 测试连接10.0.0.6:3307
[root@lb02 ~]# nginx -t
nginx: the configuration file /etc/nginx/nginx.conf syntax is ok
nginx: configuration file /etc/nginx/nginx.conf test is successful
[root@lb02 ~]# systemctl reload nginx

[root@web01 ~]# yum install -y mariadb

## -h指定ip -P指定端口
[root@web01 ~]#  mysql -uroot -p123 -h10.0.0.6 -P3307
Welcome to the MariaDB monitor.  Commands end with ; or \g.
Your MariaDB connection id is 538
Server version: 5.5.68-MariaDB MariaDB Server

Copyright (c) 2000, 2018, Oracle, MariaDB Corporation Ab and others.

Type 'help;' or '\h' for help. Type '\c' to clear the current input statement.

MariaDB [(none)]>      连接成功
Redis端口转发
[root@lb02 ~]# vim /etc/nginx/stream.d/stream.conf
stream {
    upstream redis_6379 {
        server 172.16.1.51:6379;
    }

    server {
        listen 1111;
        proxy_pass redis_6379;
    }
}

# 检查语法加重启nginx 然后在web服务器上,安装redis命令: 测试连接10.0.0.6:1111
[root@lb02 ~]# nginx -t
nginx: the configuration file /etc/nginx/nginx.conf syntax is ok
nginx: configuration file /etc/nginx/nginx.conf test is successful
[root@lb02 ~]# systemctl reload nginx

## 验证
[root@web01 ~]# yum install -y redis
[root@web01 ~]# redis-cli -h 10.0.0.6 -p 1111
10.0.0.6:1111>
[root@lb02 ~]# vim /etc/nginx/stream.d/456_22.conf
stream {
upstream db01_mysql {
server 172.16.1.51:3306;
}
server {
listen 3307;
proxy_pass db01_mysql;
}
}
# 检查语法加重启nginx 然后在web服务器上,安装数据库客户端命令:mysql 测试连接10.0.0.6:3307
[root@lb02 ~]# nginx -t
nginx: the configuration file /etc/nginx/nginx.conf syntax is ok
nginx: configuration file /etc/nginx/nginx.conf test is successful
[root@lb02 ~]# systemctl reload nginx
[root@web01 ~]# yum install -y mariadb
## -h指定ip -P指定端口
[root@web01 ~]# mysql -uroot -p123 -h10.0.0.6 -P3307
Welcome to the MariaDB monitor. Commands end with ; or \g.
Your MariaDB connection id is 538
Server version: 5.5.68-MariaDB MariaDB Server
Copyright (c) 2000, 2018, Oracle, MariaDB Corporation Ab and others.
Type 'help;' or '\h' for help. Type '\c' to clear the current input statement.
MariaDB [(none)]> 连接成功[root@lb02 ~]# vim /etc/nginx/stream.d/stream.conf
stream {
upstream redis_6379 {
server 172.16.1.51:6379;
}
server {
listen 1111;
proxy_pass redis_6379;
}
}
# 检查语法加重启nginx 然后在web服务器上,安装redis命令: 测试连接10.0.0.6:1111
[root@lb02 ~]# nginx -t
nginx: the configuration file /etc/nginx/nginx.conf syntax is ok
nginx: configuration file /etc/nginx/nginx.conf test is successful
[root@lb02 ~]# systemctl reload nginx
## 验证
[root@web01 ~]# yum install -y redis
[root@web01 ~]# redis-cli -h 10.0.0.6 -p 1111
10.0.0.6:1111> 


Comments | NOTHING