sonarqube代码质量检测
介绍
主要检测,代码规范,代码错误,代码漏洞。
-
SonarQube基础java开发,需安装open JDK8版本
-
SonarQube需要依赖MySQL数据库,至少5.6版本以上
-
SonarQube的小型实例至少4G内存,如果大型实例需要16G内存
在7.6以后版本,需要安装JDK11,并且不再支持MySQL需要使用PostgreSQL
安装postgresql
## 更换postgreSQL yum源
[root@sonar ~]# rpm -ivh https://mirrors.tuna.tsinghua.edu.cn/postgresql/repos/yum/reporpms/EL-7-x86_64/pgdg-redhat-repo-42.0-32.noarch.rpm
[root@sonar ~]# sed -i 's#gpgcheck=1#gpgcheck=0#g' /etc/yum.repos.d/pgdg-redhat-all.repo

## 安装postgreSQL
[root@sonar ~]# yum install -y postgresql13-server

## 初始化
[root@sonar ~]# /usr/pgsql-13/bin/postgresql-13-setup initdb
Initializing database ... OK
[root@sonar ~]#  ll /var/lib/pgsql/13/data/
total 52
drwx------ 5 postgres postgres    41 Aug 29 16:42 base
drwx------ 2 postgres postgres  4096 Aug 29 16:42 global
drwx------ 2 postgres postgres     6 Aug 29 16:42 log
drwx------ 2 postgres postgres     6 Aug 29 16:42 pg_commit_ts
drwx------ 2 postgres postgres     6 Aug 29 16:42 pg_dynshmem
-rw------- 1 postgres postgres  4548 Aug 29 16:42 pg_hba.conf
-rw------- 1 postgres postgres  1636 Aug 29 16:42 pg_ident.conf
drwx------ 4 postgres postgres    68 Aug 29 16:42 pg_logical
drwx------ 4 postgres postgres    36 Aug 29 16:42 pg_multixact
drwx------ 2 postgres postgres     6 Aug 29 16:42 pg_notify
drwx------ 2 postgres postgres     6 Aug 29 16:42 pg_replslot
drwx------ 2 postgres postgres     6 Aug 29 16:42 pg_serial
drwx------ 2 postgres postgres     6 Aug 29 16:42 pg_snapshots
drwx------ 2 postgres postgres     6 Aug 29 16:42 pg_stat
drwx------ 2 postgres postgres     6 Aug 29 16:42 pg_stat_tmp
drwx------ 2 postgres postgres    18 Aug 29 16:42 pg_subtrans
drwx------ 2 postgres postgres     6 Aug 29 16:42 pg_tblspc
drwx------ 2 postgres postgres     6 Aug 29 16:42 pg_twophase
-rw------- 1 postgres postgres     3 Aug 29 16:42 PG_VERSION
drwx------ 3 postgres postgres    60 Aug 29 16:42 pg_wal
drwx------ 2 postgres postgres    18 Aug 29 16:42 pg_xact
-rw------- 1 postgres postgres    88 Aug 29 16:42 postgresql.auto.conf
-rw------- 1 postgres postgres 28100 Aug 29 16:42 postgresql.conf
##直接启动会报错启动报错原因:/var/lib/pgsql/13/data/ 数据目录为空

## 启动postgre
[root@sonar ~]# systemctl start postgresql-13.service

## 切换用户
[root@sonar ~]#  su - postgres

##登录终端
-bash-4.2$ psql
psql (13.12)
Type "help" for help.

## 创建用户
postgres=# create user sonar_user with password '123';

## 创建数据库
postgres=# create database sonar_db owner sonar_user;

## 授权
postgres=# grant all on database sonar_db to sonar_user;
GRANT

## 测试连接数据库
[root@sonar ~]#  psql -d sonar_db -U sonar_user -h127.0.0.1
Password for user sonar_user:
psql (13.12)
Type "help" for help.

sonar_db=>
安装sonar
## 优化
[root@sonar ~]# sysctl vm.max_map_count
vm.max_map_count = 65530
[root@sonar ~]# sysctl fs.file-max
fs.file-max = 91945
[root@sonar ~]# ulimit -n
65535
[root@sonar ~]# ulimit -u
3805
[root@sonar ~]# sysctl -w vm.max_map_count=524288
vm.max_map_count = 524288
[root@sonar ~]# sysctl -w fs.file-max=131072
fs.file-max = 131072
[root@sonar ~]# ulimit -n 131072
[root@sonar ~]# ulimit -u 8192
[root@sonar ~]# vim /etc/security/limits.conf
sonarqube - nofile 131072
sonarqube - nproc 8192

## 创建并目录
[root@sonar ~]# mkdir /app
[root@sonar ~]# cd /app/

## 解压
[root@sonar app]# unzip sonarqube-9.8.0.63668.zip

## 改名
[root@sonar app]# mv sonarqube-9.8.0.63668 sonarqube-9.8

## 做软连接
[root@sonar app]# ln -s /app/sonarqube-9.8 /app/sonarqube

## 修改配置文件
[root@sonar app]# vim /app/sonarqube/conf/sonar.properties
sonar.jdbc.username=sonar_user
sonar.jdbc.password=123

## 创建sonar系统用户
[root@sonar app]# useradd sonar

## 授权
[root@sonar app]# chown -R sonar.sonar /app/sonar*

## 安装java11
[root@sonar app]# yum install -y java-11-openjdk

## 启动
[root@sonar app]# su - sonar -c "/app/sonarqube/bin/linux-x86-64/sonar.sh start"

## 查看端口
[root@sonar app]# netstat -lntup
Active Internet connections (only servers)
Proto Recv-Q Send-Q Local Address           Foreign Address         State       PID/Program name
tcp        0      0 0.0.0.0:22              0.0.0.0:*               LISTEN      838/sshd
tcp        0      0 127.0.0.1:5432          0.0.0.0:*               LISTEN      1841/postmaster
tcp        0      0 127.0.0.1:25            0.0.0.0:*               LISTEN      977/master
tcp6       0      0 127.0.0.1:9092          :::*                    LISTEN      3993/java
tcp6       0      0 :::9000                 :::*                    LISTEN      3993/java
tcp6       0      0 127.0.0.1:9001          :::*                    LISTEN      3901/java
tcp6       0      0 127.0.0.1:33520         :::*                    LISTEN      3901/java
tcp6       0      0 :::22                   :::*                    LISTEN      838/sshd
tcp6       0      0 ::1:5432                :::*                    LISTEN      1841/postmaster
tcp6       0      0 ::1:25                  :::*                    LISTEN      977/master

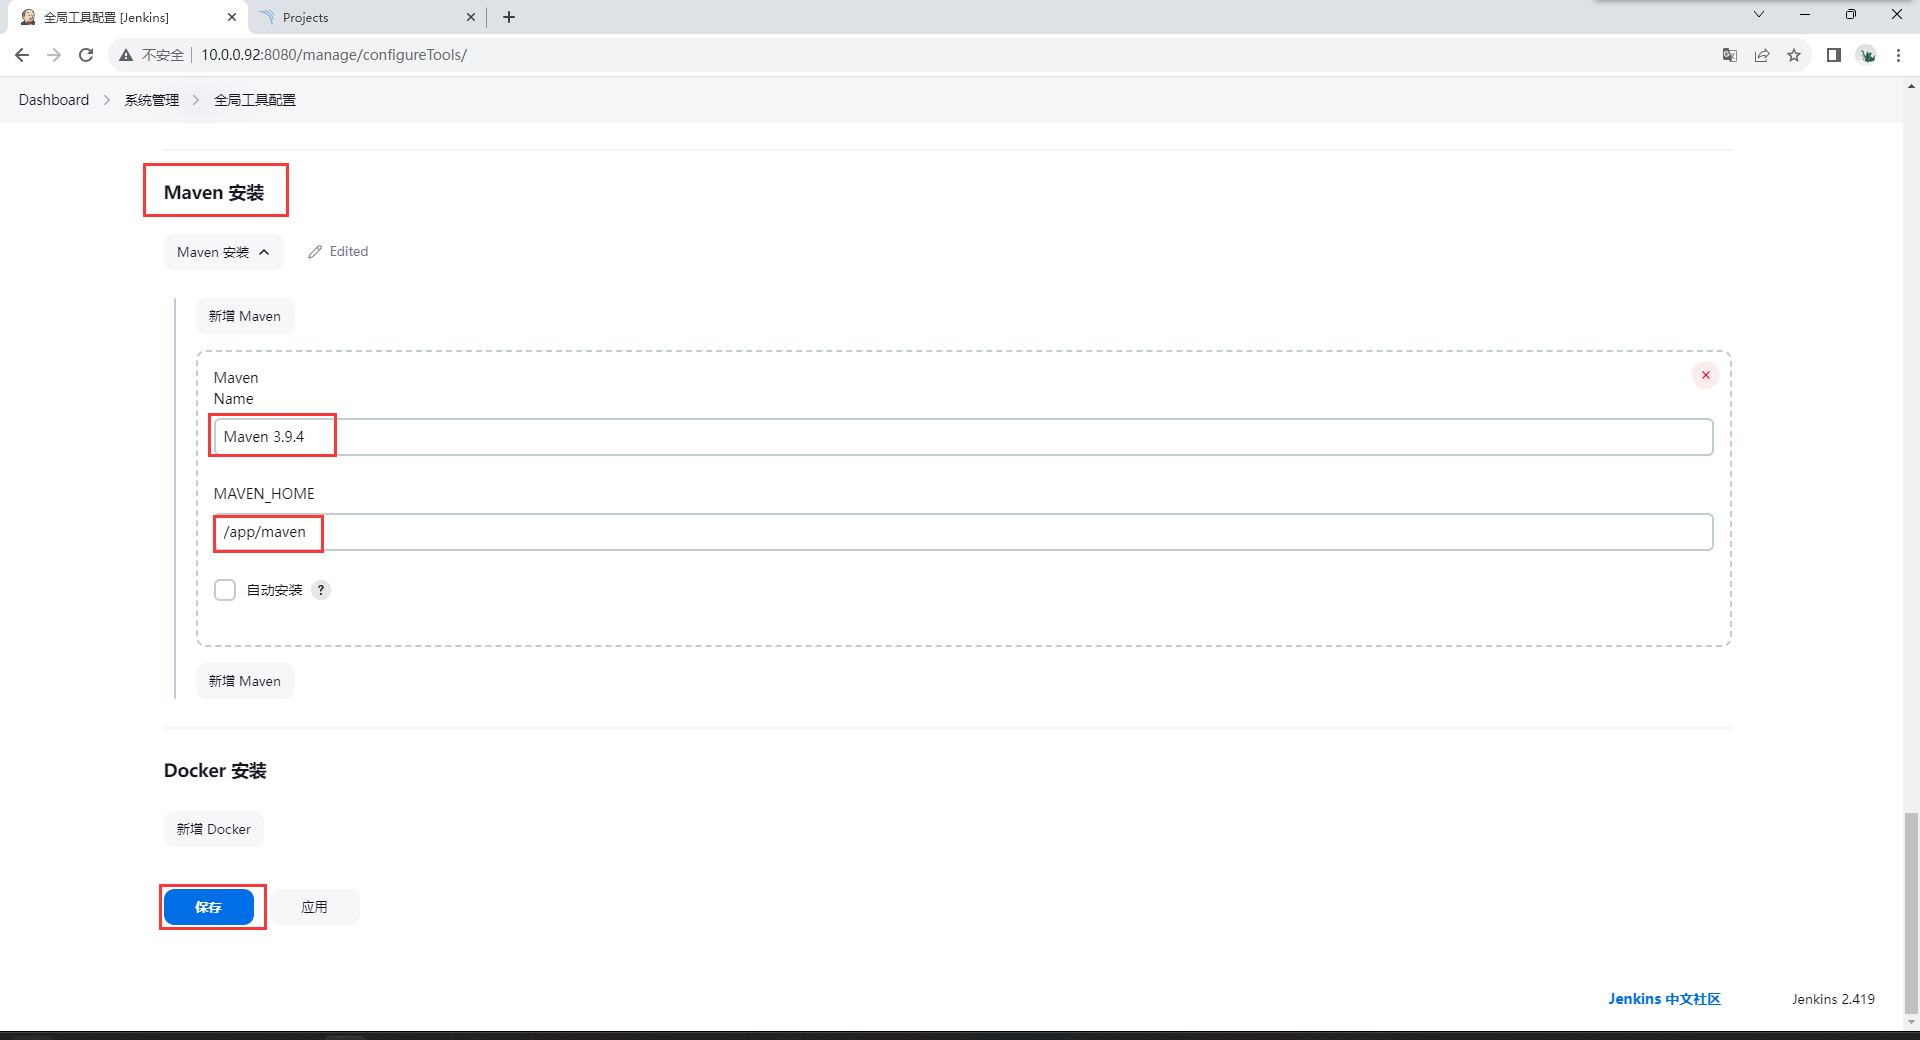
##在Jenkins上安装maven3.9(之前有maven要先卸载)
[root@jenkins app]# wget https://mirrors.tuna.tsinghua.edu.cn/apache/maven/maven-3/3.9.4/binaries/apache-maven-3.9.4-bin.tar.gz --no-check-certificate
[root@jenkins app]# tar xf apache-maven-3.9.4-bin.tar.gz
[root@jenkins app]# mv apache-maven-3.9.4 maven-3.9.4
[root@jenkins app]# ln -s /app/maven-3.9.4 /app/maven

# 环境变量
[root@jenkins app]# vim /etc/profile.d/maven39.sh
export MAVEN_HOME=/app/maven/
export PATH=${PATH}:${MAVEN_HOME}/bin

# 更换mvn源
[root@jenkins app]# vim /app/maven/conf/settings.xml
加在 <mirrors></mirrors>
<mirror>
<id>aliyunmaven</id>
<mirrorOf>*</mirrorOf>
<name>阿里云公共仓库</name>
<url>https://maven.aliyun.com/repository/public</url>
</mirror>

# 安装jdk11
[root@jenkins hello-word-maven]# yum reinstall -y java-11-openjdk
## 更换postgreSQL yum源
[root@sonar ~]# rpm -ivh https://mirrors.tuna.tsinghua.edu.cn/postgresql/repos/yum/reporpms/EL-7-x86_64/pgdg-redhat-repo-42.0-32.noarch.rpm
[root@sonar ~]# sed -i 's#gpgcheck=1#gpgcheck=0#g' /etc/yum.repos.d/pgdg-redhat-all.repo
## 安装postgreSQL
[root@sonar ~]# yum install -y postgresql13-server
## 初始化
[root@sonar ~]# /usr/pgsql-13/bin/postgresql-13-setup initdb
Initializing database ... OK
[root@sonar ~]# ll /var/lib/pgsql/13/data/
total 52
drwx------ 5 postgres postgres 41 Aug 29 16:42 base
drwx------ 2 postgres postgres 4096 Aug 29 16:42 global
drwx------ 2 postgres postgres 6 Aug 29 16:42 log
drwx------ 2 postgres postgres 6 Aug 29 16:42 pg_commit_ts
drwx------ 2 postgres postgres 6 Aug 29 16:42 pg_dynshmem
-rw------- 1 postgres postgres 4548 Aug 29 16:42 pg_hba.conf
-rw------- 1 postgres postgres 1636 Aug 29 16:42 pg_ident.conf
drwx------ 4 postgres postgres 68 Aug 29 16:42 pg_logical
drwx------ 4 postgres postgres 36 Aug 29 16:42 pg_multixact
drwx------ 2 postgres postgres 6 Aug 29 16:42 pg_notify
drwx------ 2 postgres postgres 6 Aug 29 16:42 pg_replslot
drwx------ 2 postgres postgres 6 Aug 29 16:42 pg_serial
drwx------ 2 postgres postgres 6 Aug 29 16:42 pg_snapshots
drwx------ 2 postgres postgres 6 Aug 29 16:42 pg_stat
drwx------ 2 postgres postgres 6 Aug 29 16:42 pg_stat_tmp
drwx------ 2 postgres postgres 18 Aug 29 16:42 pg_subtrans
drwx------ 2 postgres postgres 6 Aug 29 16:42 pg_tblspc
drwx------ 2 postgres postgres 6 Aug 29 16:42 pg_twophase
-rw------- 1 postgres postgres 3 Aug 29 16:42 PG_VERSION
drwx------ 3 postgres postgres 60 Aug 29 16:42 pg_wal
drwx------ 2 postgres postgres 18 Aug 29 16:42 pg_xact
-rw------- 1 postgres postgres 88 Aug 29 16:42 postgresql.auto.conf
-rw------- 1 postgres postgres 28100 Aug 29 16:42 postgresql.conf
##直接启动会报错启动报错原因:/var/lib/pgsql/13/data/ 数据目录为空
## 启动postgre
[root@sonar ~]# systemctl start postgresql-13.service
## 切换用户
[root@sonar ~]# su - postgres
##登录终端
-bash-4.2$ psql
psql (13.12)
Type "help" for help.
## 创建用户
postgres=# create user sonar_user with password '123';
## 创建数据库
postgres=# create database sonar_db owner sonar_user;
## 授权
postgres=# grant all on database sonar_db to sonar_user;
GRANT
## 测试连接数据库
[root@sonar ~]# psql -d sonar_db -U sonar_user -h127.0.0.1
Password for user sonar_user:
psql (13.12)
Type "help" for help.
sonar_db=>## 优化
[root@sonar ~]# sysctl vm.max_map_count
vm.max_map_count = 65530
[root@sonar ~]# sysctl fs.file-max
fs.file-max = 91945
[root@sonar ~]# ulimit -n
65535
[root@sonar ~]# ulimit -u
3805
[root@sonar ~]# sysctl -w vm.max_map_count=524288
vm.max_map_count = 524288
[root@sonar ~]# sysctl -w fs.file-max=131072
fs.file-max = 131072
[root@sonar ~]# ulimit -n 131072
[root@sonar ~]# ulimit -u 8192
[root@sonar ~]# vim /etc/security/limits.conf
sonarqube - nofile 131072
sonarqube - nproc 8192
## 创建并目录
[root@sonar ~]# mkdir /app
[root@sonar ~]# cd /app/
## 解压
[root@sonar app]# unzip sonarqube-9.8.0.63668.zip
## 改名
[root@sonar app]# mv sonarqube-9.8.0.63668 sonarqube-9.8
## 做软连接
[root@sonar app]# ln -s /app/sonarqube-9.8 /app/sonarqube
## 修改配置文件
[root@sonar app]# vim /app/sonarqube/conf/sonar.properties
sonar.jdbc.username=sonar_user
sonar.jdbc.password=123
## 创建sonar系统用户
[root@sonar app]# useradd sonar
## 授权
[root@sonar app]# chown -R sonar.sonar /app/sonar*
## 安装java11
[root@sonar app]# yum install -y java-11-openjdk
## 启动
[root@sonar app]# su - sonar -c "/app/sonarqube/bin/linux-x86-64/sonar.sh start"
## 查看端口
[root@sonar app]# netstat -lntup
Active Internet connections (only servers)
Proto Recv-Q Send-Q Local Address Foreign Address State PID/Program name
tcp 0 0 0.0.0.0:22 0.0.0.0:* LISTEN 838/sshd
tcp 0 0 127.0.0.1:5432 0.0.0.0:* LISTEN 1841/postmaster
tcp 0 0 127.0.0.1:25 0.0.0.0:* LISTEN 977/master
tcp6 0 0 127.0.0.1:9092 :::* LISTEN 3993/java
tcp6 0 0 :::9000 :::* LISTEN 3993/java
tcp6 0 0 127.0.0.1:9001 :::* LISTEN 3901/java
tcp6 0 0 127.0.0.1:33520 :::* LISTEN 3901/java
tcp6 0 0 :::22 :::* LISTEN 838/sshd
tcp6 0 0 ::1:5432 :::* LISTEN 1841/postmaster
tcp6 0 0 ::1:25 :::* LISTEN 977/master
##在Jenkins上安装maven3.9(之前有maven要先卸载)
[root@jenkins app]# wget https://mirrors.tuna.tsinghua.edu.cn/apache/maven/maven-3/3.9.4/binaries/apache-maven-3.9.4-bin.tar.gz --no-check-certificate
[root@jenkins app]# tar xf apache-maven-3.9.4-bin.tar.gz
[root@jenkins app]# mv apache-maven-3.9.4 maven-3.9.4
[root@jenkins app]# ln -s /app/maven-3.9.4 /app/maven
# 环境变量
[root@jenkins app]# vim /etc/profile.d/maven39.sh
export MAVEN_HOME=/app/maven/
export PATH=${PATH}:${MAVEN_HOME}/bin
# 更换mvn源
[root@jenkins app]# vim /app/maven/conf/settings.xml
加在 <mirrors></mirrors>
<mirror>
<id>aliyunmaven</id>
<mirrorOf>*</mirrorOf>
<name>阿里云公共仓库</name>
<url>https://maven.aliyun.com/repository/public</url>
</mirror>
# 安装jdk11
[root@jenkins hello-word-maven]# yum reinstall -y java-11-openjdk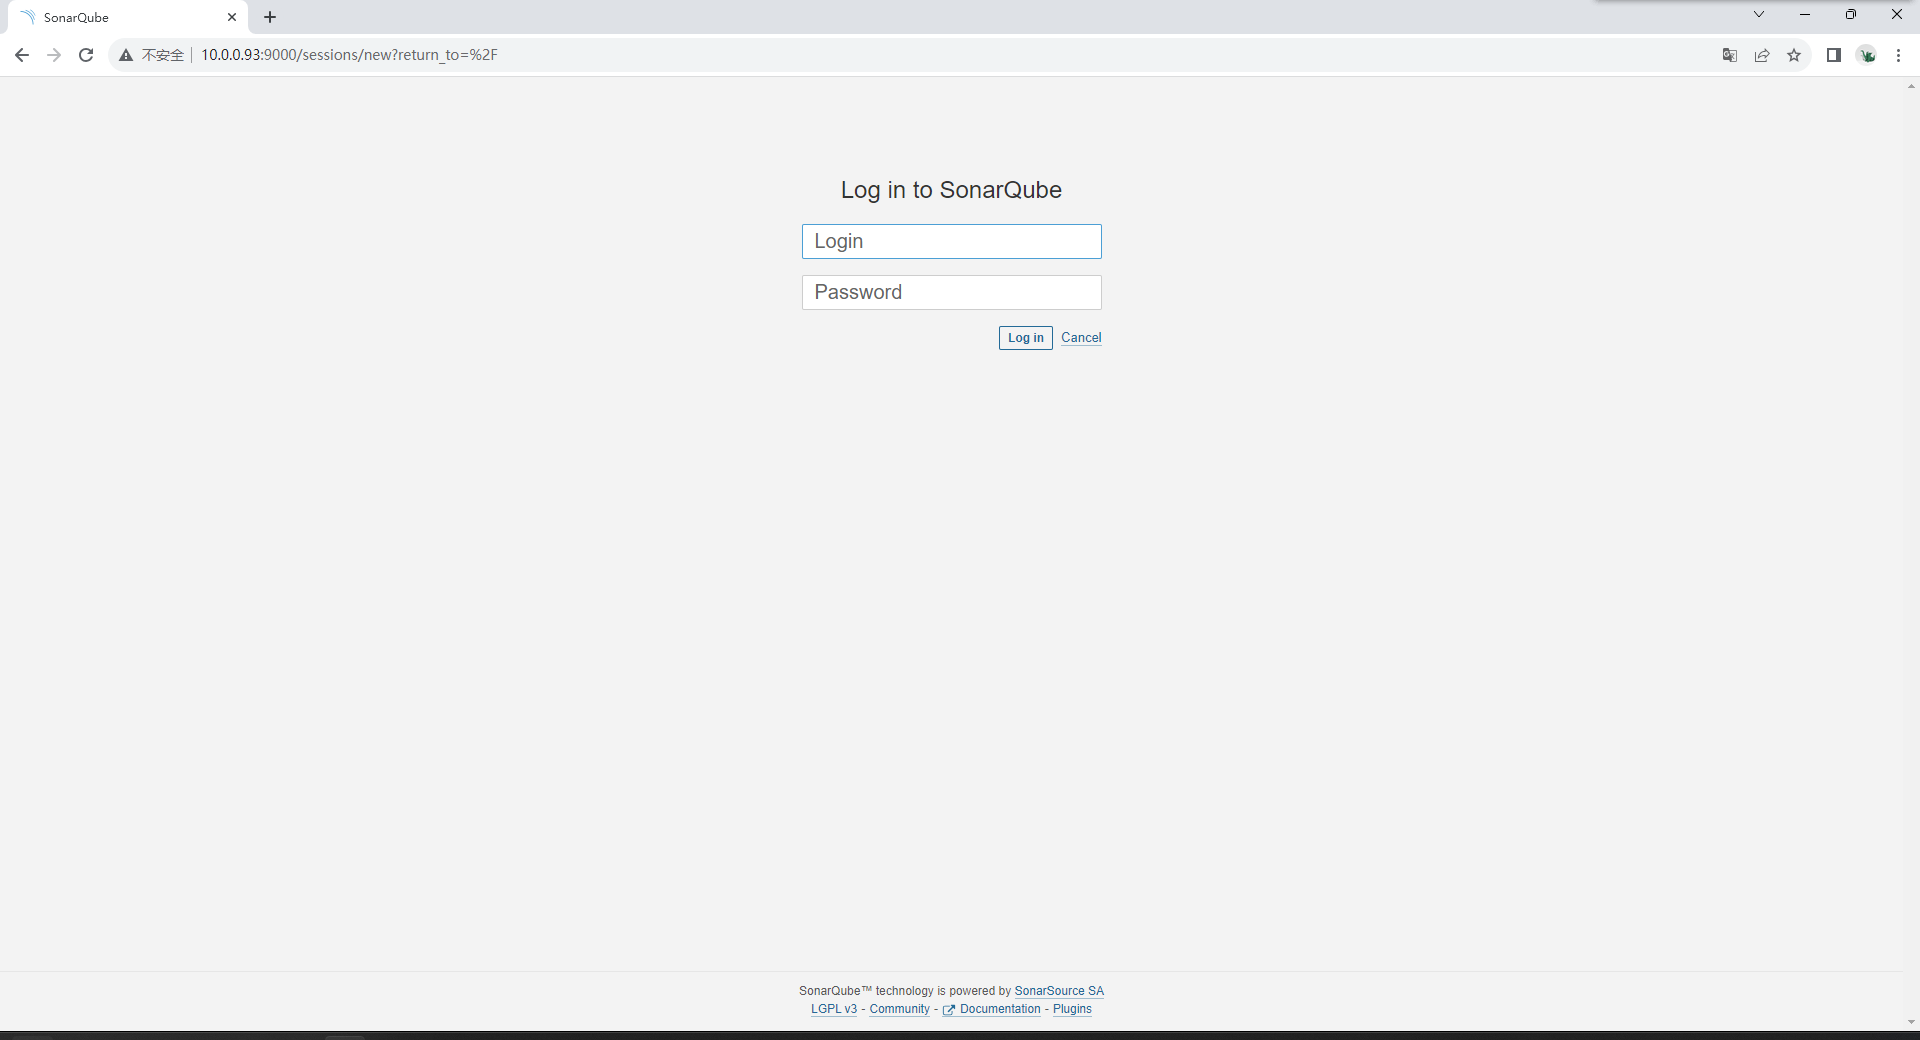
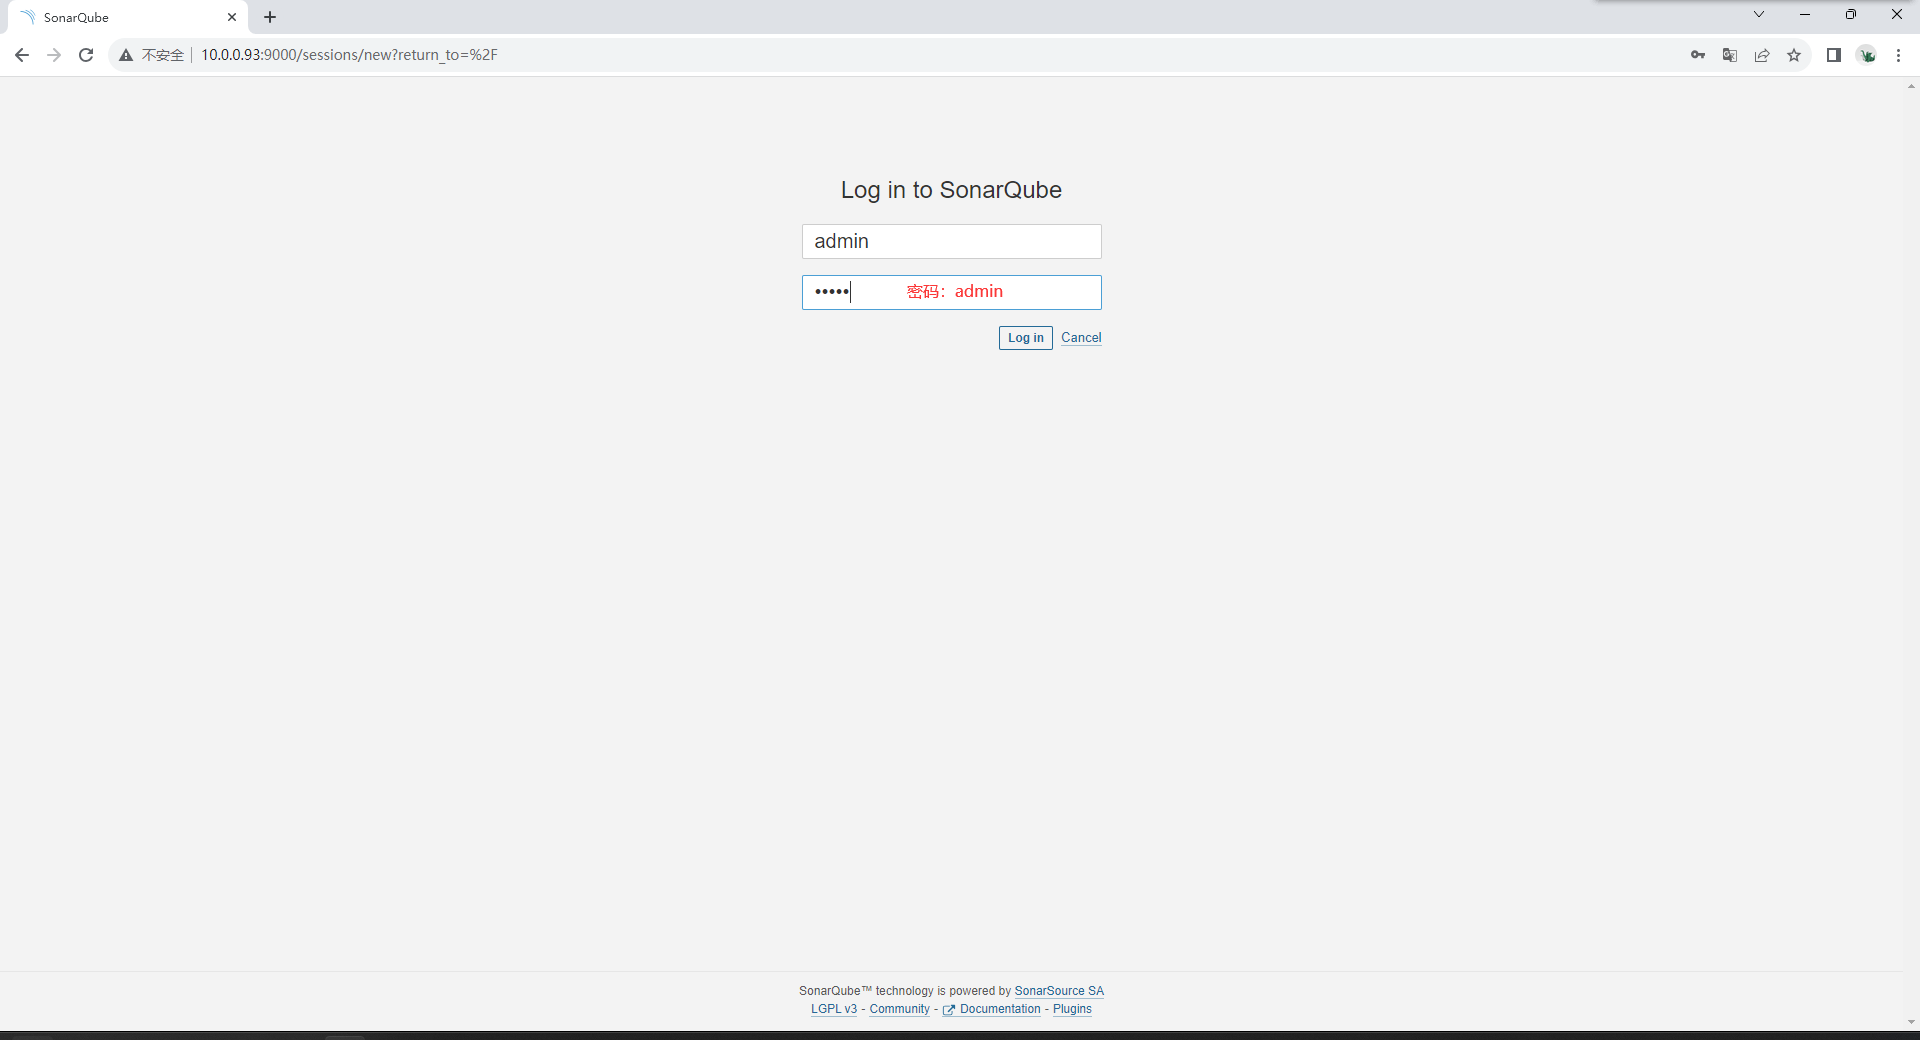

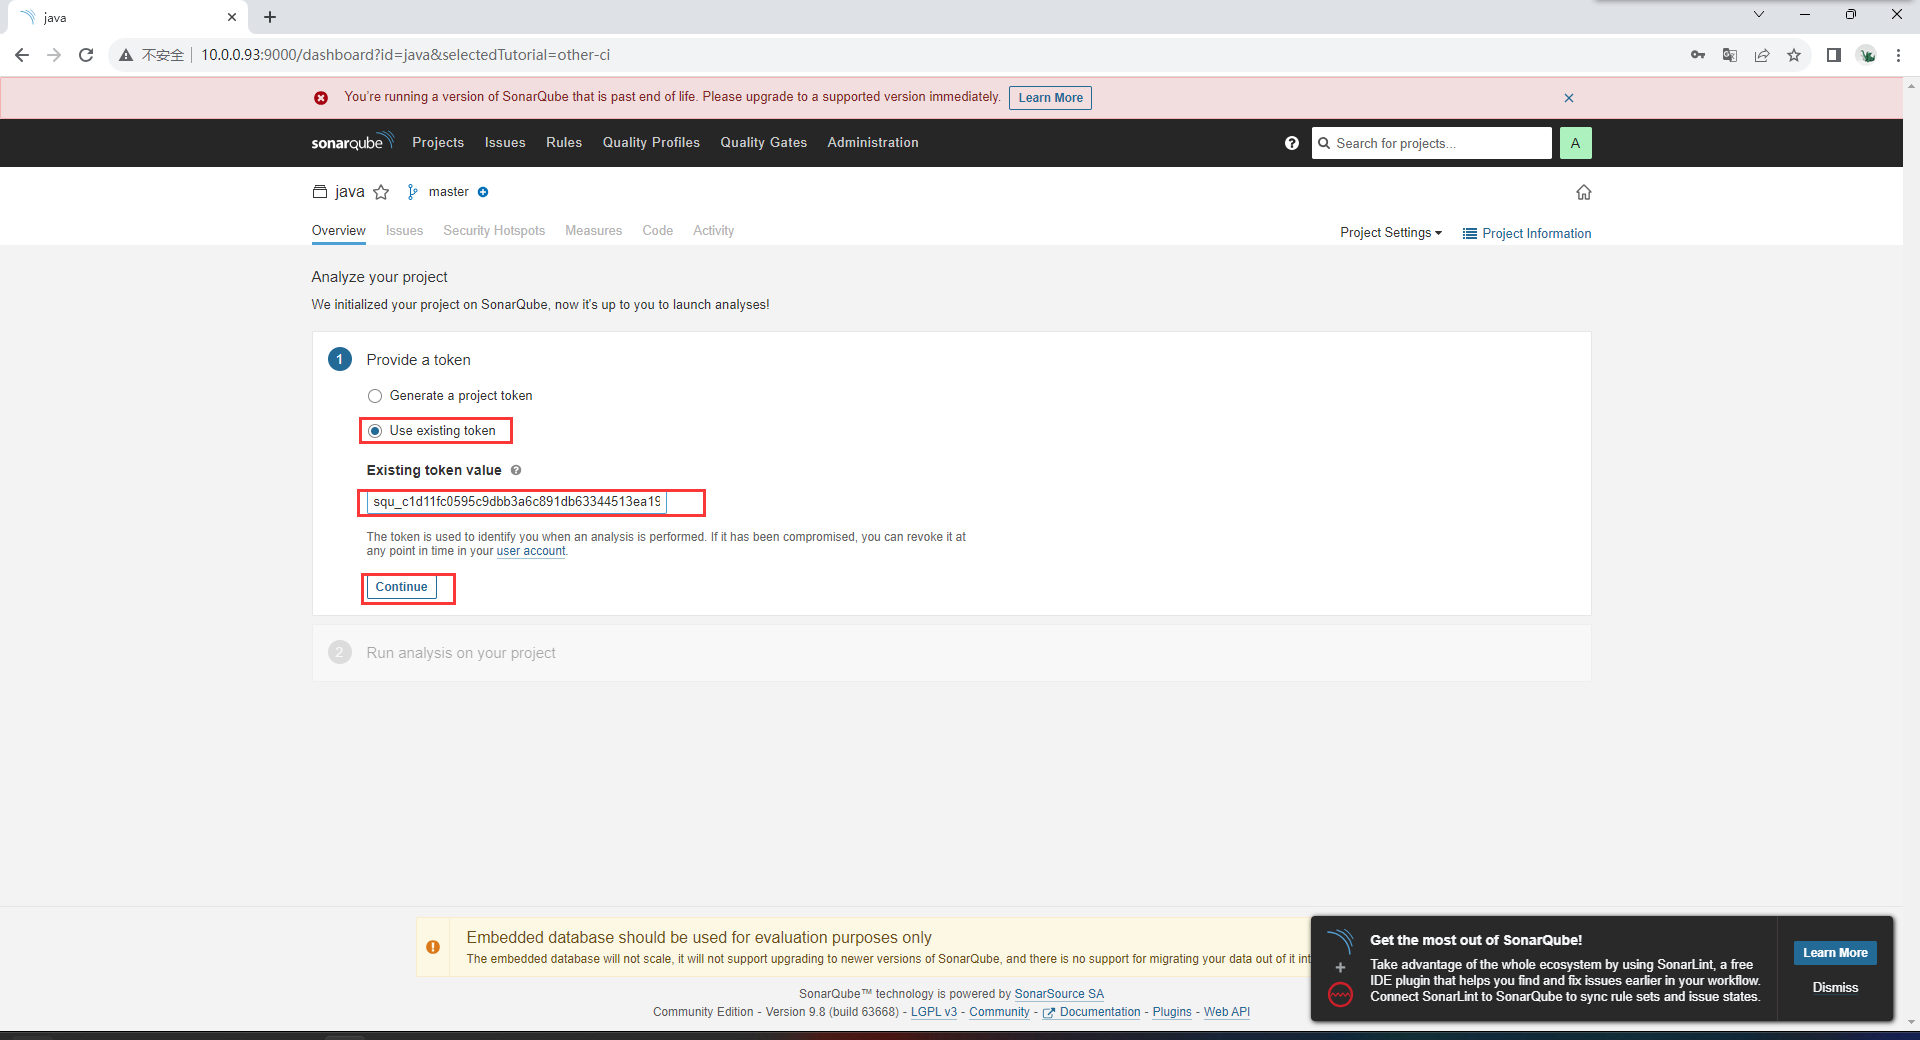
生成token
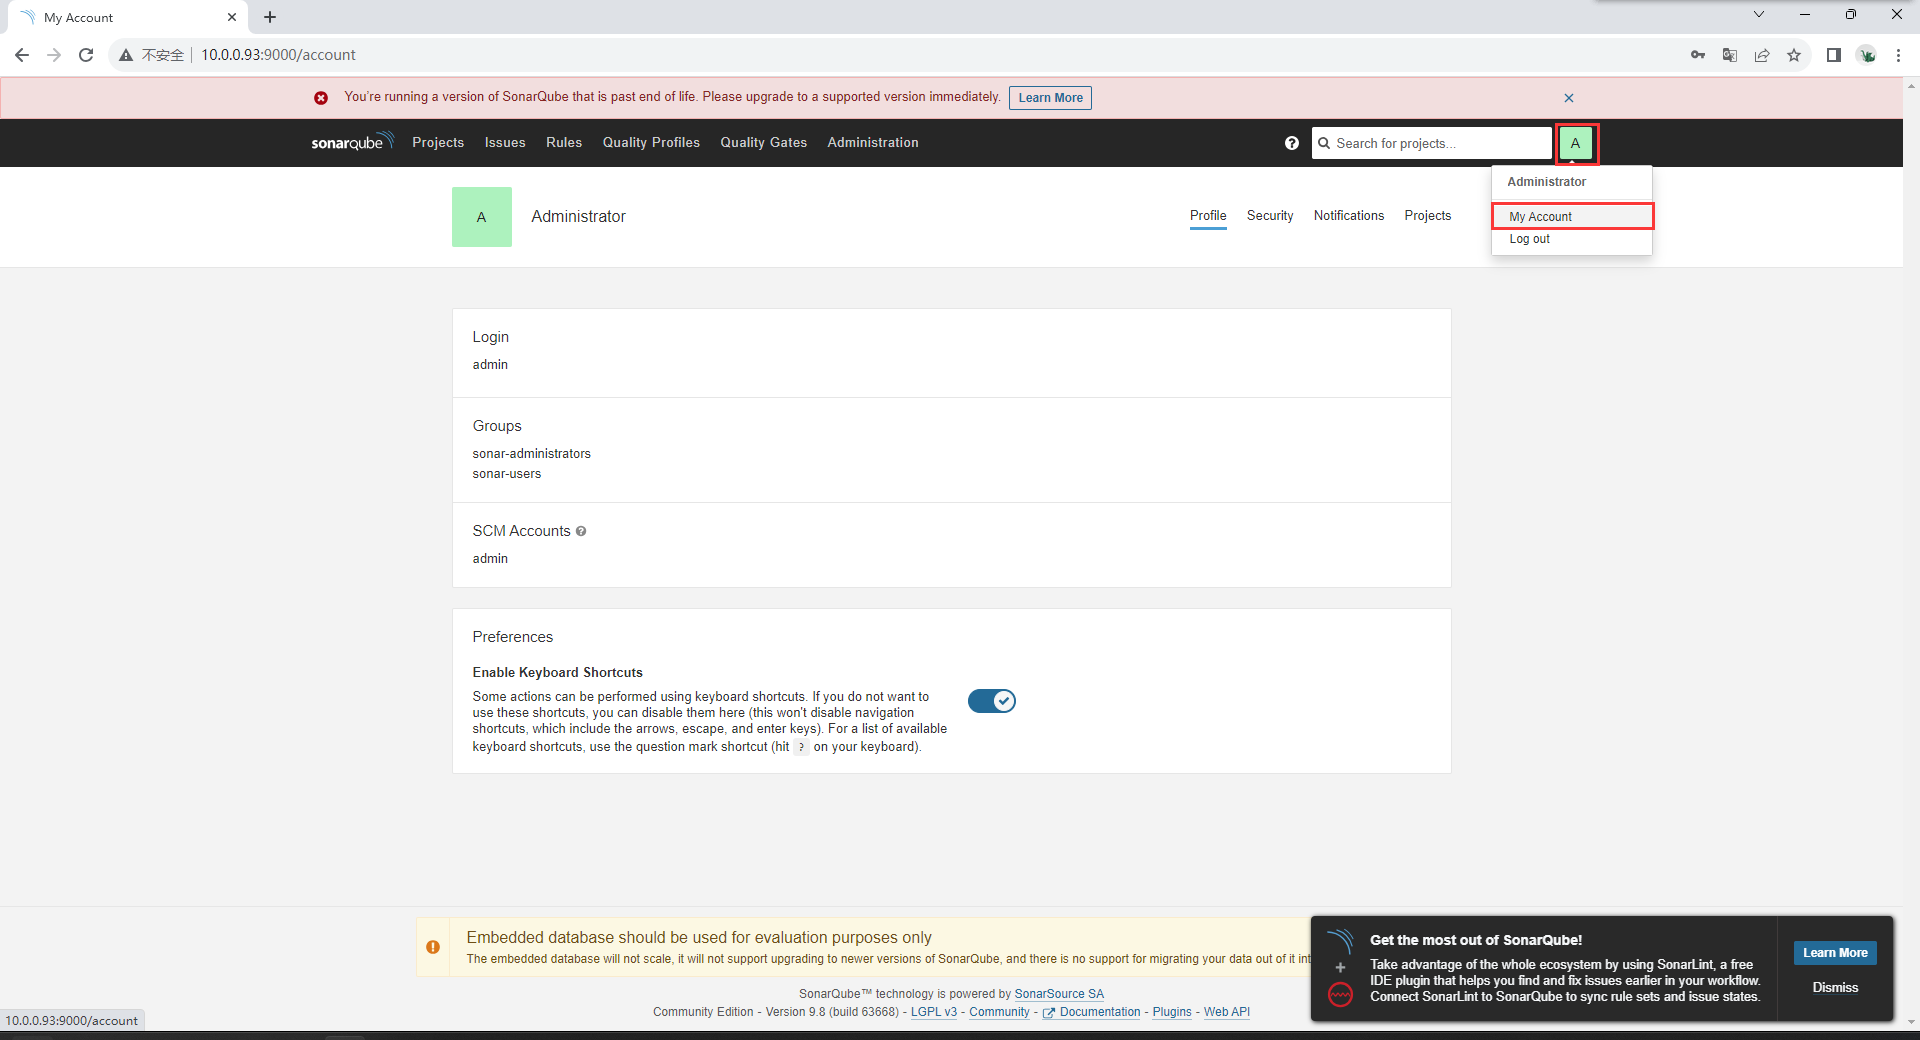
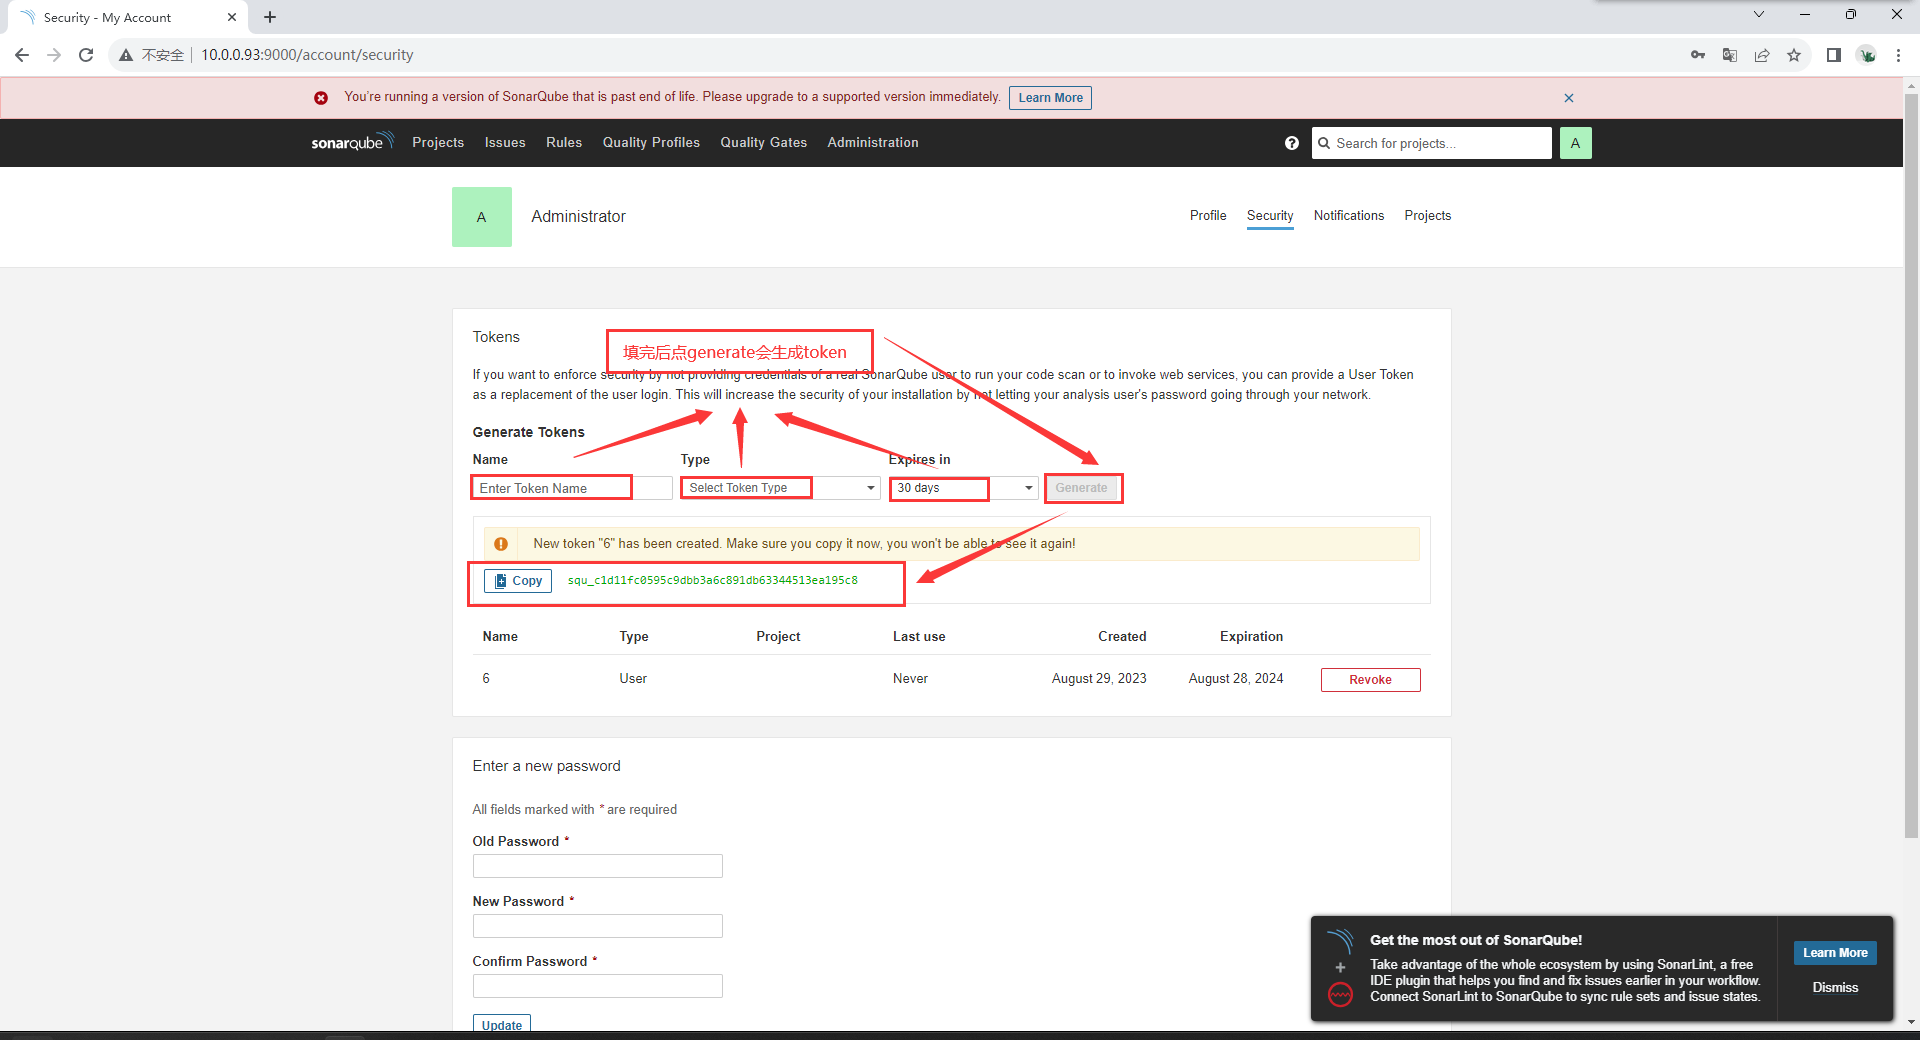
## token
squ_c1d11fc0595c9dbb3a6c891db63344513ea195c8
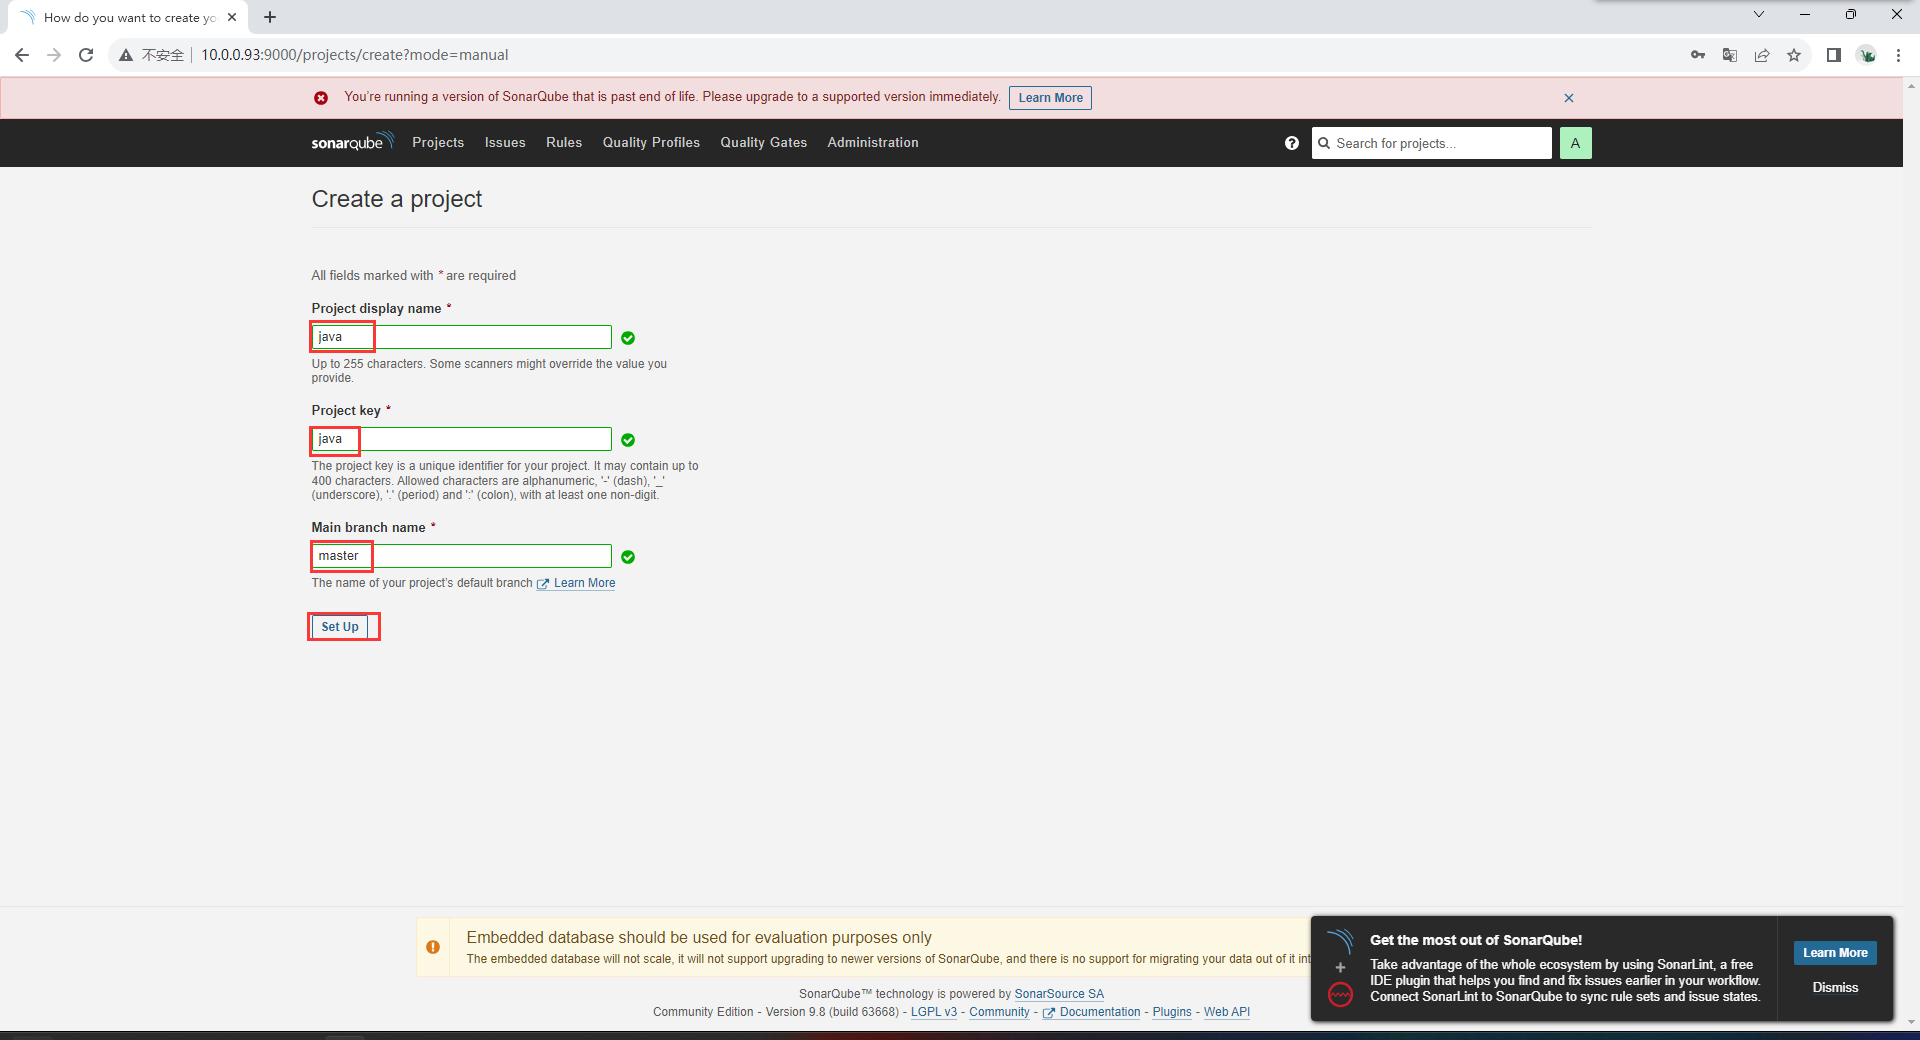
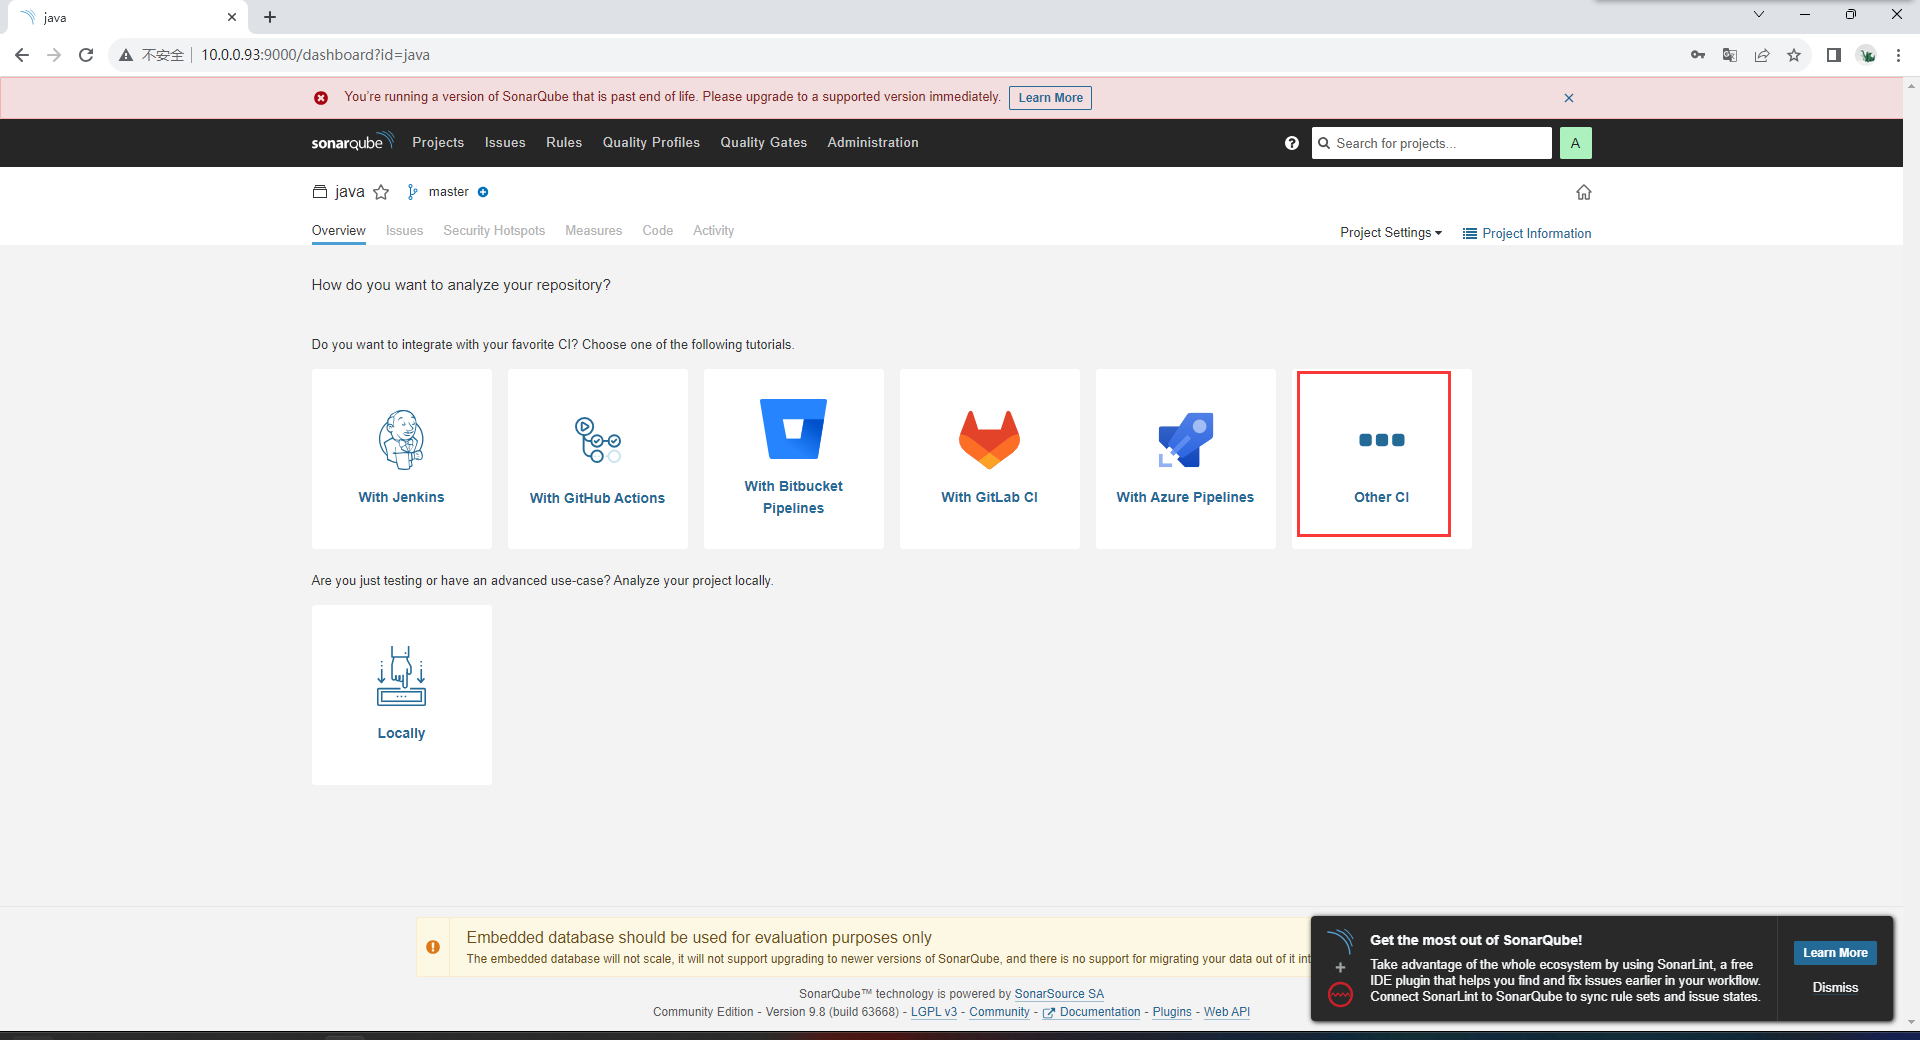
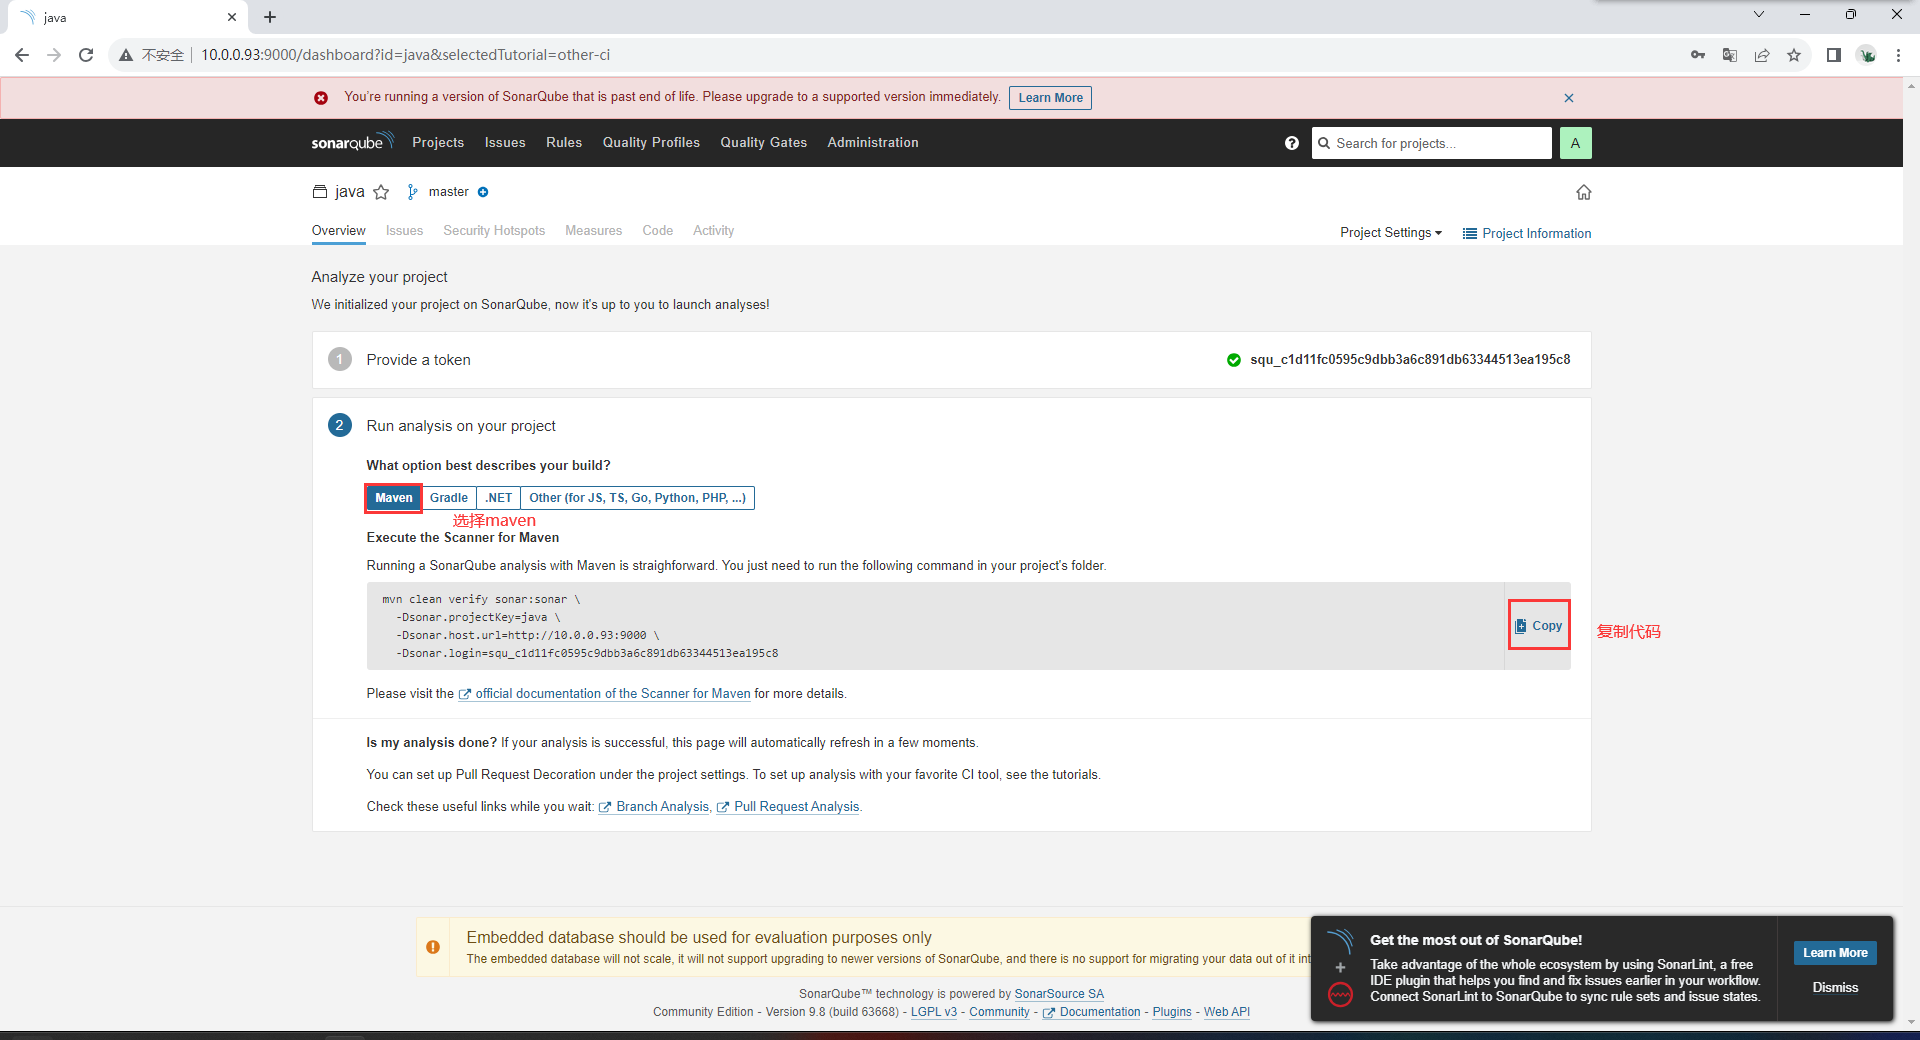
创建项目

- 测试sonar
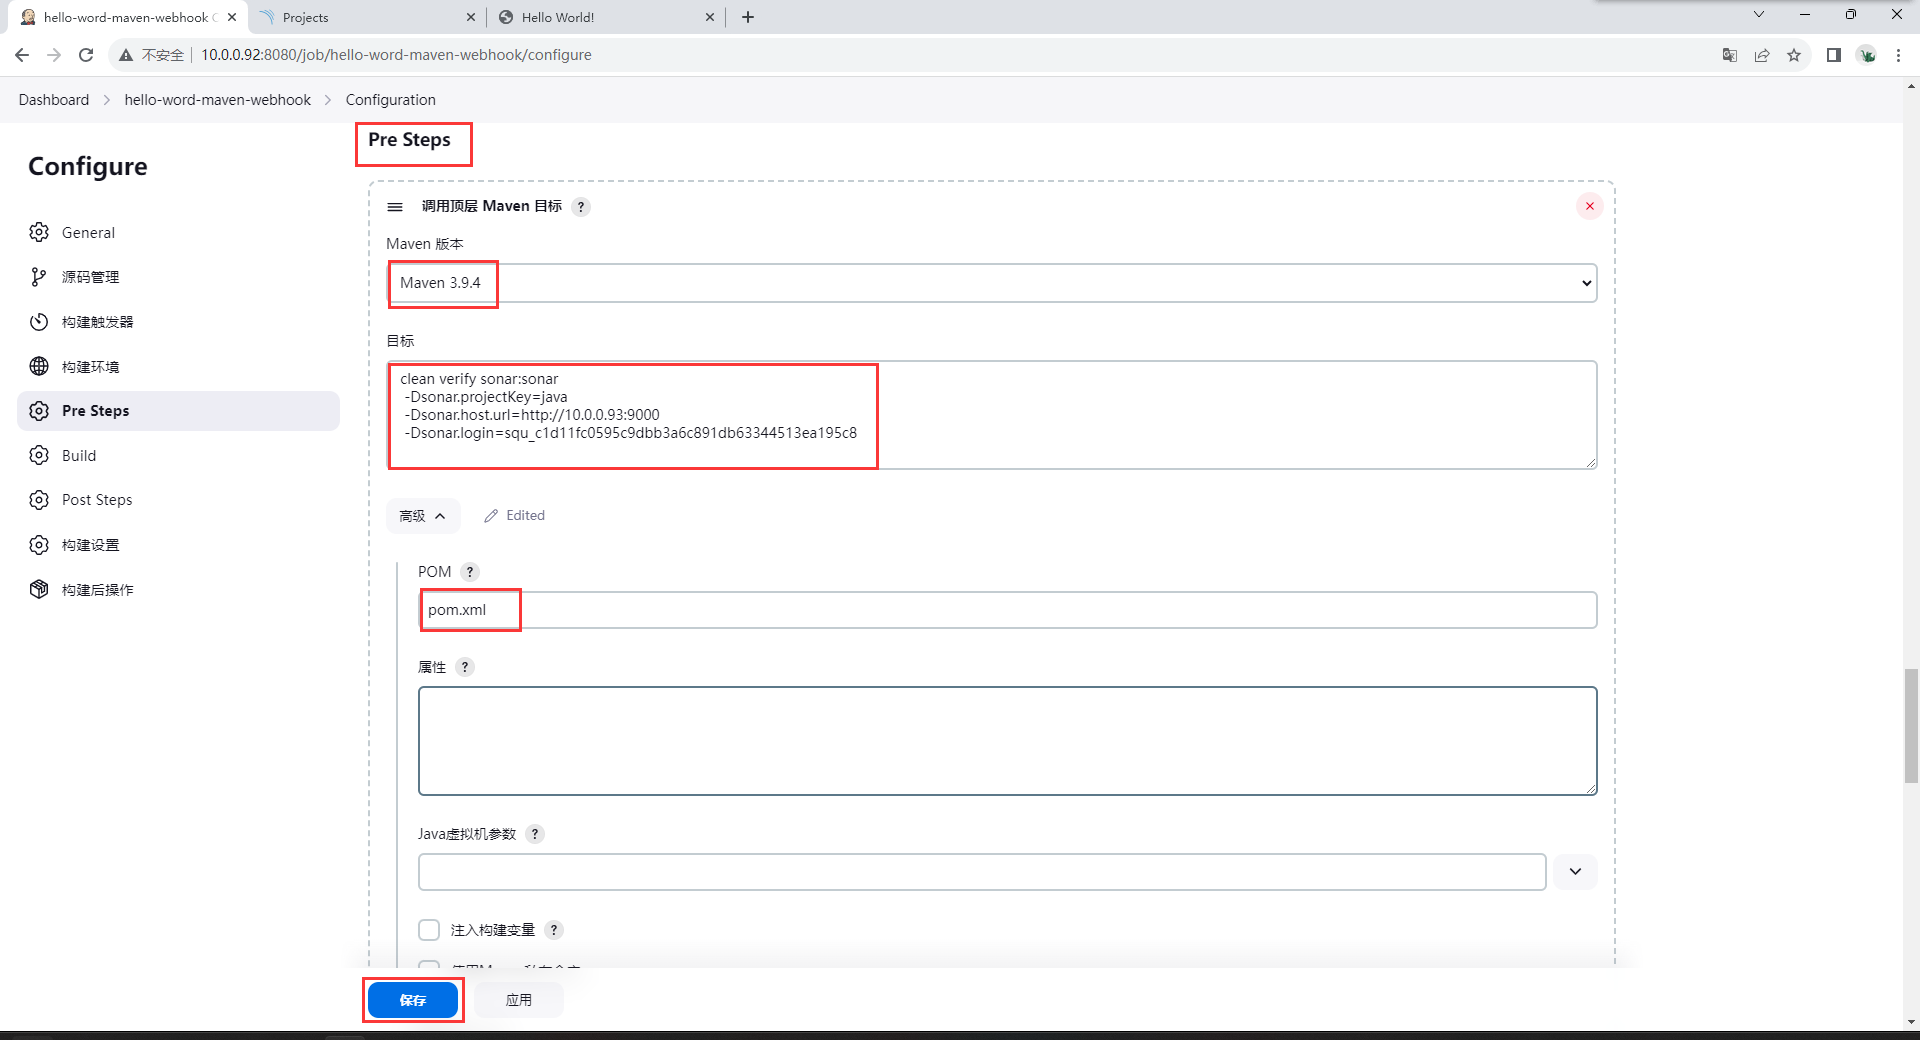
mvn clean verify sonar:sonar \
  -Dsonar.projectKey=java \
  -Dsonar.host.url=http://10.0.0.93:9000 \
  -Dsonar.login=squ_c1d11fc0595c9dbb3a6c891db63344513ea195c8

## 在jenkins工作目录执行
[root@jenkins hello-word-maven-webhook]# /var/lib/jenkins/workspace/hello-word-maven-webhook
[root@jenkins hello-word-maven-webhook]# mvn clean verify sonar:sonar \
>   -Dsonar.projectKey=java \
>   -Dsonar.host.url=http://10.0.0.93:9000 \
>   -Dsonar.login=squ_c1d11fc0595c9dbb3a6c891db63344513ea195c8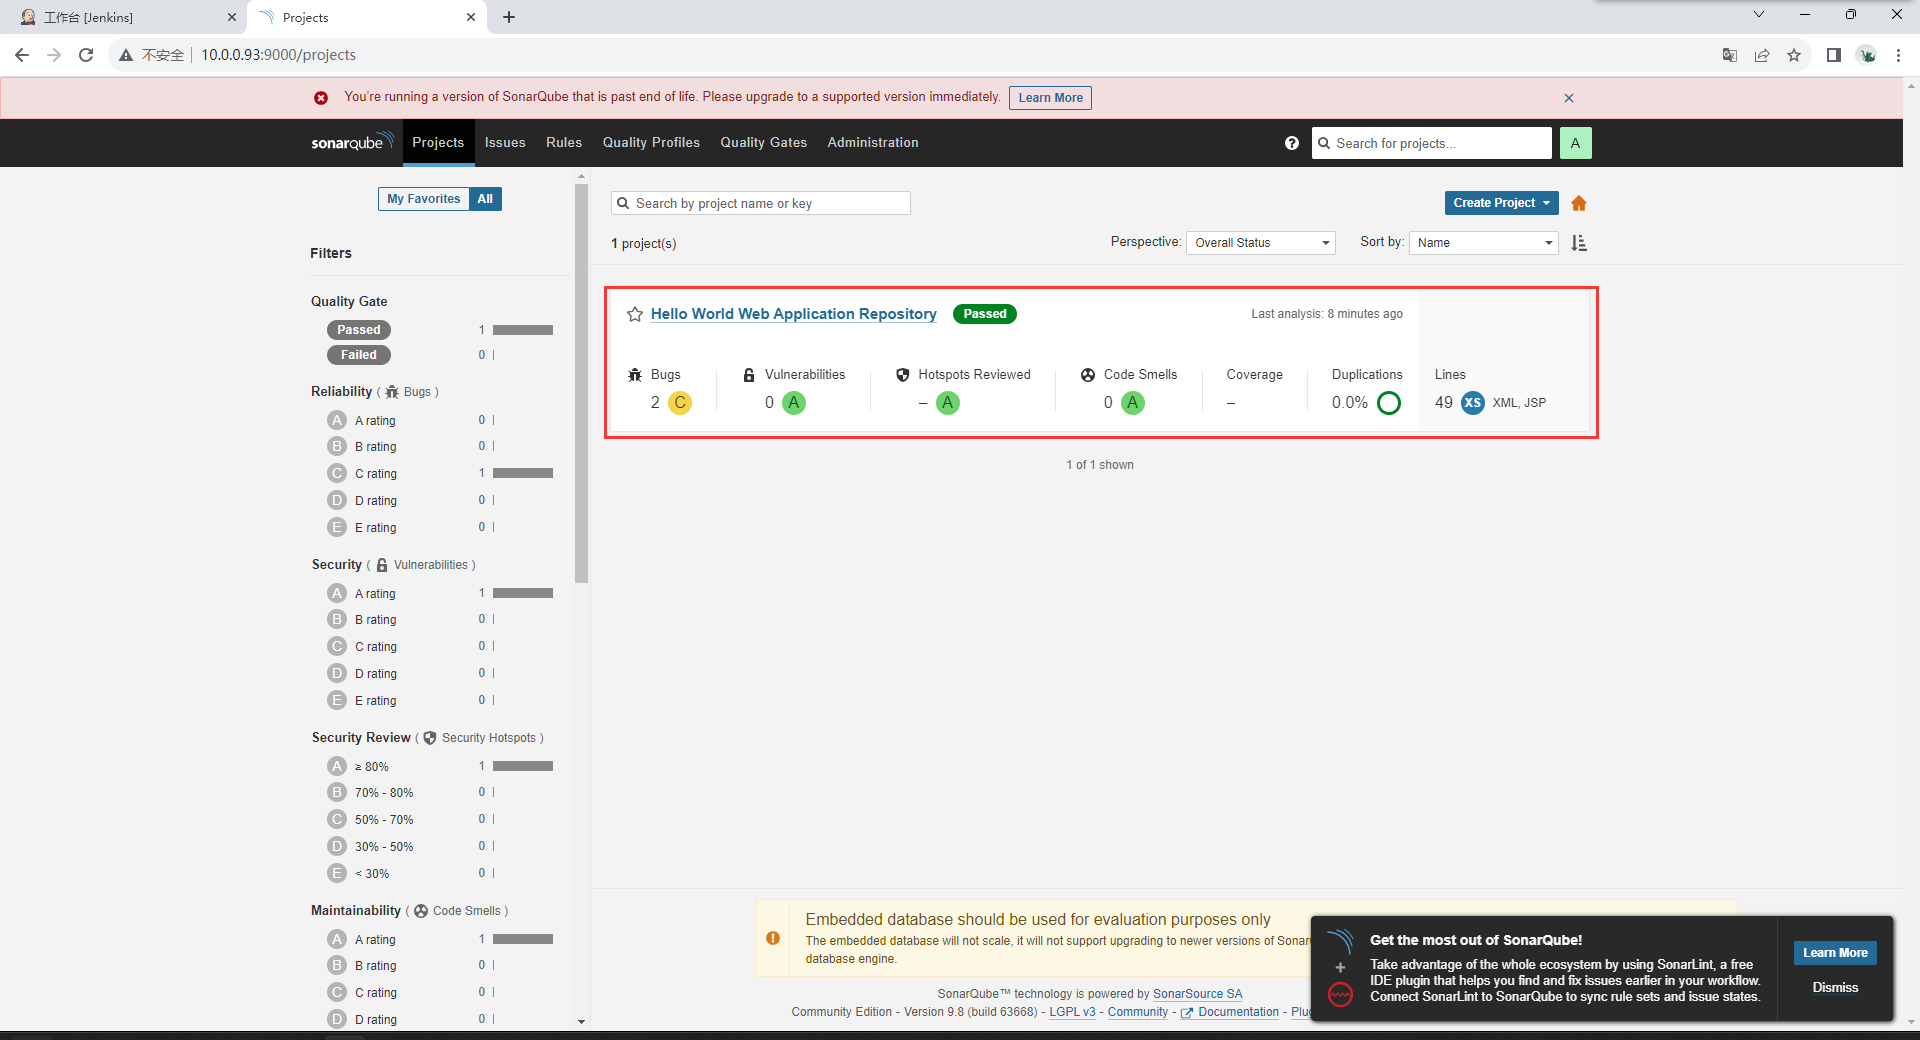
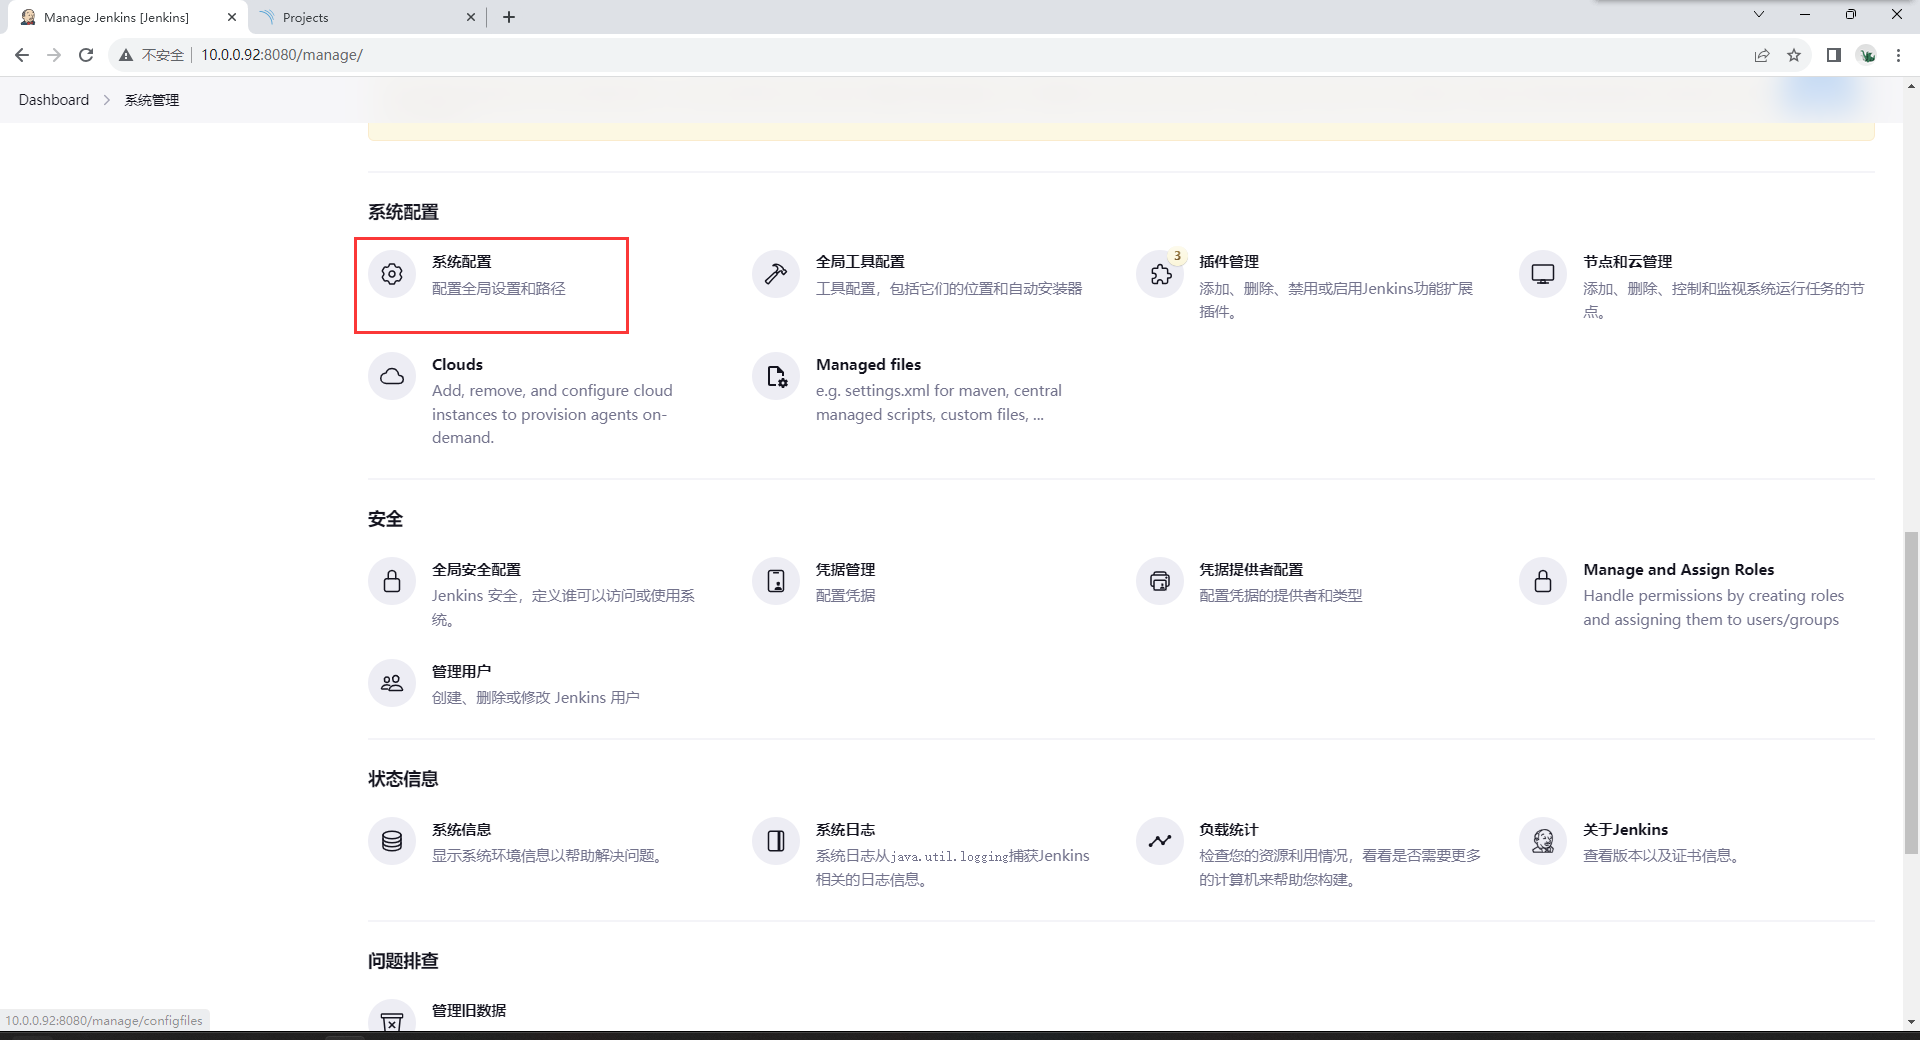
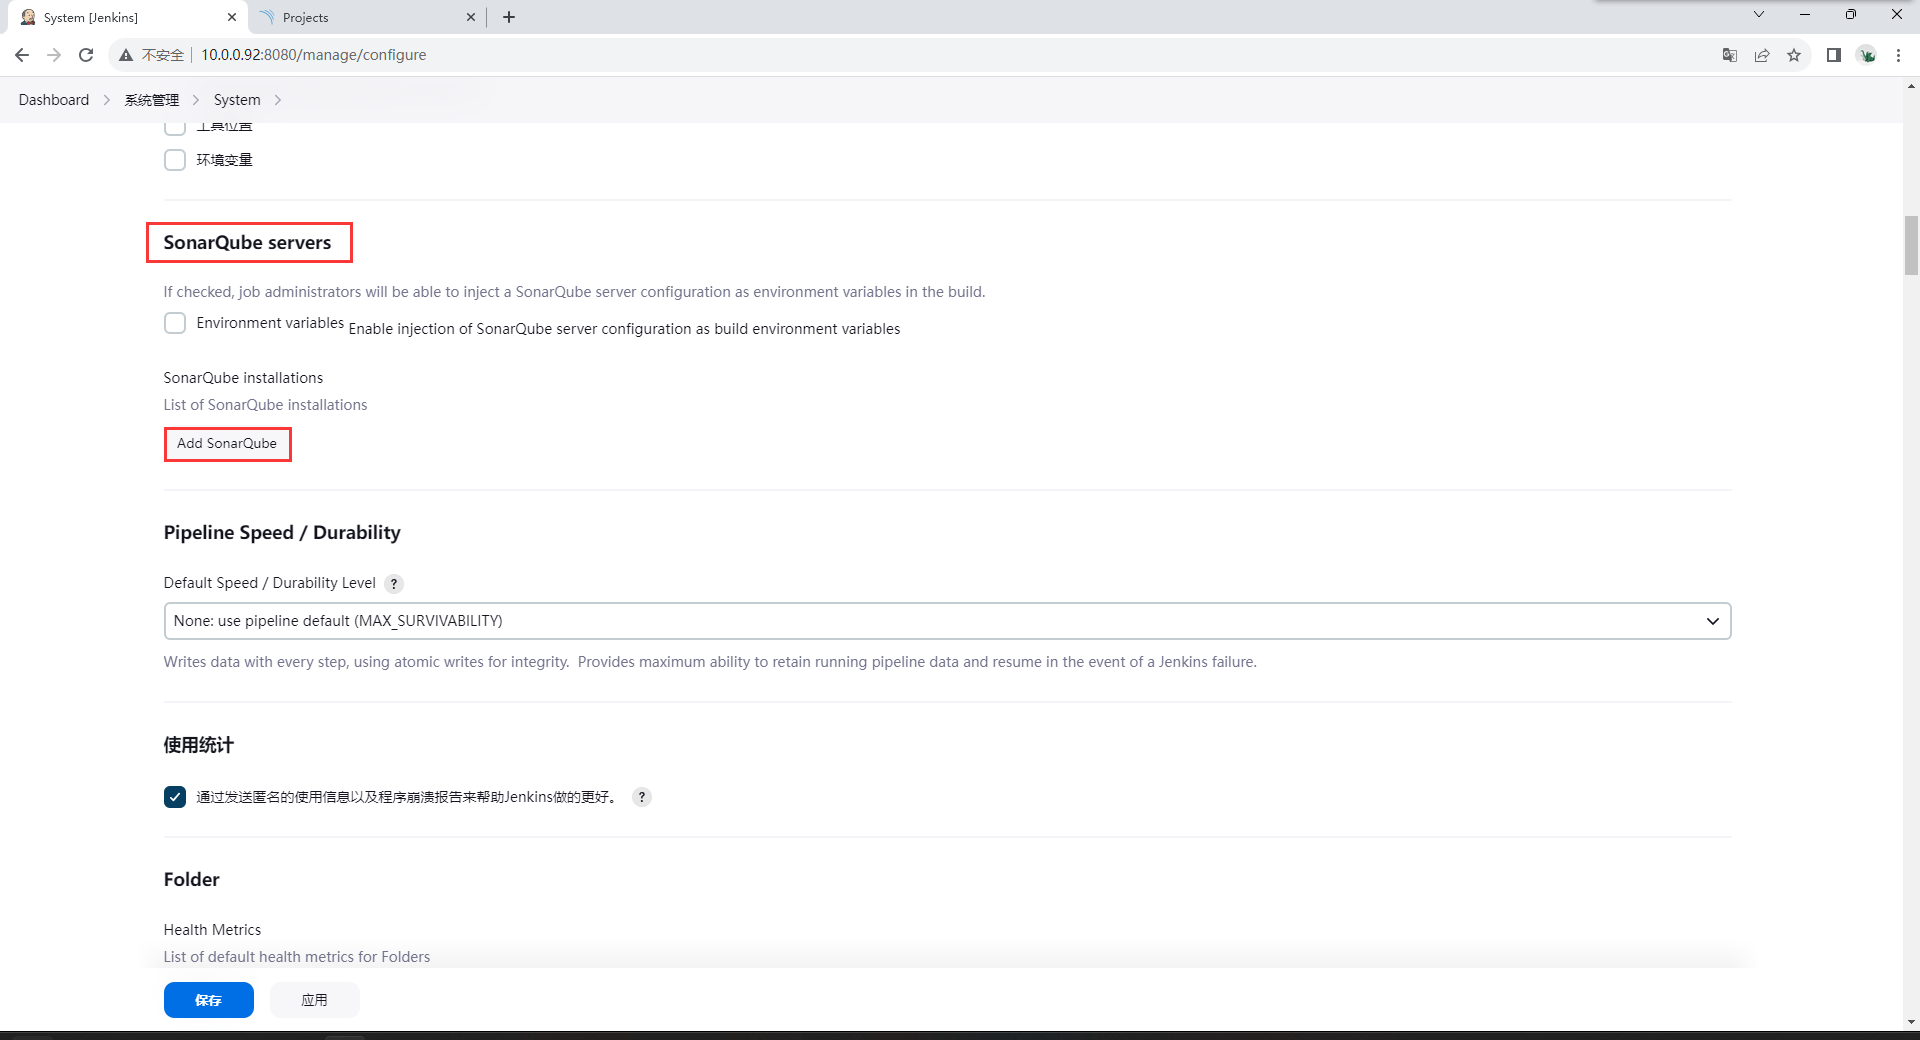
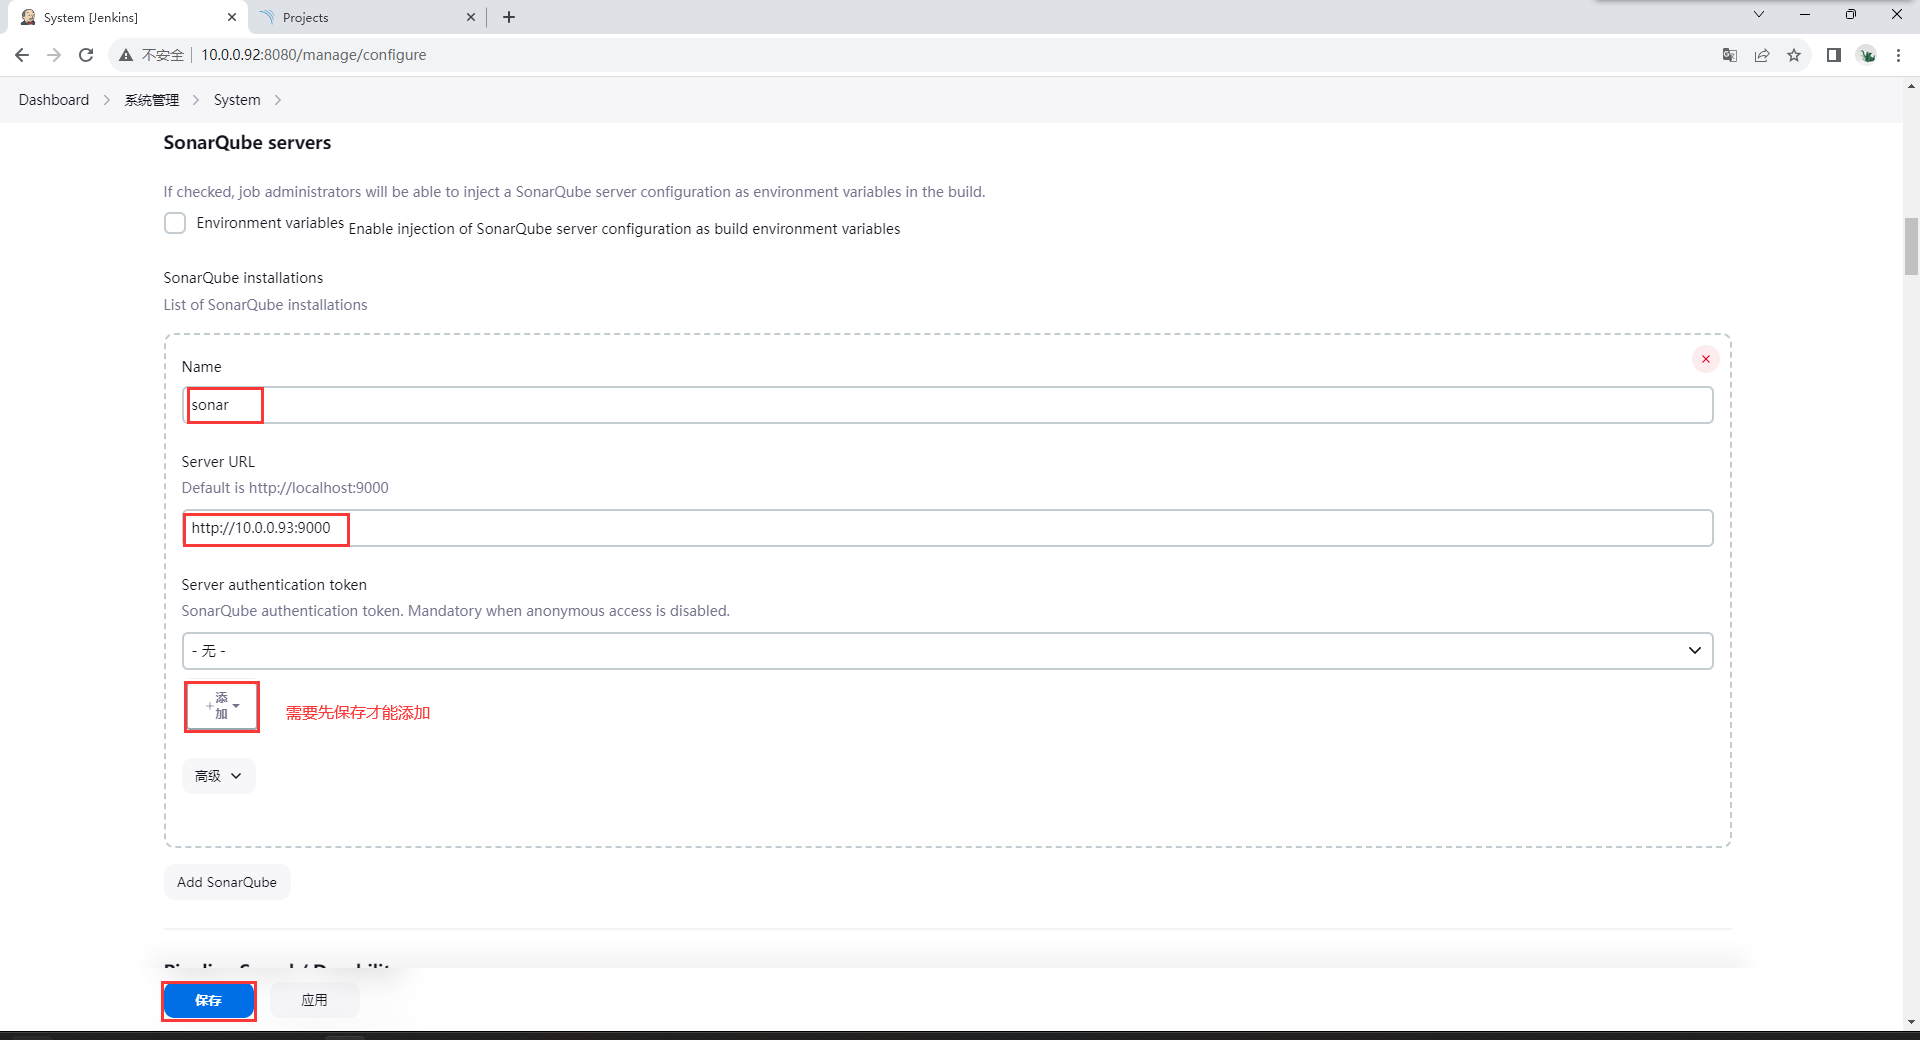
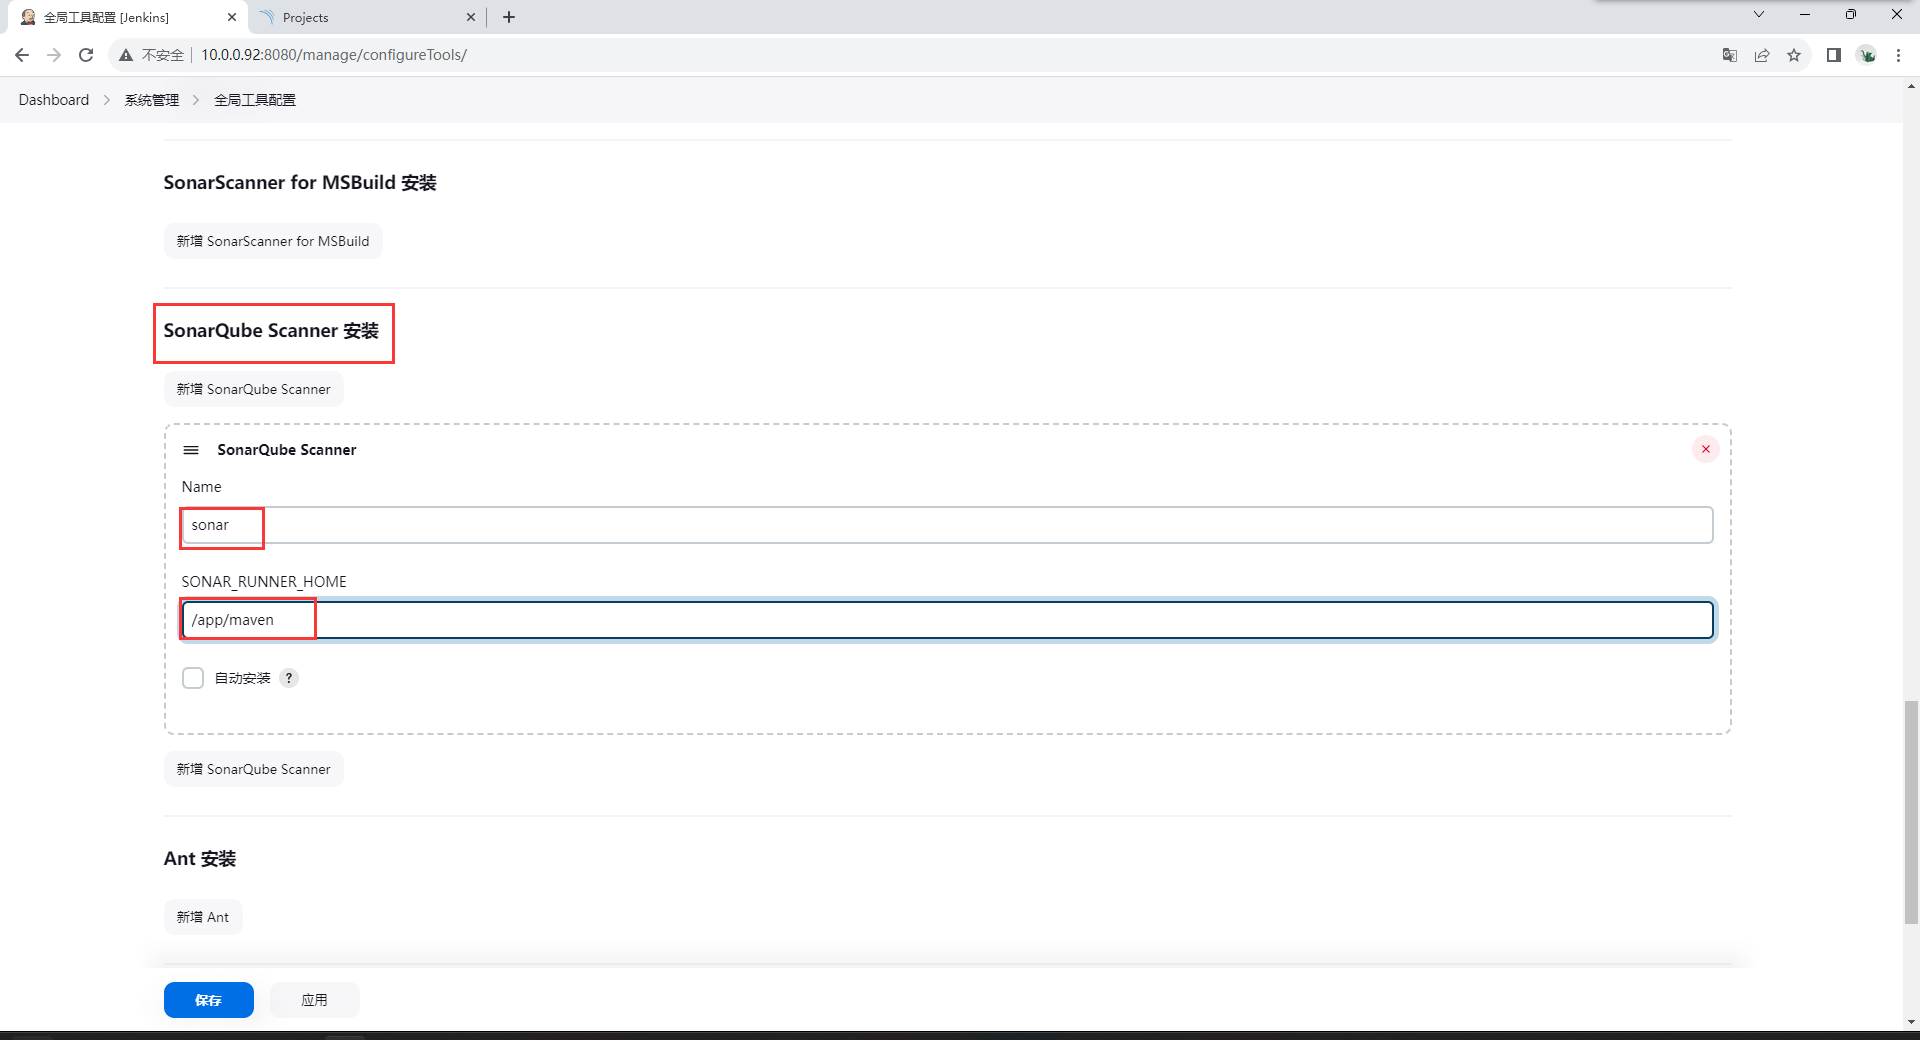
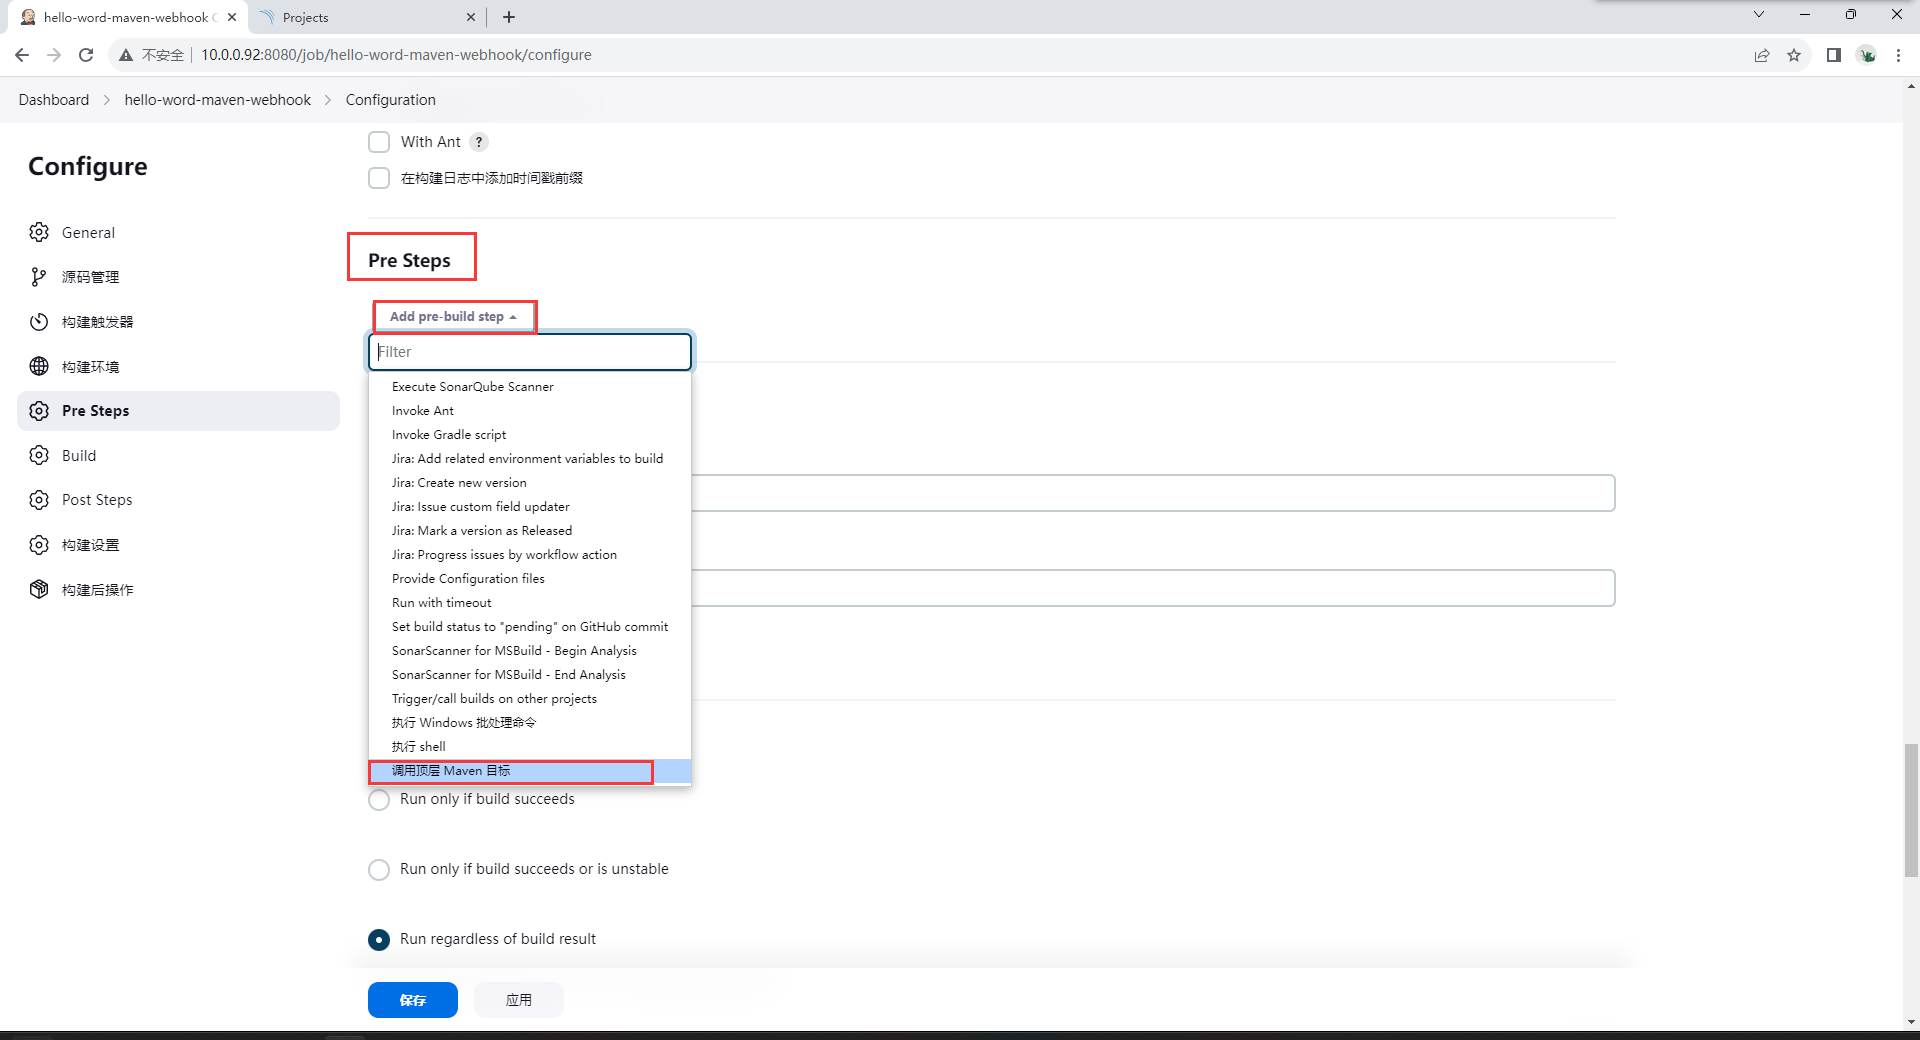
将sonar集成到jenkins
- 配置sonar server
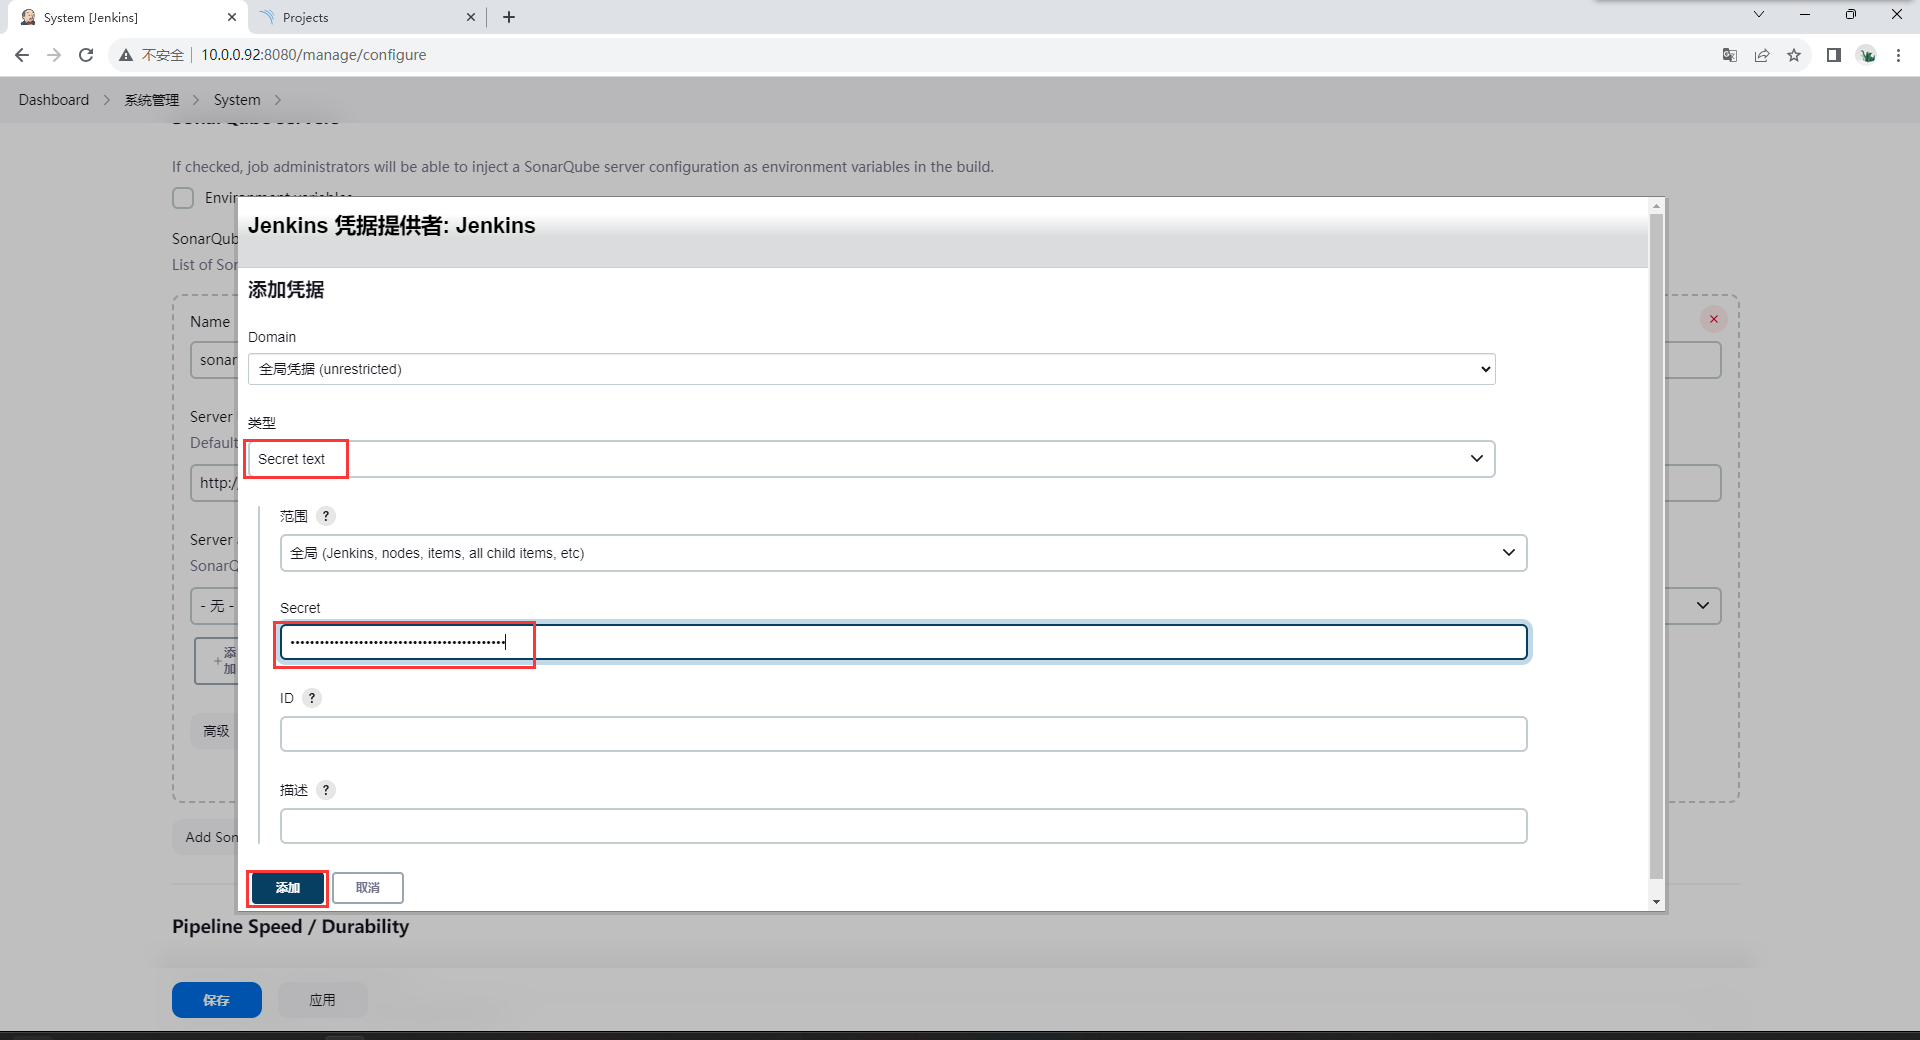
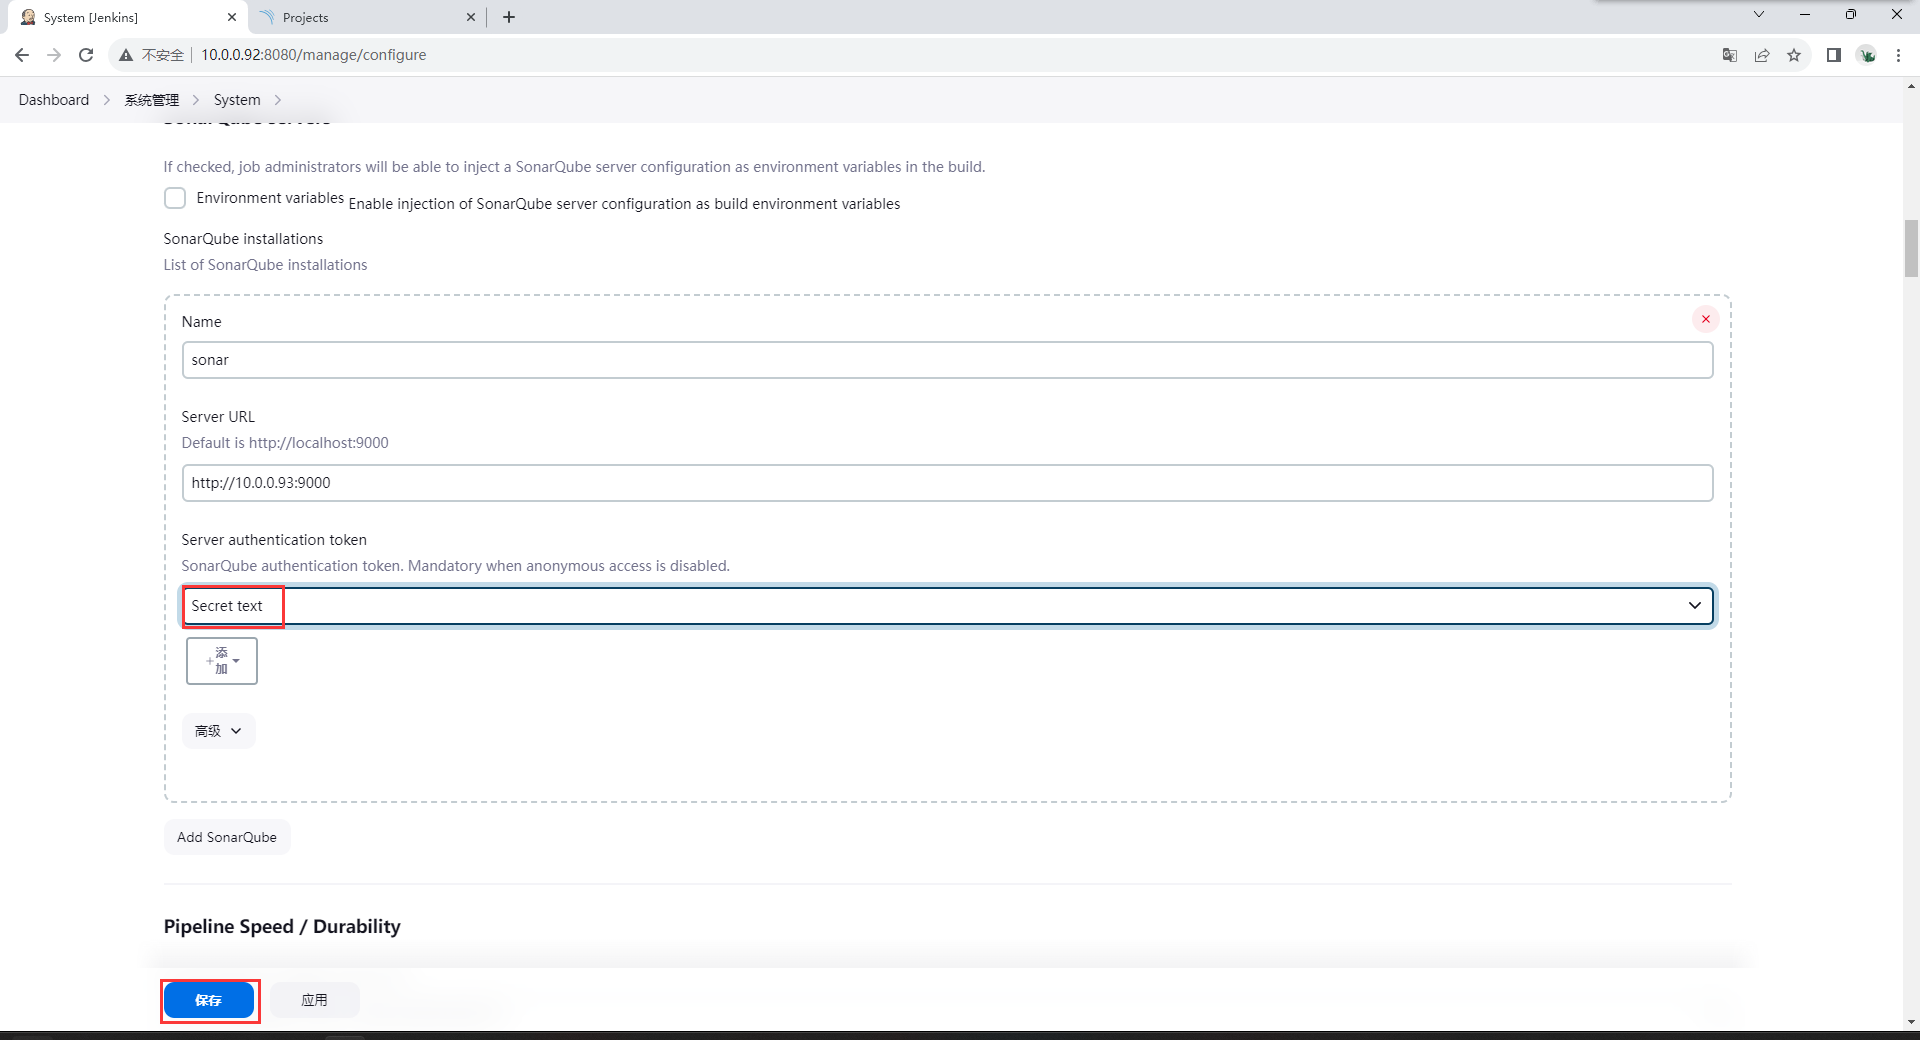
- 配置sonar scanner
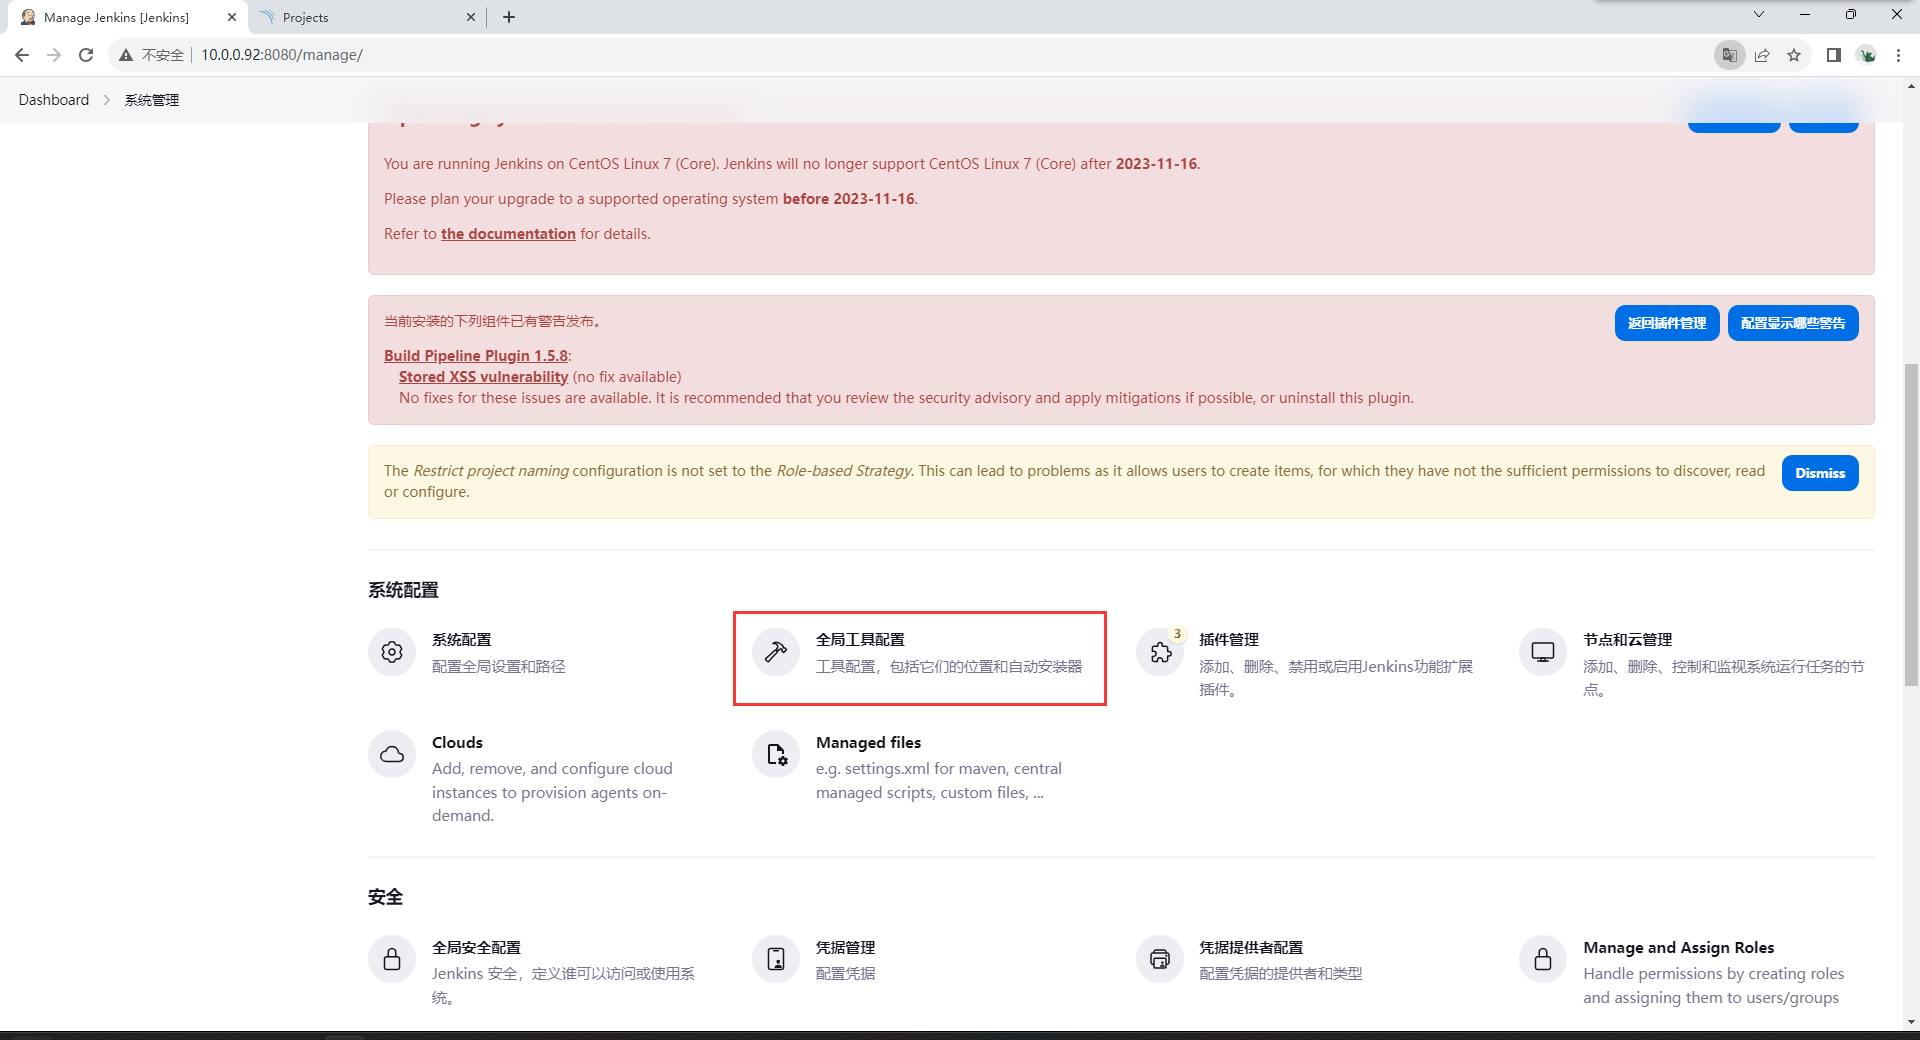
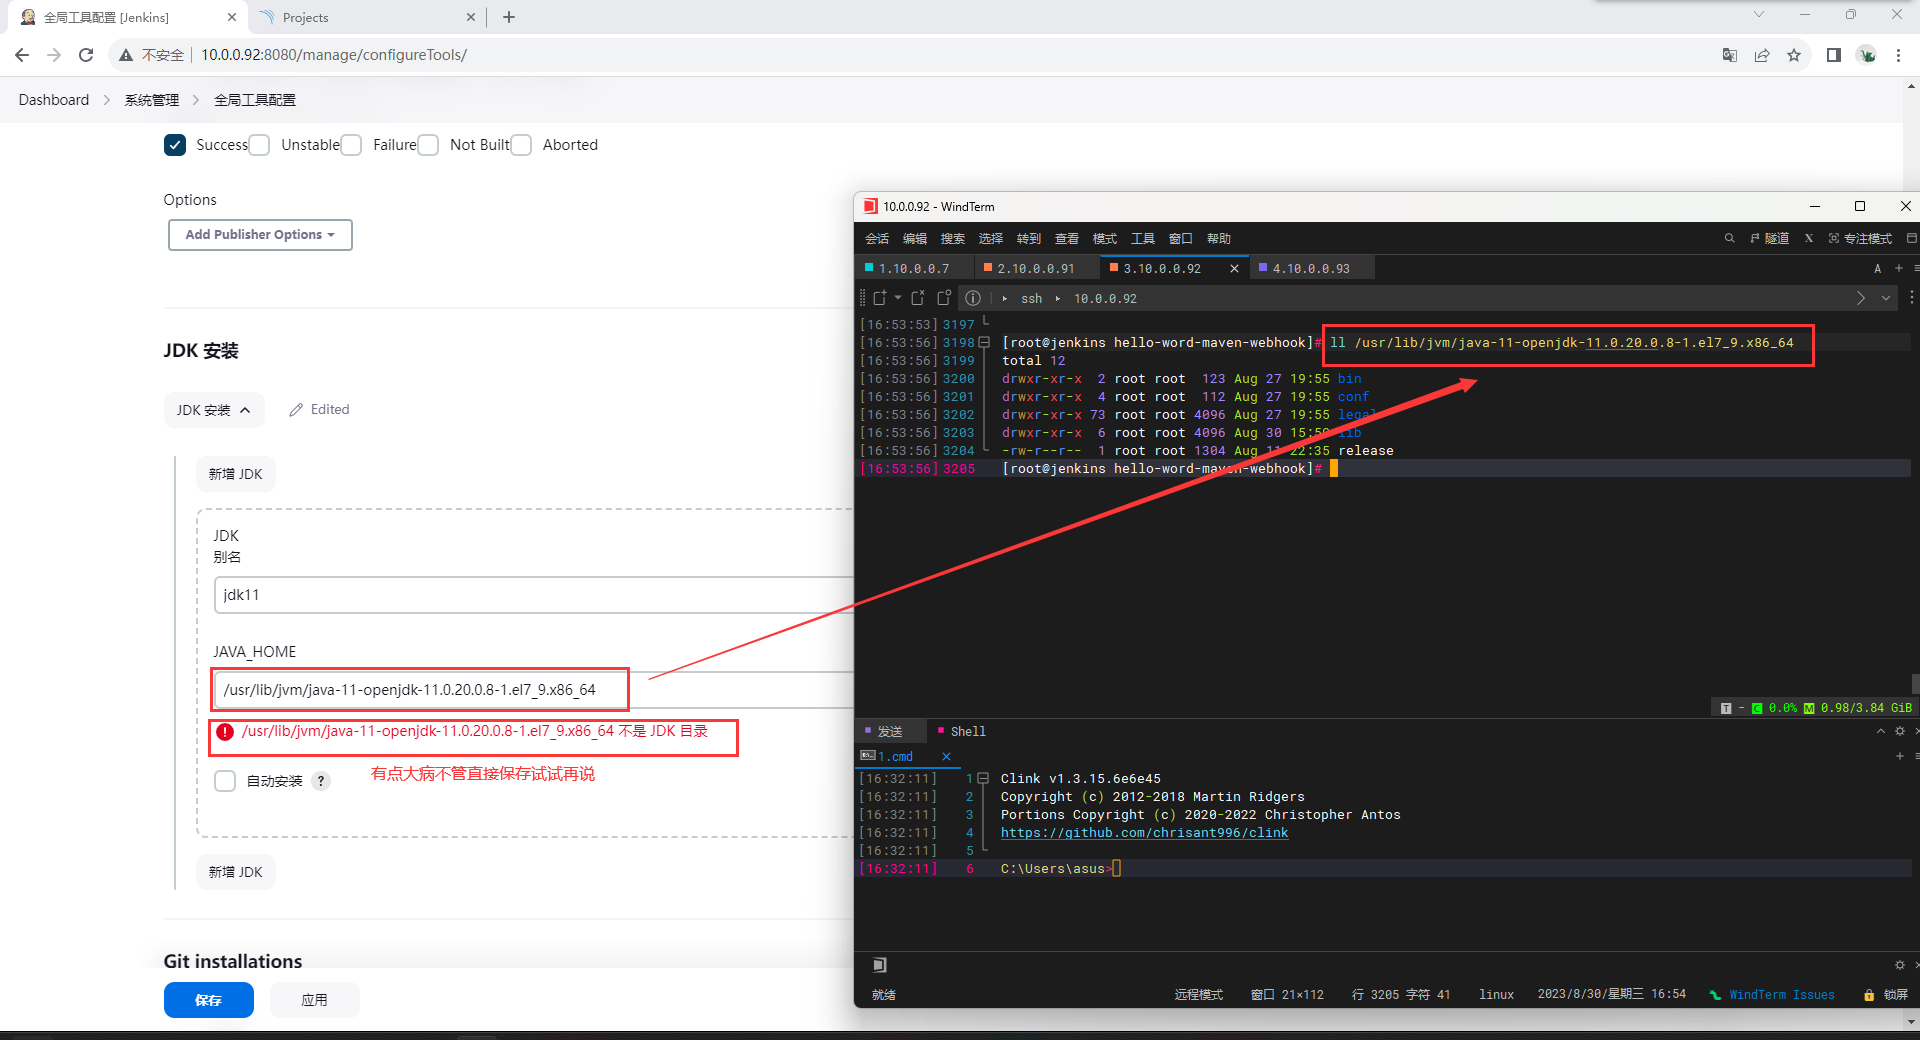
系统管理 -> 全局工具配置 -> SonarQube Scanner 安装
- 配置项目
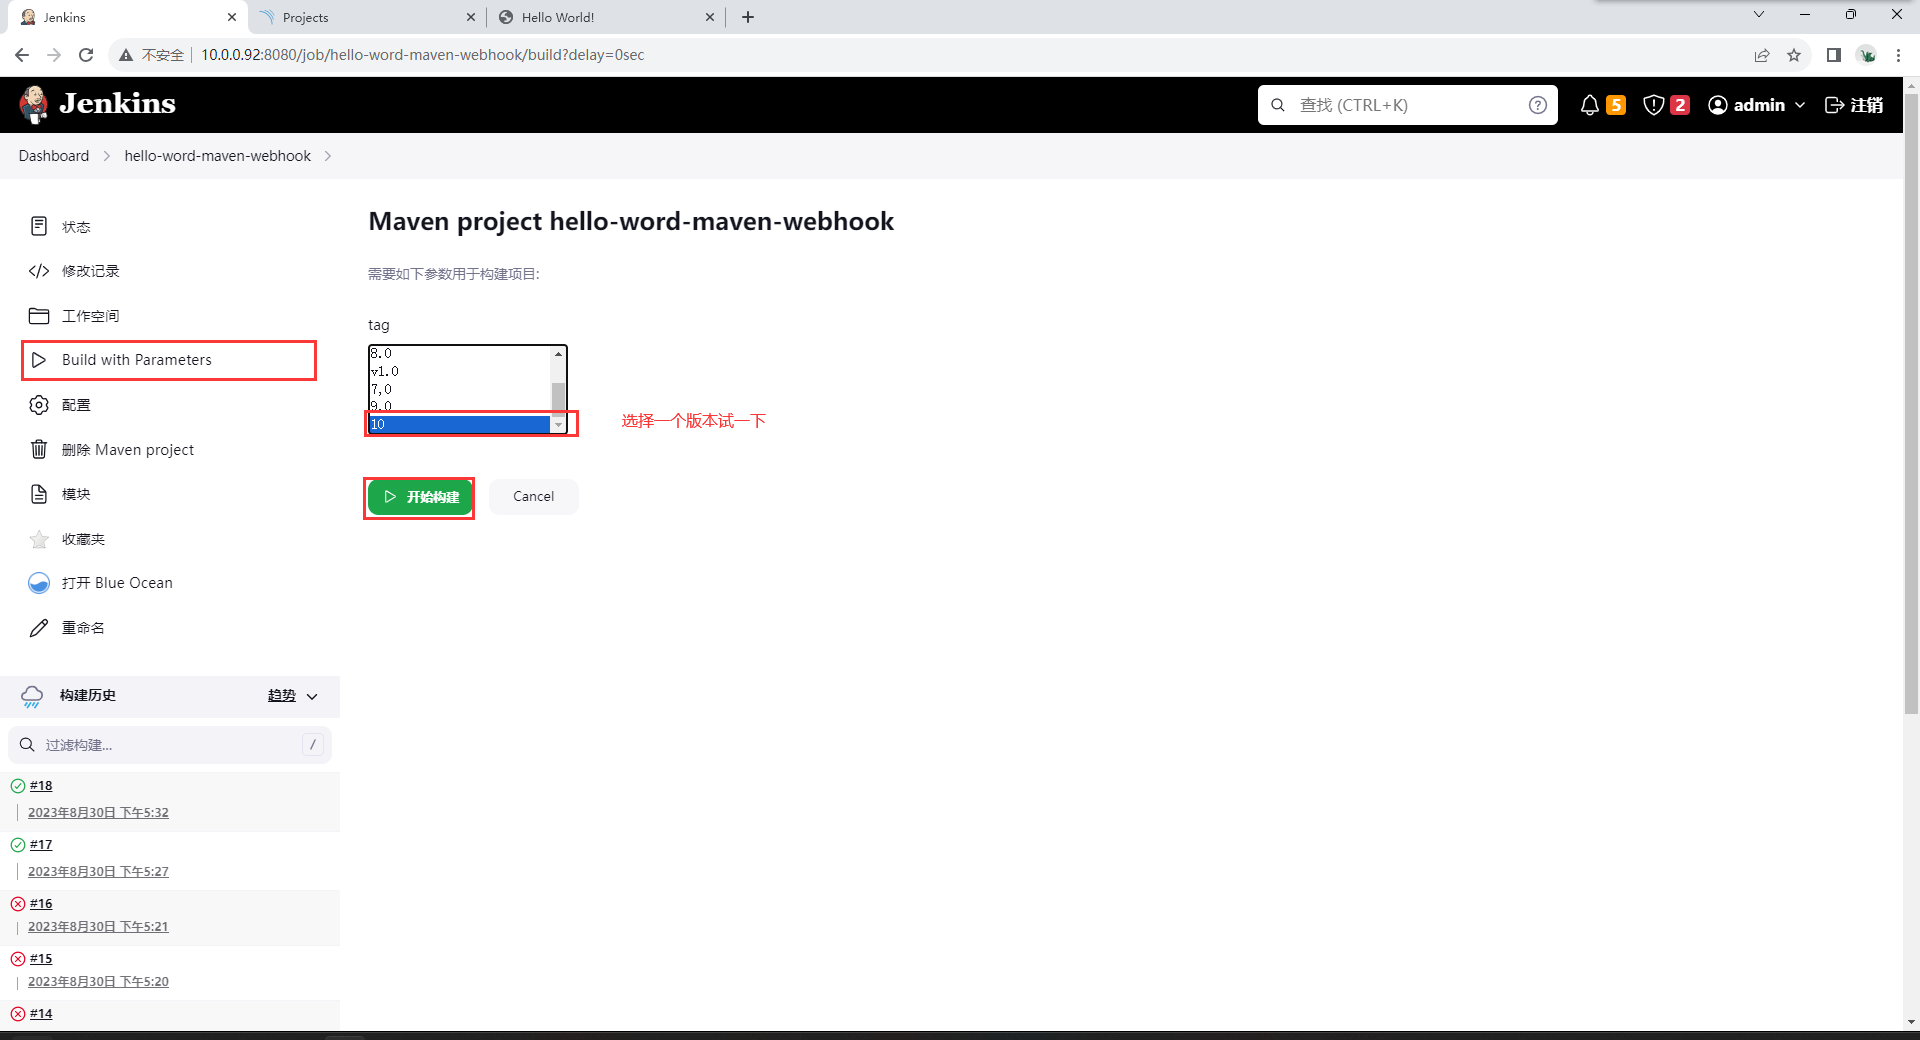
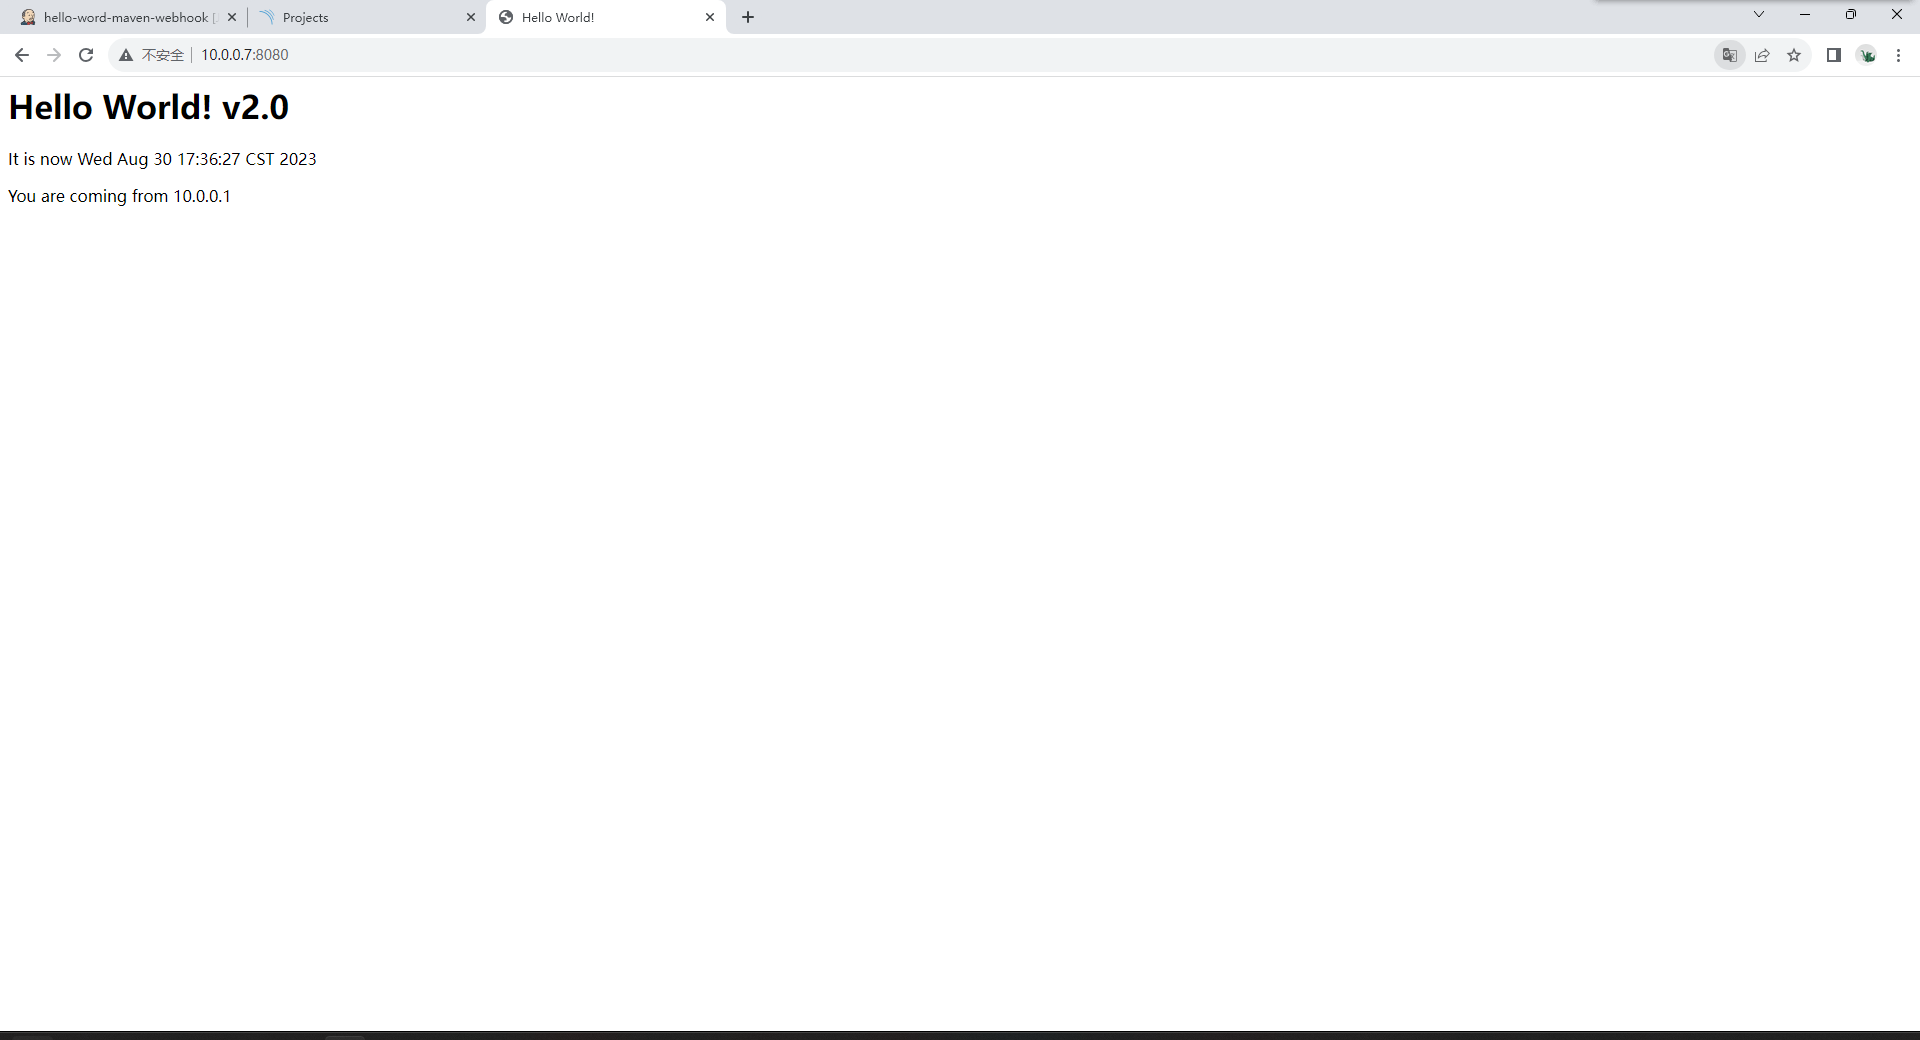
- 当前版本
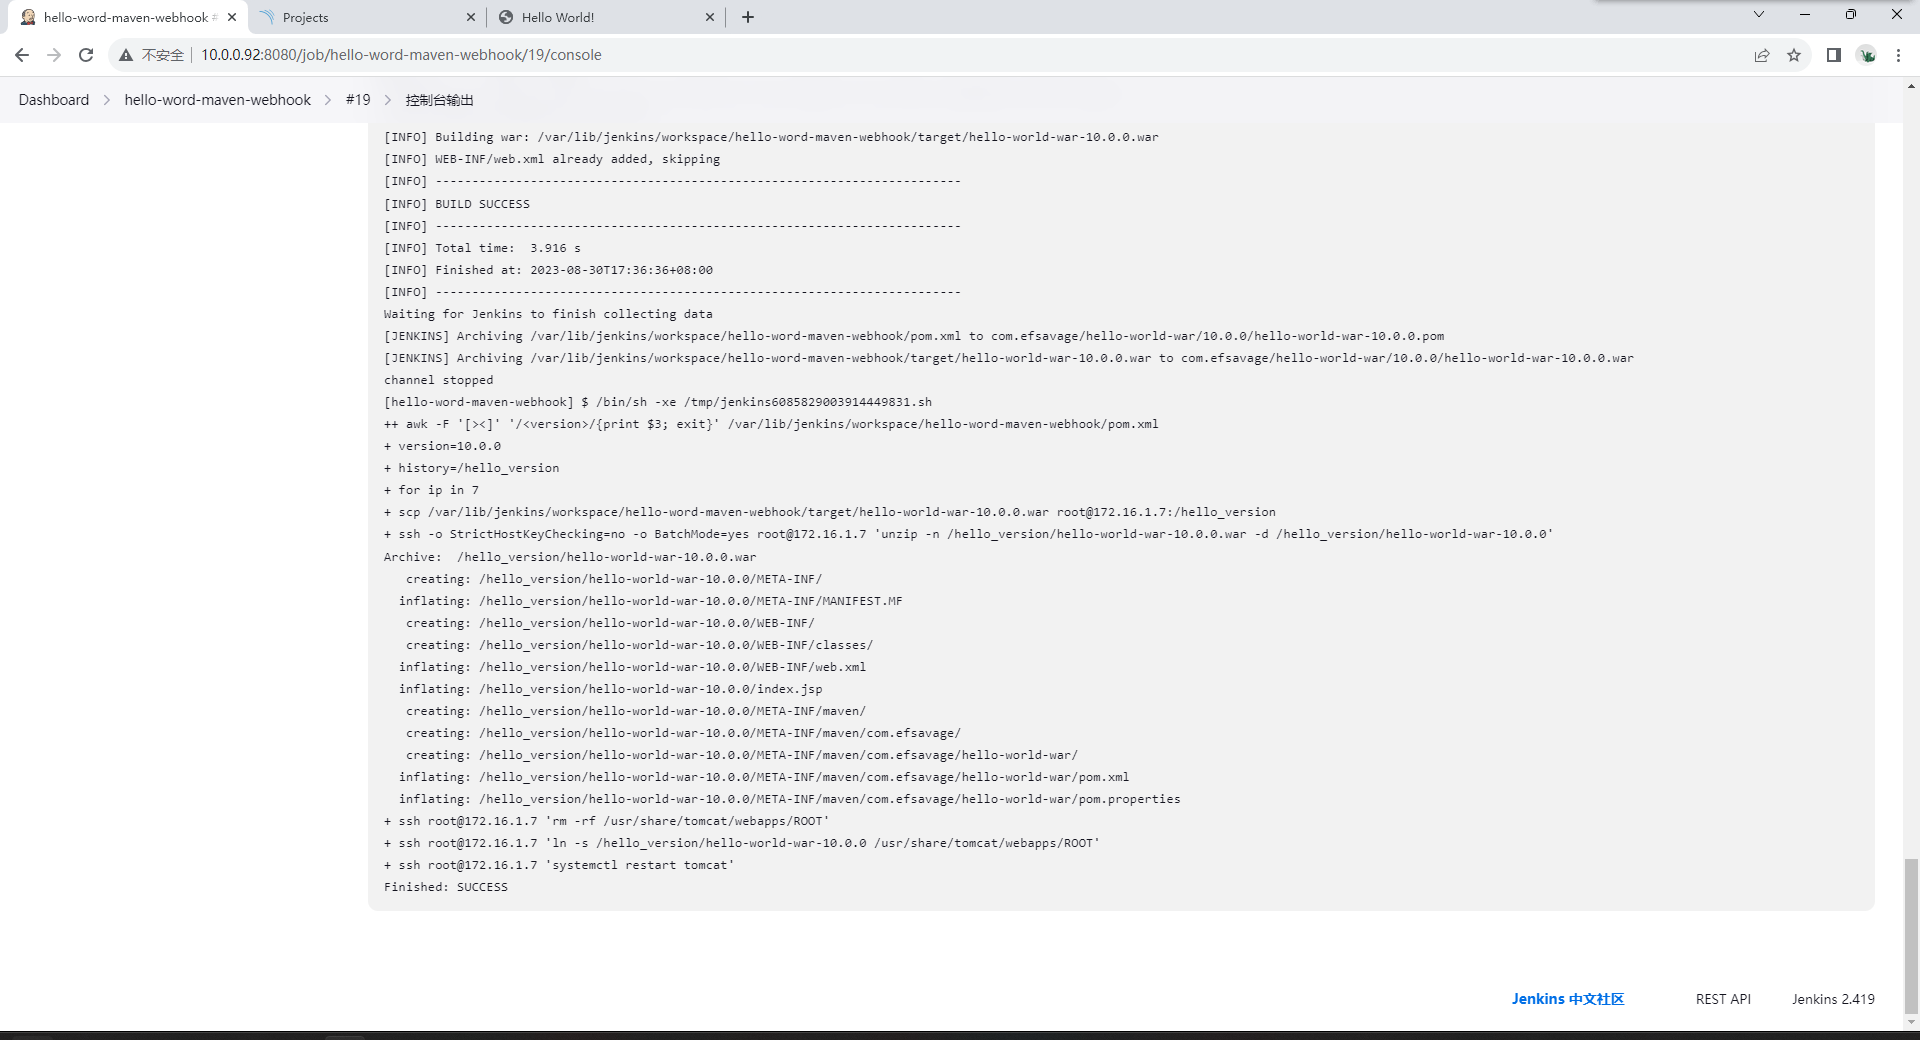
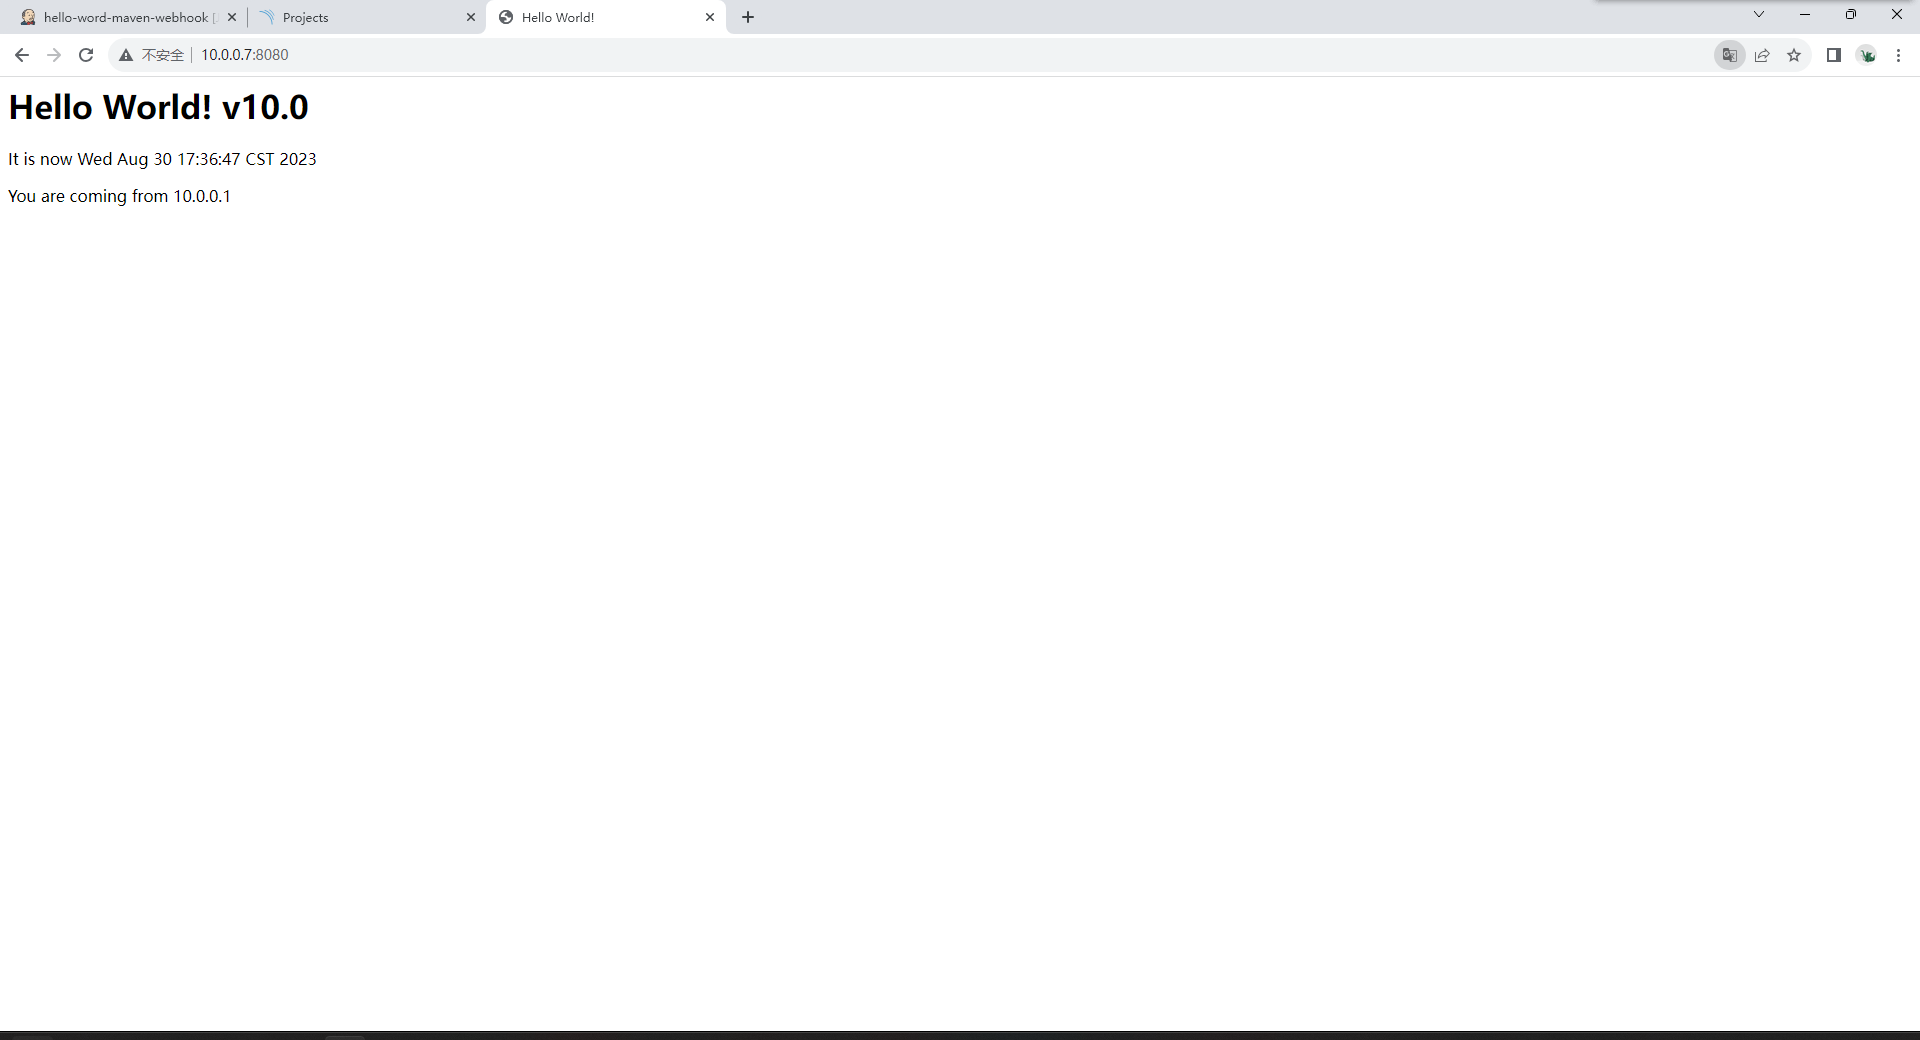
- 构建成功之后版本


Comments | NOTHING